The NetBSD Operating System
A Guide
Federico Lupi
Copyright © 1999, 2000, 2001, 2002 by Federico Lupi
Copyright © 2003 by The NetBSD Foundation
License
Redistribution and use in source and binary forms, with or without modification, are permitted provided that the following conditions are met:
-
Redistributions of source code must retain the above copyright notice, this list of conditions and the following disclaimer.
-
Redistributions in binary form must reproduce the above copyright notice, this list of conditions and the following disclaimer in the documentation and/or other materials provided with the distribution.
-
All advertising materials mentioning features or use of this software must display the following acknowledgement: This product includes software developed by Federico Lupi for the NetBSD Project.
-
The name of the author may not be used to endorse or promote products derived from this software without specific prior written permission.
THIS SOFTWARE IS PROVIDED BY THE AUTHOR ``AS IS'' AND ANY EXPRESS OR IMPLIED WARRANTIES, INCLUDING, BUT NOT LIMITED TO, THE IMPLIED WARRANTIES OF MERCHANTABILITY AND FITNESS FOR A PARTICULAR PURPOSE ARE DISCLAIMED. IN NO EVENT SHALL THE AUTHOR BE LIABLE FOR ANY DIRECT, INDIRECT, INCIDENTAL, SPECIAL, EXEMPLARY, OR CONSEQUENTIAL DAMAGES (INCLUDING, BUT NOT LIMITED TO, PROCUREMENT OF SUBSTITUTE GOODS OR SERVICES; LOSS OF USE, DATA, OR PROFITS; OR BUSINESS INTERRUPTION) HOWEVER CAUSED AND ON ANY THEORY OF LIABILITY, WHETHER IN CONTRACT, STRICT LIABILITY, OR TORT (INCLUDING NEGLIGENCE OR OTHERWISE) ARISING IN ANY WAY OUT OF THE USE OF THIS SOFTWARE, EVEN IF ADVISED OF THE POSSIBILITY OF SUCH DAMAGE.
- Table of Contents
- Purpose of this guide
- 1 What is NetBSD
- 2 New features in NetBSD 2.0
-
- 2.1 What's new in NetBSD 2.0?
-
- 2.1.1 Native threads
- 2.1.2 Kernel events notification framework - kqueue
- 2.1.3 systrace
- 2.1.4 UFSv2
- 2.1.5 Java support
- 2.1.6 Verified Exec
- 2.1.7 Cryptographic disk driver
- 2.1.8 Non-executable stack and heap
- 2.1.9 New toolchain
- 2.2 New ports and enhancements to existing ports
- 2.3 The NetBSD Packages Collection (pkgsrc)
- 3 Installation
-
- 3.1 Documentation
- 3.2 The layout of a NetBSD installation
- 3.3 Installation
-
- 3.3.1 Keyboard
- 3.3.2 Geometries
- 3.3.3 Partitions
- 3.3.4 Hard disk space requirements
- 3.3.5 Retry
- 4 Example Installation
-
- 4.1 Installation example
-
- 4.1.1 Preparing the installation
- 4.1.2 Creating the installation floppy
- 4.1.3 Last preparatory steps
- 4.1.4 Beginning the installation
- 4.1.5 Partitions
- 4.1.6 Disklabel
- 4.1.7 Creating a disklabel
- 4.1.8 Final operations
- 4.1.9 Choosing the installation media
- 5 The first boot
- 6 The second boot
- 7 Printing
- 8 Using the build.sh Front End
-
- 8.1 Building the tools
- 8.2 Cross Compiling a Kernel
- 8.3 Build & Release
- 8.4 Environment Variables
-
- 8.4.1 Changing the Destination Directory
- 8.4.2 Static Builds
- 9 Compiling the kernel
- 10 The package collection
-
- 10.1 Installing the package collection
- 10.2 Updating the package collection
- 10.3 Example: installing a program from source
-
- 10.3.1 Downloading the sources
- 10.3.2 Compiling and installing
- 10.4 Example: installing a binary package
- 10.5 Package management commands
- 10.6 Quick Start Packaging Guide
-
- 10.6.1 Tools
- 10.6.2 Getting Started
- 10.6.3 Filling in the Rest
- 10.6.4 Checking with pkglint
- 10.6.5 Running and Checking Build/Installs
- 10.6.6 Submitting a Package Using send-pr
- 10.6.7 Final Notes
- 11 Networking
-
- 11.1 Introduction to TCP/IP Networking
-
- 11.1.1 Audience
- 11.1.2 Supported Networking Protocols
- 11.1.3 Supported Media
- 11.1.4 TCP/IP Address Format
- 11.1.5 Subnetting and Routing
- 11.1.6 Name Service Concepts
- 11.1.7 Next generation Internet protocol - IPv6
- 11.2 Practice
- 11.3 Advanced Topics
-
- 11.3.1 IPNAT
- 11.3.2 NFS
- 11.3.3 Setting up /net with amd
- 11.3.4 IPv6 Connectivity & Transition via 6to4
- Bibliography
- 12 The Domain Name System
-
- 12.1 Notes and Pre-Requisites
- 12.2 What is DNS?
- 12.3 The DNS Files
-
- 12.3.1 /etc/namedb/named.conf
- 12.3.2 /etc/namedb/localhost
- 12.3.3 /etc/named/zone.127.0.0
- 12.3.4 /etc/namedb/diverge.org
- 12.3.5 /etc/namedb/1.168.192
- 12.3.6 /etc/namedb/root.cache
- 12.4 Using DNS
- 12.5 Setting up a caching only name server
-
- 12.5.1 Testing the server
- 13 Mail and news
-
- 13.1 sendmail
-
- 13.1.1 Configuration with genericstable
- 13.1.2 Testing the configuration
- 13.1.3 Using an alternative MTA
- 13.2 fetchmail
- 13.3 Reading and writing mail with mutt
- 13.4 Strategy for receiving mail
- 13.5 Strategy for sending mail
- 13.6 Advanced mail tools
- 13.7 News with tin
- 14 Console drivers
-
- 14.1 wscons
-
- 14.1.1 50 lines text mode with wscons
- 14.1.2 wsmouse
- 14.2 pccons
- 14.3 pcvt
-
- 14.3.1 Changing the screen size
- 15 Editing
-
- 15.1 Introducing vi
-
- 15.1.1 The vi interface
- 15.1.2 Switching to Edit Mode
- 15.1.3 Switching Modes & Saving Buffers to Files
- 15.1.4 Yanking and Putting
- 15.1.5 Navigation in the Buffer
- 15.1.6 Searching a File, the Alternate Navigational Aid
- 15.1.7 A Sample Session
- 15.2 Configuring vi
-
- 15.2.1 Extensions to .exrc
- 15.2.2 Documentation
- 15.3 Using tags with vi
- 16 X
-
- 16.1 What is X?
- 16.2 Configuration
- 16.3 The mouse
- 16.4 The keyboard
- 16.5 The monitor
- 16.6 Video card and X server
- 16.7 Starting X
- 16.8 Customizing X
- 16.9 Other window managers
- 16.10 Graphical login with xdm
- 17 Linux emulation
-
- 17.1 Emulation setup
-
- 17.1.1 Configuring the kernel
- 17.1.2 Installing the Linux libraries
- 17.1.3 Installing Acrobat Reader
- 17.2 Directory structure
- 18 Audio
-
- 18.1 Basic hardware elements
- 18.2 BIOS settings
- 18.3 Configuring the audio device
- 18.4 Configuring the kernel audio devices
- 18.5 Advanced commands
-
- 18.5.1 audioctl
- 18.5.2 mixerctl
- 18.5.3 audioplay
- 18.5.4 audiorecord
- 19 Obtaining sources by CVS
- 20 CCD Configuration
- 21 The cryptographic device driver
-
- 21.1 Configuring kernel support
- 21.2 Setting up a cgd device
- 21.3 Swap encryption
- 22 rc.d System
-
- 22.1 The rc.d Configuration
- 22.2 The rc.d Scripts
- 22.3 The Role of rcorder and rc Scripts
- 22.4 Additional Reading
- 23 The Internet Super Server
-
- 23.1 Overview
- 23.2 What is Inetd
- 23.3 Protocols
- 23.4 Services
- 23.5 RPC
- 23.6 Inetd
- 23.7 Adding a Service
- 23.8 When to use or not to use inetd
- 23.9 Other Resources
-
- 23.9.1 NetBSD/i386 Man Pages
- 23.9.2 Misc. Links
- 24 Miscellaneous operations
-
- 24.1 Creating install boot floppies for i386
- 24.2 Creating a CD-ROM
-
- 24.2.1 Creating the ISO image
- 24.2.2 Writing the image to the CD
- 24.2.3 Copying a CD
- 24.2.4 Creating a bootable CD
- 24.3 Synchronizing the system clock
- 24.4 Installing the boot manager
- 24.5 Deleting the disklabel
- 24.6 Speaker
- 24.7 Forgot root password?
- 24.8 Adding a new hard disk
- 24.9 Password file is busy?
- 24.10 How to rebuild the devices in /dev
- A. Information
-
- A.1 Guide history
- B. Contributing to the NetBSD guide
- C. Getting started with XML/DocBook
-
- C.1 What is XML/DocBook
- C.2 Jade
- C.3 DocBook
- C.4 The DSSSL stylesheets
- C.5 Using the tools
- C.6 An alternative approach to catalog files
- C.7 Producing PostScript output
-
- C.7.1 Installing TeX
- C.7.2 Enabling hyphenation for the italian language
- C.7.3 Creating the hugelatex format
- C.7.4 Installing Jadetex
- C.8 Links
- D. Acknowledgements
- List of Figures
- 3-1. Partitions
- 4-1. Beginning the installation
- 4-2. Confirming the installation
- 4-3. Choosing a hard disk
- 4-4. BIOS geometry
- 4-5. Choosing the partitioning scheme
- 4-6. Choosing a unit of measure
- 4-7. fdisk
- 4-8. Deleting a partition
- 4-9. Deleted partition
- 4-10. Partitioning completed
- 4-11. Configuring the boot selector
- 4-12. Boot selector configuration
- 4-13. Disklabel
- 4-14. Standard disklabel
- 4-15. Modify the disklabel (sec)
- 4-16. Modifying a BSD partition
- 4-17. Modified disklabel
- 4-18. Selecting the sets
- 4-19. Installation media
- 4-20. CD-ROM installation
- 4-21. Congratulations
- 11-1. Our demo-network
- 11-2. Attaching one subnet to another one
- 11-3. Adresses are divided into more significant network- and less significant hostbits
- 11-4. IPv6-addresses have a similar structure to class B addresses
- 11-5. Several interfaces attached to a link result in only one scope ID for the link
- 11-6. Network with gateway
- 11-7. A frequently used method for transition is tunneling IPv6 in IPv4 packets
- 11-8. 6to4 derives a IPv6 from an IPv4 address
- 11-9. Request and reply can be routed via different gateways in 6to4
- 11-10. Enabling packet forwarding is needed for a 6to4 router
- 13-1. Structure of the mail system
- List of Examples
- 5-1. Manual sections
- 7-1. /etc/printcap
- 7-2. /usr/local/libexec/lpfilter
- 7-3. /etc/printcap
- 7-4. /usr/local/libexec/lpfilter-ps
- 11-1. resolv.conf
- 11-2. nsswitch.conf
- 11-3. Connection script
- 11-4. Chat file
- 11-5. Chat file with login
- 11-6. /etc/ppp/options
- 11-7. ppp-up
- 11-8. ppp-down
- 11-9. /etc/hosts
- 12-1. strider's /etc/hosts file
- 12-2. localhost
Purpose of this guide
This guide describes the installation and the configuration of the NetBSD operating system. It addresses mainly people coming from other operating systems in hope of being useful for the solution of the many small problems found when one starts using a new tool.
This guide is not a Unix tutorial: a basic knowledge of some concepts and tools is required to understand it. You should know, for example, what a file and a directory are and how to use an editor. There are plenty of books explaining these things so, if you don't know them, I suggest that you buy an introductory text. I think that it is better to choose a general book an avoid titles like "Learning Unix-XYZ, version 1.2.3.4 in 10 days", but this is a matter of personal taste. If you install a BSD system, sooner or later you will be confronted with the vi editor: without some documentation this could be an insurmountable obstacle. When you finish installing your system, you will be able to install whatever editor and programs you like.
Still a lot of work is required to finish this short introduction to NetBSD: some chapters are not finished (some are not even started) and some subjects still need testing (yes, a guide must also be tested). I'll try to work on it and improve it in my spare time but if you want to help, you're welcome: you can write new chapters (or parts of) or send corrections for existing subjects.
Federico Lupi <flupi@mclink.it>
Chapter 1 What is NetBSD
NetBSD is a free, highly portable UNIX-like operating system available for many platforms, from 64bit alpha servers to handheld devices. Its clean design and advanced features make it excellent in both production and research environments, and it is user-supported with complete source. Many applications are easily available.
1.1 The story of NetBSD
The first version of NetBSD (0.8) dates back to 1993 and springs from the 4.3BSD Lite operating system, a version of Unix developed at the University of California, Berkeley (BSD = Berkeley Software Distribution), and from the 386BSD system, the first BSD port to the Intel 386 CPU. In the following years, the modifications from the 4.4BSD Lite release (the last release of the Berkeley group) have been integrated in the system. The BSD branch of Unix has had a great importance and influence in the history of this operating system, to which it has contributed many tools, ideas and improvements (the vi editor, the C shell, job control, the Berkeley fast file system, reliable signals, support for virtual memory, TCP/IP implementation, just to name a few) which are now standard in all Unix environments. This tradition of research and development survives today in the BSD systems (free and commercial) and, in particular, in NetBSD.
1.2 NetBSD features
NetBSD operates on a vast range of hardware platforms and is very portable, probably the most portable operating system in the world. The full source to the NetBSD kernel and userland is available for all the supported platfoms; please see the details on the official site of the NetBSD Project.
A detailed list of NetBSD features can be found at: http://www.NetBSD.org/Misc/features.html.
The basic features of NetBSD are:
-
Portability (more than 50 platforms are supported)
-
Code quality and correctness
-
Adherence to the standards
-
Research and innovation
The aforementioned characteristics bring also indirect advantages. For example, if you work on just one platform you could think that you're not interested in portability. But portability is tied to code quality: without a well written and well organized code base it would be impossible to support that many platforms. And code quality is the base of any good and solid software systems, though surprisingly few people seem to understand it. The attention to architectural and quality issues is rewarded with the great potentiality of NetBSD's code and the quality of it's drivers.
One of the distinguishing characteristics of NetBSD is not to be satisfied with partial implementations. Some systems seem to have the philosophy of "If it works, it's right". In that light NetBSD could be described as "It doesn't work unless it's right". Think about how many overgrown programs are nowadays sadly collapsing under their own weight and "features" and you'll understand why NetBSD wants to avoid this situation at all costs.
1.3 Supported platforms
NetBSD supports over 50 platforms, including the popular i386, sparc, sparc64, alpha, mac68k and macppc platforms. Technical details for all of them can be found on the NetBSD site.
1.4 NetBSD's target users
The NetBSD site states that: "The NetBSD Project provides a freely available and redistributable system that professionals, hobbyists, and researchers can use in whatever manner they wish". I would add that NetBSD is an ideal system if you want to learn Unix, mainly because of its adherence to standards (one of the project goals) and because it can run on hardware which is considered obsolete by most other operating systems; we could say "to learn and use Unix you don't need to buy expensive hardware: you can reuse the old PC or Mac that you have in your attic". Also, if you need a Unix system which runs consitently on a variety of platforms, NetBSD is probably your best (only) choice.
1.5 Applications for NetBSD
When you install NetBSD you have a rich set of programs and applications that you can install on your system. Besides having all the standard Unix productivity tools, editors, formatters, C/C++ compilers and debuggers and so on, there is a huge (and constantly growing, I think it is now over 1000) number of packages that can be installed both from source and in pre-compiled form. All the packages that you expect to find on a well configured system are available for NetBSD for free and there is also a number of commercial applications. You can also make use of one of the available emulation to run binaries from other *nix operating systems. Linux emulation is probably the most relevant example, lots of efforts have gone into it and it is used by almost all NetBSD users; you can run the Linux version of
-
Netscape
-
Acrobat Reader
-
Doom, Quake
-
Adobe FrameMaker
-
many other programs
NetBSD is also capable of emulating FreeBSD, BSDI and other systems.
1.6 The philosophy of NetBSD
Differently from many contemporary operating systems, the NetBSD installation, though feature rich is not huge in size, because it strives to produce a stable and complete base system without being redundant. After the installation you get a fully working system which still lacks a number of applications like, for example, a web browser (NetBSD, contrary to other OS, does not consider the browser as part of the base system): you have the freedom to decide which programs to install on your machine and the installation of new programs is very easy with the packages collection.
Another advantage of this approach is that the base system will work without these additional packages; if you decide to upgrade your version of Perl you need'nt be afraid to break some parts of your system. When you install NetBSD you don't find huge pre-packaged collections of applications: you may now see this as a disadvantage but when you start understanding the philosophy behind this you will find that it gives you freedom. When you install these software collections (which someone else has decided for you) you fill your hard disk with tons of programs, most of which will stay unused (and unknown) and only waste space (and possibly make the system less stable): this is something which the typical BSD user doesn't want to do.
Even when you start knowing NetBSD, there is always something that will continue to amaze you, the extreme consistency and logic of the system and the attention to the details: nothing appears the result of chance and everything is well thought out. Yes, that's what quality is about and, in my opinion, this is the most distinguishing feature of NetBSD.
We could spend days arguing on the relative merits of operating systems (and some people like to do it) but if you don't try something seriously you can't really judge. I am convinced, because I saw it many times in the mailing lists, that if you try NetBSD you'll be conquered by the perfect balance between complexity and effectiveness; all problems have more than one solution: NetBSD is not happy with a solution but always tries to find the easiest and most elegant one. NetBSD is a tool that enables you to do your work without getting in your way. In this light it is an optimal tool; it's like using a pen: you work hard to learn how to use it but once you've learned you can write or draw and completely forget about the pen.
1.7 How to get NetBSD
There is no "official" supplier of NetBSD CD-ROMs but there are various resellers. You can find the most up to date list on the relevant page on the NetBSD site. Of course you can also download NetBSD from the Internet from one of the mirrors.
Chapter 2 New features in NetBSD 2.0
2.1 What's new in NetBSD 2.0?
It is impossible to list every single improvement to NetBSD since the previous release, 1.6, however, a summary of the major new features in NetBSD 2.0 are below.
2.1.1 Native threads
Native thread support has been added, based on Scheduler Activations. Applications which support native threads can now take full advantage of the high-performance NetBSD POSIX threads implementation.
Multi-threading provides application-level parallelism; multiple threads within the same process can run concurrently on different CPUs; concurrency requires kernel support for threads, which is what Scheduler Activations provides.
Scheduler Activations is an efficient method of mapping N userland threads to M kernel threads which avoids both the concurrency problems of N:1 implementations and the scalability problems of 1:1 implementations.
2.1.2 Kernel events notification framework - kqueue
kqueue provides a stateful and efficient event notification framework. Currently supported events include socket, file, directory, fifo, pipe, tty and device changes, and monitoring of processes and signals.
kqueue is supported by all writable filesystems in the NetBSD tree (with the exception of Coda) and all device drivers supporting poll(2).
2.1.3 systrace
systrace monitors and controls an application access to the system by enforcing access policies for system calls. The systrace utility might be used to trace an untrusted application's access to the system. In addition, it can be used to protect the system from software bugs (such as buffer overflows) by constraining a daemon's access to the system.
The privilege elevation feature of systrace can be used to obviate the need to run large, untrusted programs as root when only one or two system calls require the elevated privilege.
2.1.4 UFSv2
FreeBSD's UFS2 has been ported to NetBSD. UFS2 is an extension to FFS, adding 64 bit block pointers and support for extended file storage. Among other enhancements, UFS2 allows for file systems larger than 1Terabyte.
2.1.5 Java support
Improvements have been made to NetBSD's Linux emulation to support the latest Sun JDK/JRE for Linux. Testing has shown that it now runs as well as it does on Linux natively.
2.1.6 Verified Exec
As the name suggests, Verified Exec verifies a cryptographic hash before allowing execution of binaries and scripts.
This can be used to prevent a system from running binaries or scripts which have been illegally modified or installed. In addition, Verified Exec can also be used to limit the use of script interpreters to authorized scripts only and disallow interactive use.
2.1.7 Cryptographic disk driver
The cryptographic disk driver (cgd) can be used to encrypt disks or partitions, using some strong encryption algorithms, like AES (Rijndael) and Blowfish. cgd can be configured to encrypt swap.
2.1.8 Non-executable stack and heap
NetBSD 2.0 has support for non-executable mappings on many platforms. If enabled, parts of the stack and heap are made non-executable when they are marked writable. This makes exploiting potential buffer overflows harder.
2.1.9 New toolchain
NetBSD 2.0 sports a new toolchain based on gcc 3.3.1 and binutils 2.13.2.1. gcc 3.3.1 adds support for a number of CPU targets and greatly improved support for i386 and other targets. New platforms supported by gcc 3.3.1 has enabled the porting of NetBSD to even more architectures.
2.2 New ports and enhancements to existing ports
2.2.1 amd64
New port to AMD's 64-bit Opteron CPU, including SMP support.
2.2.2 evbsh5
The SuperH SH-5 is a bi-endian, 32 and 64-bit capable CPU, and this is a new port to the SH-5 Cayman evaluation board. Support for a number of generic, machine-independent device drivers including audio, SCSI and ethernet cards is present.
2.2.3 i386
The i386 port now supports SMP and has a new ACPI and power management framework which takes advantage of Intel's ACPI implementation.
2.3 The NetBSD Packages Collection (pkgsrc)
pkgsrc has been significantly expanded and now contains almost 4000 packages. A number of new platforms are supported, including OpenBSD, IRIX and FreeBSD, and a new, portable bootstrap kit has been created making it much simpler to port to new operating systems.
Chapter 3 Installation
3.1 Documentation
The documentation of NetBSD is mostly in the format for manual pages and makes up an excellent technical reference to the system. I won't deny that it is unsuited as a tutorial (not to mention the fact that you can't read it until you install NetBSD); these are the reasons for the existence of this guide.
Note: as a matter of fact you could read the man pages through the web interface, but I don't think it is a practical way to learn the system...
After installation you will find some BSD guides in the /usr/share/doc directory. They are divided in three main sections, psd (UNIX Programmer's Supplementary Documents), smm (UNIX System Manager's Manual) and usd (UNIX User's Supplementary Documents). You can read the text on the terminal with, for example:
$ cd /usr/share/doc/smm/09.sendmail
$ nroff -me 09.sendmail/intro.me | more
or you can generate Postscript output using the makefiles.
It's undeniable that there is a lack of HOWTOs and for this reason you should make the most of the existing ones; the NetBSD release contains some documents in text format and on the NetBSD web site you can find further information and FAQ's.
Original documentation: the NetBSD site contains several pages with documentation and HOWTOs both generic and platform specific. This information is well written and usually easy to understand; for example you can find:
how to access a DOS/Windows partition from NetBSD
how to start NetBSD from the Windows NT boot loader
...
All the versions of NetBSD contain the following files:
- INSTALL
-
installation notes. This is the most important document and you should read (and reread it) carefully; it contains a description of the NetBSD system, a list of the supported hardware and, most notably, the installation instructions.
- README.first
-
you should also read this.
- release.man
-
describes the structure of the NetBSD release you are installing. It is a text file in man layout: it is preformatted and you can read it with any editor.
On the NetBSD web site you can find, amongst the others, the following guides:
- NetBSD FAQ
-
general information and pointers to other FAQ.
- NetBSD/i386 FAQ
-
NetBSD/i386 specific FAQ.
- Basic NetBSD Networking
-
Guide to network and PPP configuration.
3.2 The layout of a NetBSD installation
The layout of the files of a NetBSD installation is described in the aforementioned INSTALL file. For example, for the i386 platform the system binaries are in the i386/binary/sets directory and the sources are in the source/sets directory. The source/patches directory contains patches to the base release which usually fix bugs or security related problems discovered after the release.
3.3 Installation
The first thing to do before installing NetBSD is to read the release information and installation notes in the INSTALL file: this is the official description of the installation procedure. Next you should decide the installation media that you will use; you can choose between:
-
ftp
-
nfs
-
CDROM
-
floppy
-
unmounted filesystem
-
local directory
3.3.1 Keyboard
sysinst will not allow you to change the keyboard layout during the installation: if you use a US keyboard it's OK, but for the rest of the world it's a minor annoyance, though not a big problem. If you install from CD-ROM you only need to use alphanumeric keys (which have the same layout on most, if not all, national keyboards) and only in a couple of places you need to press other keys. I hope that the next releases of the installation program will allow to change the keyboard layout; for the present, you can use the map in the following table.
| US | IT | DE | FR |
|---|---|---|---|
| - | ' | ß | ) |
| / | - | - | ! |
| = | ě | ' | - |
| : | ç | Ö | M |
| ; | ň | ö | m |
| # | Ł | § | 3 |
| " | ° | Ä | % |
| * | ( | ( | 8 |
| ( | ) | ) | 9 |
| ) | = | = | 0 |
| ' | ŕ | ä | ů |
| ` | \ | ^ | @ |
| \ | ů | # | ` |
If you use a non US keyboard, one of the first things that you will do after installation will be to change the keyboard layout. Until then, please be patient.
3.3.2 Geometries
The installation program mentions two types of hard disk geometries; you should understand what they mean:
-
real geometry
-
BIOS geometry
real geometry is the real geometry of the hard disk, detected by the system. BIOS geometry is the geometry used by the BIOS and it could be different from the real one (for example, BIOS could remap the disk using LBA).
The disk used in the installation example is an IDE disk with the following geometries:
real:  6232 cyl,   16 heads,  63 sec
BIOS:   779 cyl,  128 heads,  63 sec   (LBA)
As you can see the BIOS remaps the disk using LBA, effectively reducing the number of cylinders and increasing the number of tracks (but the result is the same: 6232 * 16 = 779 * 128 = 99712). A sector contains 512 bytes, which means that the disk size is 6232 * 16 * 63 * 512 = 3 GB. NetBSD does not need to remap the disk geometry (and in fact won't do it). During the installation it is possible to change manually the geometry if sysinst got it wrong.
3.3.3 Partitions
The terminology used by NetBSD for partitioning is different from the typical DOS/Windows terminology; in fact, there are two partitioning schemes. NetBSD installs in one of the four primary BIOS partitions (the partitions defined in the hard disk partition table).
Within its BIOS partition (also called slice) NetBSD defines the BSD partitions using a disklabel: these partitions can be seen only by NetBSD and are identified by lowercase letters (starting with "a"). For example, wd0a refers to the "a" partition of the first IDE disk (wd0) and sd0a refers to the "a" partition of the first SCSI disk. In Figure 3-1 there are two primary BIOS partitions, one used by DOS and the other by NetBSD. NetBSD describes the disk layout through the disklabel.
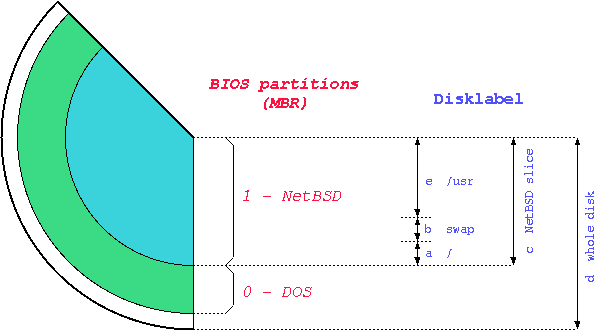
Note: the meaning of partitions "c" and "d" is typical of the i386 port. Other ports use different conventions (e.g. "c" represents the whole disk.)
Note: if NetBSD shares the hard disk with another OS (like in the previous example) you will probably need to install a boot manager, i.e. a program which enables you to chose the OS to start at boot time. sysinst can automatically install and configure a simple but effective boot manager.
If Windows NT is installed on the same hard disk, you can use the NT bootloader to start NetBSD. An easy way to accomplish this is described on the NetBSD web site.
3.3.4 Hard disk space requirements
The space required by a NetBSD installation depends on the use that you plan to do with it (eg. server or workstation). For example, consider a home desktop system with a 420 MB hard disk (rather small by today's standards) with X, the kernel sources and some applications (Netscape, ...). The swap partition is 32 MB. df shows the following:
Filesystem  1K-blocks     Used    Avail Capacity  Mounted on
/dev/wd1a       31887    16848    13444    56%    /
/dev/wd1e      363507   173202   172129    50%    /usr
As you can see there are 180 MB left on the system.
3.3.5 Retry
When you install an OS for the first time it is seldom a success and NetBSD is no exception. Even if everything goes well, as soon as you start using the system you usually realize that (for example) you could have chosen a better layout for your partitions. It is important not to give up; if you try again you'll realize that what was difficult to understand the first time gradually becomes clearer by virtue of the accumulated experience and numerous rereads of the INSTALL document.
During the first installations it is wiser to accept the defaults suggested by sysinst and avoid, for example, changing the disklabel. The only thing that you must decide is the disk space for the NetBSD fdisk partition.
Chapter 4 Example Installation
4.1 Installation example
The remaining part of this chapter deals with a real installation example for a common case: installation from CD-ROM. The concepts are the same for all types of installation (eg. ftp); the only difference is in the way the binary sets are found by sysinst. Please note that some details of the installation differ depending on the NetBSD release: this example was created with release 1.5.
For the sake of teaching, in the following example the most "difficult" options will always be chosen.
-
BIOS partition table full: one or more existing partitions will be deleted to make room for NetBSD.
-
fdisk partitioning using sectors instead of MB.
-
manual modification of the disklabel created by sysinst, also using sectors.
-
"custom" installation (meaning that you can select one by one the binary sets that you want to install).
This set of choices gives the impression that the installation is very complicated and requires a lot of work: remember that if you accept the defaults everything is much simpler. On the other hand, a tutorial which explains only the "easy" parts is not very useful (except from the marketing point of view...)
4.1.1 Preparing the installation
Before installing it is a good idea to make a detailed plan of the steps that you will need to perform. First, read the INSTALL file (I promise it's the last time that I say it) reading the description of the installation and checking the hardware compatibilities. Next, if there is already something on the hard disk, think how you can free some space for NetBSD; if NetBSD will share the disk with other operating systems you will probably need to create a new partition (which you will do with sysinst) and, maybe, to resize an existing one. It is not possible to resize an existing partition with sysinst, but there are some commercial products (like Partition Magic) and some free tools (FIPS, pfdisk) available for this.
The installation is divided logically in two steps. In the first part you create a partition for NetBSD and you write the diklabel for that partition. In the second part you decide which binary sets you want to install and extract the files in the newly created partitions. The first part is independent of the intallation method (CD-ROM, ftp, NFS, ...); at the end of the first part nothing has yet been written to the hard disk and you are prompted to confirm the installation. If you confirm, the installation goes on, else you are brought back to the main menu and the hard disk remains unchanged.
4.1.2 Creating the installation floppy
Note: if you have a bootable NetBSD CD-ROM you don't need to create an installation floppy: enable the "boot from CD-ROM" in your BIOS settings, insert the CD and reboot the machine. This option is probably not available on older machines.
Before installing you need to create the installation floppy, i.e. to copy the floppy image from the CD-ROM to a diskette. To perform this operation in DOS you can use the rawrite program in the i386/installation/misc directory. The image file is i386/installation/floppy/boot.fs.
-
Format the floppy.
-
Go to the I386\INSTALLATION\FLOPPY directory of the CD-ROM.
-
Run the ..\MISC\RAWRITE program. The "Source file" is BOOT.FS and the "Destination drive" is A:
If you create the boot floppy in a Unix environment, you can use the dd command. For example:
# cd i386/installation/floppy
# dd if=boot.fs of=/dev/fd0a bs=36b
dd copies blocks of 512 bytes: the bs=36b option copies 36 blocks at a time, effectively making the operation faster.
Note: a 1440K floppy contains 1474560 bytes and is made up of 80 cylinders, 2 tracks, 18 sectors and 512 bytes per sector, i.e. 80 * 2 * 18 = 2880 blocks. Thus bs=36b copies one cylinder (18 * 2 blocks) at a time and repeats the operation 80 times instead of 2880.
4.1.3 Last preparatory steps
Everything is now ready for the installation but, before beginning, it is better to gather some information on the hardware of the PC.
The most important thing to check is the type of hard disk (IDE, SCSI) and its geometry. You can find this information on the hard disk manual or using a diagnostic program. Some hard disks have a label on which this data is written. Another option is to connect to the web site of the producer of your disk and look for the product info.
If you install via ftp or NFS remember to check your network card settings: if the installation kernel expects your card to be on an IRQ but the card's settings are different you won't be able to install. For example, the install kernel can recognize an NE2000 compatible network card with one of the following two settings:
ne0     at isa? port 0x280 irq 9        # NE[12]000 ethernet cards
ne1     at isa? port 0x300 irq 10
If your NE2000 network card has different settings it will not be detected. (After the installation you will be able to compile a customized kernel with your own settings.)
While you are at it you should check some other hardware details like, for example, the number of serial and parallel ports, etc.; this is not required for installation but it can turn out useful later. Check your settings (IRQ, I/O ports, ...) against the ones written in the INSTALL file.
Note: you can install even if you don't know the hard disk geometry as well as any of the other details. In this case you must trust sysinst, which automatically determines the geometry and (usually) gets it right.
4.1.4 Beginning the installation
Insert the newly created installation floppy in drive A: and reboot the computer (or boot from CD-ROM). The kernel on the floppy is booted and starts displaying a lot of messages on the screen, most of which say something about hardware not being found or not being configured. This is normal: the kernel on the floppy tries to detect almost all the hardware supported by NetBSD; you probably (!) don't have all these devices in your machine.
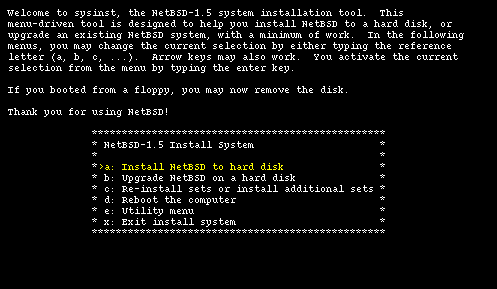
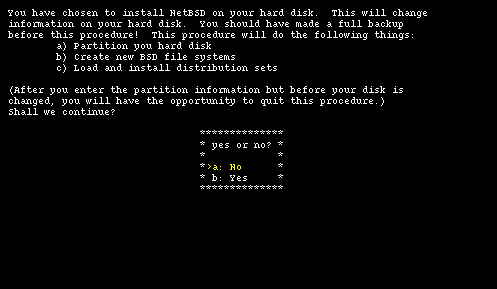
When the boot procedure is over you will find yourself in the main menu of the installation program, shown in Figure 4-1. Don't be deceived by the spartan look of sysinst: it is a rather powerful and flexible program. From here on you should follow the instructions displayed on the screen, using the INSTALL document as a reference. The sysinst screens all have more or less the same layout: the upper part of the screen shows a short description of the current operation or a short help message; the central part of the screen shows the current settings as detected by NetBSD; the bottom part displays a menu of available choices. Choosing the Install option ("a") brings you to the next screen (Figure 4-2) where you confirm the operation.
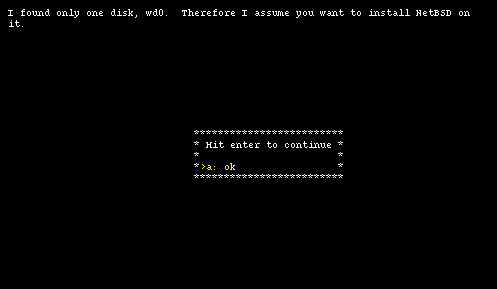
After choosing to continue with option "b", it is time to select on which hard disk you want to install NetBSD. If more than one disk is available, sysinst displays a list of disks from which you can pick one. In this example there is only one hard disk and the installation program only displays an informational message, shown in Figure 4-3.
Note: the information in this screen will be different depending on the type and number of hard disks installed on the system.
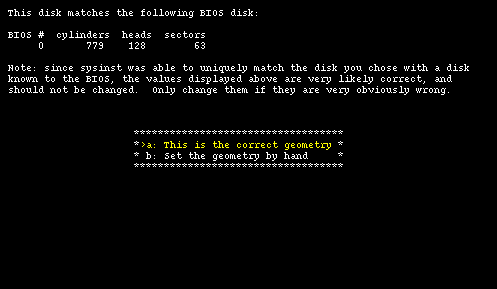
Next (Figure 4-4) sysinst displays the BIOS geometry for the chosen disk; you can confirm that it is correct or, if the installation program got it wrong, you can modify it by entering new values manually.
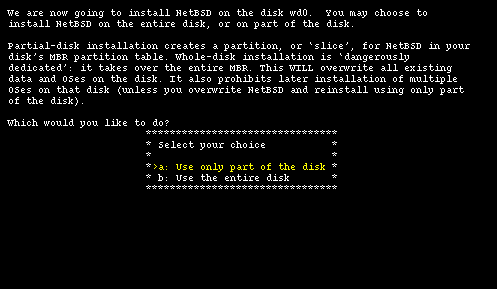
4.1.5 Partitions
The first important step of the installation has come: the partitioning of the hard disk. First you must specify if NetBSD will use a partition (suggested choice) or the whole disk ("dangerous" choice). In the former case it is still possible to create a partition that uses the whole hard disk (Figure 4-5) so I recommend to select this option which, if I understand correctly, keeps the BIOS partition table in a format compatible with other operating systems.
In the this example we will use a disk with the following "real" geometry, corresponding to the BIOS geometry of Figure 4-4.
6232 cyl, 16 heads, 63 sec  (6232 x 16 x 63 = 6281856 total sectors)
1 sector = 512 bytes
1 track = 63 sectors = 63 * 512 bytes = 32 K
1 cylinder = 16 * 63 * 512 bytes = 504 K
The next step, depicted in Figure 4-6, is the selection of a unit of measure to be used for hard disk partitioning: sectors give the most flexibility and precision (note that it is usually better to align partition on cylinder boundaries for performance reasons, at least on older hard disks.) Megabytes are easier to use because they don't require manual calculations and are more "intuitive".
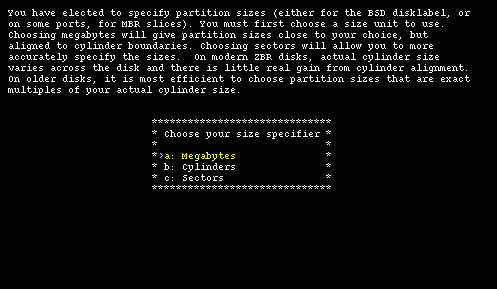
This tutorial will use sectors because they are more useful for teaching purposes. Chosing option "c" you are taken to the fdisk interface screen.
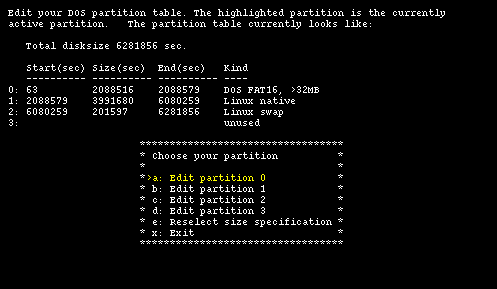
Figure 4-7 shows the current situation of the hard disk before the installation of NetBSD; there are four primary partitions: one is used by DOS/Windows and two by GNU/Linux; the last one is unused. There is no free space on the disk: the End(sec) column of partition 2 shows that the 6281856 sectors of the hard disk are all occupied.
Note: in the fdisk screen the following formula holds:
Start(sec) + Size(sec) = End(sec)
This means that the End(sec) column of a partition is equal to the Start(sec) column of the following partition, which is not very intuitive because the sector in the End(sec) column of a partition actually belongs to the following one. Disklabel will use a different (and more logical) convention.
To make room the two Debian GNU/Linux partitions will have to sacrificed, starting with the last one. Sysinst displays a screen that can be used to modify the existing data for a partition and Figure 4-8 shows the current data for partition 2.
To delete the partition, select type unused using option "a" and than choose option "b" leaving the fields "Start" and "Size" empty (press Enter leaving the fields blank). Finally, confirm everything with option "d" and you are back in the main fdisk screen, where partition 3 is now empty. Use the same method to delete partitions 2 and 1, leaving only partition 0 on the disk (Figure 4-9.)
Only the DOS/Windows partition is left, using 2088516 sectors which are equal to 1029 MB (about 1 GB). The free space is calculated as the difference between the already calculated total number of sectors and the end sector of the DOS partition (the number in the End(sec) column.)
6281856 - 2088579 = 4193277 sectors = 2047 MB free on disk
Note: the DOS partition begins at sector 63 and not at sector 0 as you could expect. This is not unusual: the first track (63 sectors) is reserved. At cylinder 0, track 0, sector 1 of the hard disk there is the Master Boot Record (MBR). When the system is booted the BIOS loads the MBR in memory from the hard disk, detects which partition is active and loads in memory the boot sector of that partition, to which it yields control. The boot sector, then, starts the operating system on his partition.
Now, using option "b", a new partition for NetBSD will be created, starting at the end of the DOS partition. To create a new partition the following information must be supplied:
-
the type of the new partition
-
the first sector of the new partition
-
the size (in sectors) of the new partition
Choose the partition type "NetBSD" for the new partition (option "a: Kind") and input the data that we have calculated: start = 2088579 and size = 4193277 using option "b". Check that everything is correct and confirm the creation with option "d", which brings you back to the main fdisk menu. The result is shown in Figure 4-10 which displays the final layout of the partition table. Now, selecting option "x" you proceed to the next menu.
Note: sysinst for NetBSD 1.5 checks the start and end sectors of the unused partitions too, even though you can't see this information on the screen. Thus it can happen that the program issues a warning about overlapping partitions even if everything looks correct on the screen. I suggest to correctly define the start and size of the unused partitions.
If you have made an error in partitioning (for example you have created overlapping partitions) sysinst will display a message and suggest to go back to the fdisk menu (you are also allowed to continue). If the data is correct but the NetBSD partition lies outside the range of sectors which is bootable by the BIOS, sysinst warns you and asks if you want to proceed anyway. This could lead to problems on older PC's: the PC used in the example received this warning but boots perfectly. It is not possible to give a general rule (it is BIOS dependent); if the PC is not very old I suggest to ignore the warning and continue.
Note: this is not a limitation of NetBSD; some old BIOSes cannot boot a partition which lies outside the first 1024 cylinders. To understand fully the problem you should study the different type of BIOSes and the many addressing schemes that they use (physical CHS, logical CHS, LBA, ...). These topics are not described in this guide.
With the most recent BIOS, supporting int13 extensions, it is possible to install NetBSD in partitions that live outside the first 8 GB of the hard disk, provided that the NetBSD boot selector is installed.
If the data is correct and sysinst detects that you have more than one operating system on your hard disk, it will offer to install a boot selector on the hard disk. Using the installation program you can both install the boot selector and configure it; you can specify what strings will be displayed on the boot menu for each operating system, which partition is booted by default and the timeout used when the user does not select anything. This screen is shown in Figure 4-11.
Note: if the arrow keys don't work you can scroll the menu options using the < and > keys.
Select the partitions that will appear in the boot manager menu and define a menu item string for each one using the options from "a" to "d". In the "Menu entry" column you should see an entry for each bootable partition, as shown in Figure 4-12.
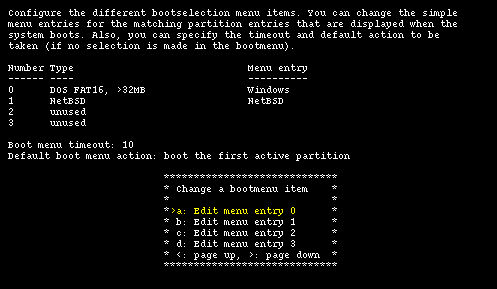
Option "e" enables you to choose a timeout for the boot menu: once the timeout is elapsed without a choice from the user, the default partition (defined with option "f") is booted. You can specify one of the following as default:
-
a partition
-
another hard disk
-
the first active partition
After finishing the boot manager configuration, the first part of the installation, namely disk partitioning, is over.
The BIOS partitions, also called slices by BSD, have been created; there are now two slices: DOS and NetBSD. It's time to define the BSD partitions.
4.1.6 Disklabel
There are three alternatives for the creation of the BSD partitions, as shown by Figure 4-13.
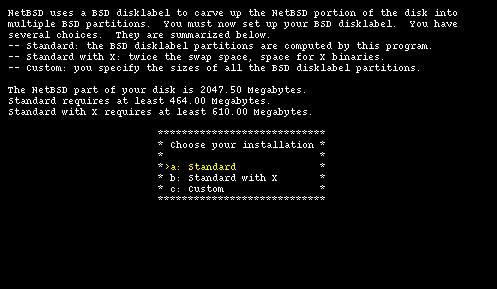
For a first time installation I suggest choosing options "a" or "b" and leaving to sysinst the partitioning decisions. In this example life will be a little more complicated by modifying manually the disklabel (only for teaching purposes, of course).
Note: even if you let the system decide for you, it is still better to examine carefully the generated disklabel. If the disk space is insufficient the 1.5 sysinst is smart enough to detect it and issue a warning; previous versions of the installer didn't and silently created invalid partitions.
4.1.7 Creating a disklabel
First, let the installation program automatically create a disklabel. Choosing option "b" from Figure 4-13 we are taken to Figure 4-14.
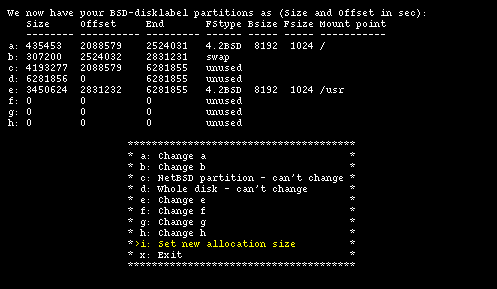
Having done this you could just confirm everything (with option "b") and your work would be over. Instead, let's see what you need to do to modify the size of the swap partition to make it smaller and increase the size of the /usr partition. To change the size of the swap partition, choose option "a": in the new screen we change the unit of measure to sectors. The result is shown in Figure 4-15.

The sequence of partition identifiers is standard: some letters are reserved for predefined uses.
-
a is usually the root partition.
-
b is the swap partition.
-
c covers the whole NetBSD slice.
-
d covers the whole hard disk: extending outside the NetBSD slice. With a similar method you will be able to make a DOS or a Linux partition visible to NetBSD, by creating a BSD partition which is outside the NetBSD slice.
-
e is the first free partition. Usually /usr is mounted on "e".
Note: the meaning of a partition id can differ from port to port. The preceding description applies to port-i386.
You normally don't want to modify partitions b and c. You are free to change the size and mount point of the remaining partitions and to create new ones (with a maximum of 8, using the letters from e to h.)
To modify the swap partition you need to modify partition b. You will also need to modify partition "e", so that it begins right after the end of "b". Partitions "c" and "d" will be left unchanged.
You will now create a 150 MB (307200 sectors) swap partition; this means that "b" will start at sector 2524032 and end at sector 2831231 (2524032+307200-1).
id:      Size    Offset       End FStype Bsize Fsize Mount point
---      ----    ------       --- ------ ----- ----- -----------
 a:    435453   2088579   2524031 4.2BSD  8192  1024 /
 b:    307200   2524032   2831231   swap
 ...
The newly freed space will be assigned to partition "e", which will have: start = 2831232, size = 3450624 and end = 6281855. These values have been calculated as follows: "start" is the sector immediately following the end sector of partition "b"; "end" is equal to the last sector of the NetBSD partition; "size" is given by: End - Offset + 1.
id:      Size    Offset       End FStype Bsize Fsize Mount point
---      ----    ------       --- ------ ----- ----- -----------
 a:    435453   2088579   2524031 4.2BSD  8192  1024 /
 b:    307200   2524032   2831231   swap
 ...
 e:   3450624   2831232   6281855 4.2BSD  8192  1024 /usr
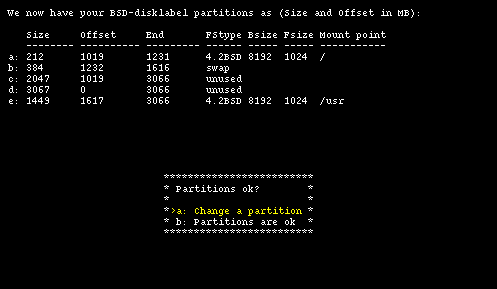
The preceding example shows the disklabel that you want. With option "b" and "e" you can input the data that you have calculated.
This is depicted in Figure 4-16.
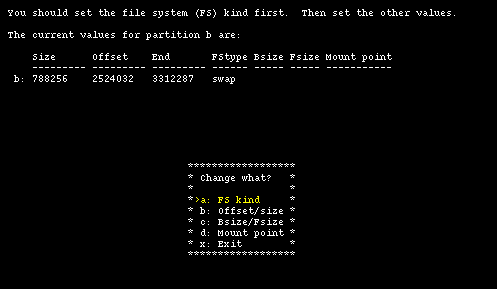
Figure 4-17 shows the modified disklabel.
Partition sizes: it is very difficult to give a general rule to decide how many partitions you should create and their best sizes: this depends on the intended usage of the computer (server, workstation, mail server, ...). This is why I recommend, for a first time installation, to stick with the sysinst generated defaults. A complex server will probably need a more sofisticated partitioning; those who deal with this type of problems will also know the answers.
When you are happy with the result, you can select option "x" to save and exit. You are now back in Figure 4-14 where you can choose option "b".
4.1.8 Final operations
The difficult part (creating the BIOS and the BSD partitions) is now over; the remaining part of the installation is much simpler. Now you can choose a name for the hard disk (the default name is mydisk) and confirm the operations that you have done.
Note: all that was done until now has not yet been committed to disk: it is still possible to change your mind and go back to the main sysinst menu leaving the disk unchanged.
sysinst will now create the partitions and the file systems with fdisk, newfs, fsck and installboot and then we will install the NetBSD sets.
4.1.9 Choosing the installation media
You have finished the first and most difficult part of the installation. In the next step you will choose the type of installation, which can be full, which installs all the sets, or custom, which enables you to choose the sets to be installed. If you don't have a shortage of space on the hard disk I suggest to choose the former option. In this example option custom will be used only to show what it looks like. This brings you to Figure 4-18.
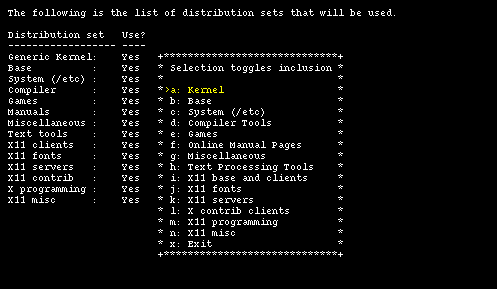
The first three sets are mandatory: without them the system can't work. You can toggle the installation of the remaining sets using the menu options. Initially all sets are selected for installation, which is the same as the aforementioned full option. Leave all the sets on and proceed to the next step with option "x: Exit".
sysinst then asks if you want to see filenames during the extraction from the sets.
Now sysinst needs to find the NetBSD sets (the .tgz files) and you must supply this information. The menu offers several choiches:
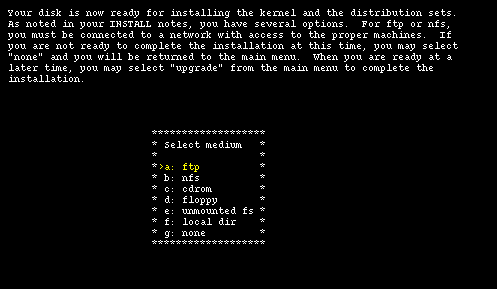
The options are explained in detail in the INSTALL document. It is also possible to install from an unmounted filesystem (provided that it is of a type recognised by the install kernel): this means that, for example, it is possible to copy all the sets to an existing MS-DOS partition and install from there.
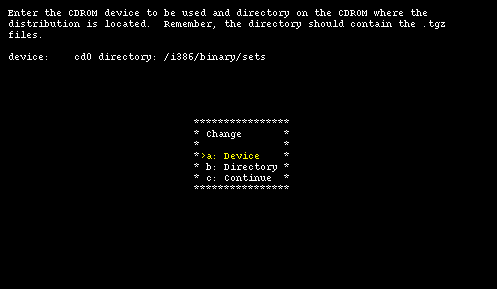
Selecting "cdrom", sysinst asks the name of the device (for example cd0) and mounts it automatically. You should also input the pathname to the installation sets on the CD-ROM if it is different from the default value. If, for example, the NetBSD distribution is in the NetBSD-1.5 directory you must modify the pathname, using option "b", like this:
/NetBSD-1.5/i386/binary/sets
Note: if you are using a non US keyboard you'll have to be careful when you type the "/" character. See Section 3.3.1.
The CD-ROM device name: if you don't know the name of the CD-ROM device, you can find it in the following way:
Press Ctrl-Z to pause sysinst and go to the shell prompt (that's a nice feature!)
Type the command:
# cat /kern/msgbufThis will show the kernel startup messages, including the name of the CD-ROM device (for example cd0).
If the display scrolls too quickly, you can also use the ed editor.
# ed /kern/msgbufGo back to the installation program with the command:
# fg
At the end of the installation sysinst displays a message saying that everything went well. Selecting option "a: ok" the device files are created.
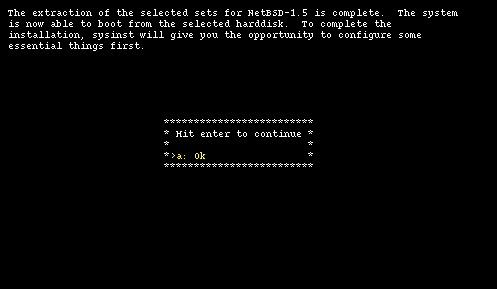
The installation is over. Sysinst can now do some system configuration before rebooting. First you can configure the timezone and, in the following screen, you can choose a password for root. Now it's tiem to reboot. Select "a: ok" and go back to the main menu, then remove the floppy from the drive and select option "d: Reboot the computer".
Chapter 5 The first boot
After installing the computer will reboot from the hard disk: if everything went well you'll be looking at the login prompt within a few seconds (or minutes, depending on your hardware). The system is not yet configured but don't worry: configuration is very easy and this approach is not inconvenient but, instead, gives you a lot of flexibility. You'll see how to quickly configure everyhing and, in the meantime, you'll learn how the system works; in the future, in case of trouble you'll know where to look.
5.1 If something went wrong
If the system doesn't boot it could be that the boot manager was not installed correctly or that there is a problem with the MBR (Master Boot Record). Reboot the machine from the boot floppy and when you see the prompt:
booting fd0a:netbsd - starting in ...
press the space bar during the 5 second countdown; the boot stops and a prompt is displayed. You can have a basic help with the "?" key or with the "help" command.
type "?" or "help" for help.
> ?
commands are:
boot [xdNx:][filename] [-adrs]
     (ex. "sd0a:netbsd.old -s")
ls [path]
dev xd[N[x]]:
help|?
quit
> boot wd0a:netbsd
The system should now boot from the hard disk instead of the foppy. If NetBSD boots correctly from the hard disk, there is probably a Master Boot Record problem: you can install the boot manager or modify its configuration with the fdisk -B command. See Section 24.4 for a detailed description.
5.2 Login
For the first login you will use the root superuser, which is the only user defined at the end of the installation. At the password prompt write the password for root that you have defined during the installation. If you haven't defined a password, just press Enter.
NetBSD/i386 (Amnesiac) (ttyE0)
login: root
password
...
We recommend creating a non-root account and using su(1) for root access.
#
5.3 Changing the keyboard layout
The keyboard has still the US layout; if you have a different keyboard it's better to change its layout now, before starting to configure the system. For example, to use the italian keyboard, give the following command:
# wsconsctl -k -w encoding=it
encoding -> it
A full list of keyboard mappings is in /sys/dev/wscons/wsksymdef.h but some of the more common maps are:
-
de
-
dk
-
fr
-
it
-
jp
-
sv
-
uk
-
us
This setting will last until the next reboot. To make it permanent, add the previous command at the end of the /etc/rc.local: it will be executed automatically the next time you reboot.
# echo "wsconsctl -k -w encoding=it" >> /etc/rc.local
Note: be careful and type two ">" characters. If you type only one ">", you will overwrite the file instead of adding a line.
There is also a better approach to the keyboard layout problem: you can compile a new kernel which uses your preferred layout by default. This will be described in Chapter 9.
5.4 The man command
If you have never used a Unix(-like) operating system before, your best friend is now the man command, which displays a manual page: the NetBSD manual pages are amongst the best and most detailed you can find, although they are very technical.
man name shows the man page of the "name" command and man -k name shows a list of man pages dealing with "name" (you can also use the apropos command.)
To learn the basics of the man command, type:
# man man
The manual is divided in nine sections, containing not only basic infomations on commands but also the descriptions of some NetBSD features and structures. For example, take a look at the hier(7) man page, which describes in detail the layout of the filesystem used by NetBSD.
# man hier
Other similar pages are release(7) and packages(7). Each section of the manual has an intro man page describing its content. For example, try:
# man 8 intro
Example 5-1. Manual sections
-
general commands (tools and utilities)
-
system calls and error numbers
-
C libraries
-
special files and hardware support
-
file formats
-
games
-
miscellaneous information pages
-
system maintenance and operation commands
-
kernel internals
A subject may appear in more than one section of the manual; to view a specific page, supply the section number as an argument to the man command. For example, time appears in section 1 (the time user command), in section 3 (the time function of the C library) and in section 9 (the time system variable). To see the man page for the time C function, write:
# man 3 time
To see all the available pages:
# man -a time
5.5 Changing the root password
If you haven't defined a password for root during installation (which was not possible on pre 1.5 systems) now it's time to do it, using the passwd command.
# passwd
Changing local password for root.
New password:
Retype new password:
Password are not displayed on the screen while you type. Later we will see how to add other accounts on the system.
5.6 Changing the shell
The default shell for root is csh; if this doesn't mean anything to you, you should begin studying csh with (man csh): it's a good interactive shell although it lacks history editing (have a look at tcsh, bash or even the NetBSD /bin/sh for this). If you want to change your shell, use the chsh. The shells available on NetBSD after installation are:
-
csh
-
sh
-
ksh
The new shell will come into effect the next time you login. In the mean time, you can issue the following command:
# set filec
that enables filename completion on the command line (with the ESC key; use Ctrl+D for a list of possible completions.)
You can also install other shells on the system, if you want to: tcsh, bash, zsh and other shells are available in the package collection (which we shall examine later).
This is a good time to create the shell's initialization files (.chsrc, .login, ...)
5.7 System time
NetBSD, like all UNIX systems, uses a system clock based on Greenwich time (UTC) and this is what you should set your system clock to. If you want to keep the system clock set to the local time (because, for example, you have a dual boot system with Windows installed), you must notify NetBSD, modifying the rtc_offset system variable. You can edit the kernel configuration file and recompile the kernel or you can patch directly the existing kernel (the new time will be effective only after rebooting): this is easier than you think. For example:
# gdb --write /netbsd
GNU gdb 4.17
Copyright 1998 Free Software Foundation, Inc.
...
This GDB was configured as "i386--netbsd"...(no debugging symbols found)...
(gdb) set rtc_offset=-60
(gdb) quit
The value supplied (-60) is the number of minutes west of UTC.
To display the current setting of the rtc_offset variable:
# sysctl kern.rtc_offset
kern.rtc_offset = -60
Now the kernel knows how to convert the time of the PC clock in the UTC system time but you must still configure the system for your local time zone (which you will find in /usr/share/zoneinfo/.) If you have already done this during the installation you can skip this step (although it is better to check that the setting is correct.) For example, for Italy:
# rm -f /etc/localtime
# ln -s /usr/share/zoneinfo/Europe/Rome /etc/localtime
Once everything is set up correctly, you can change the time with the following command:
# date [[[[[cc]yy]mm]dd]hh]mm
5.8 Basic configuration /etc/rc.conf
NetBSD uses the /etc/rc.conf for system configuration at startup: this file determines what will be executed when the system boots. Understanding this file is very important.
Starting from version 1.5 of NetBSD the administration of rc.conf has changed. In prior versions all the default values were stored in /etc/rc.conf and the user was supposed to modify directly this file; version 1.5 introduced the /etc/defaults/rc.conf file, which contains the default values. To modify a default value the user must write the new value in /etc/rc.conf: this definition overrides the one in /etc/defaults/rc.conf (which stays unchanged.)
Understanding this file is very important. The manual page contains a detailed description of all the options.
# man rc.conf
The first modifications are:
-
Set "rc_configured=YES" (this modification might already have been done by the installation software.)
-
Set "lpd=YES" to activate the printer spooler daemon
-
Define an hostname for your machine (use a fully qualified hostname). If you have a standalone machine you can use any name (for example, "woody.toys.net".) If your machine is connected to a network, you should supply the correct network name.
Instead of defining the host name in the configuration file, you can write it in the /etc/myname file: the result is the same.
Note: Make sure that the hostname is resolvable, either using DNS or /etc/hosts, some programs do not work with an unresolvable hostname.
5.9 Rebooting the system
In this first session you have
-
Configured the keyboard
-
Changed the root password
-
Changed root's shell (optional)
-
Changed the system time and the RTC offset
-
Defined the local time
-
Configured /etc/rc.conf
Now it's time to reboot the system, with the following command:
# reboot
Chapter 6 The second boot
During the first boot you have set up a basic system configuration. This chapter describes some common commands and operations.
6.1 dmesg
At system startup the kernel displays a long sequence of messages on the screen: these messages give information about the kernel status (for example, available memory) and the peripherals that have been detected on the system. This information is very important for diagnosing hardware or configuration problems, and for determining the name of the devices for the peripherals (for example you can check if your network card has been detected as ne0 or ne1.) Usually these messages scroll on the screen too fast to be useful, but you can use the dmesg command to view them again.
# dmesg | more
If something on your system doesn't appear to work correctly and you ask for help on one of the NetBSD mailing lists, always remember to include the relevant dmesg output in your post: it will help other people diagnose your problem.
6.2 Mounting the CD-ROM
New users are often surprised by the fact that although the installation program recognized and mounted their CD-ROM perfectly, the installed system seems to have "forgotten" how to use the CD-ROM. There is no special magic for using a CD-ROM: you can mount it as any other file system, all you need to know is the device name and some options to the mount command. You can find the device name with the aforementioned dmesg command. For example, if dmesg displays:
# dmesg | grep ^cd
cd0 at atapibus0 drive 1: <ASUS CD-S400/A, , V2.1H> type 5 cdrom removable
the device name is cd0, and you can mount the CD-ROM with the following commands:
# mkdir /cdrom
# mount -t cd9660 -o ro /dev/cd0a /cdrom
in most cases NetBSD can also automatically detect the filesystem type. In most cases the following command is sufficient:
# mount /dev/cd0a /cdrom
To make things easier, you can add a line to the /etc/fstab file.
/dev/cd0a /cdrom cd9660 ro,noauto 0 0
Without the need to reboot, you can now mount the cdrom with:
# mount /cdrom
When the cdrom is mounted you can't eject it manually; you'll have to unmount it before you can do that:
# umount /cdrom
There is also a software command which unmounts the cdrom and ejects it:
# eject /dev/cd0a
6.3 Mounting the floppy
To mount a floppy you must know the name of the floppy device and the file system type of the floppy. Read the fdc(4) manpage for more information about device naming. For example, to read and write a floppy in MS-DOS format you use the following command:
# mount -t msdos /dev/fd0a /mnt
Instead of /mnt, you can use another directory of your choice; you could, for example, create a /floppy directory like you did for the cdrom. If you do a lot of work with MS-DOS floppies, you will want to install the mtools package, which enables you to access a MS-DOS floppy (or hard disk partition) without the need to mount it. It is very handy for quickly copying a file from/to floppy.
6.4 Accessing a DOS/Windows partition
If NetBSD shares the hard disk with MS-DOS or Windows, it is possible modify the disklabel and make the DOS partitions visible from NetBSD. First, you must determine the geometry of the DOS partition , for example using fdisk.
# fdisk wd0
NetBSD disklabel disk geometry:
cylinders: 6232 heads: 16 sectors/track: 63 (1008 sectors/cylinder)
...
Partition table:
0: sysid 6 (Primary 'big' DOS, 16-bit FAT (> 32MB))
    start 63, size 2088516 (1019 MB), flag 0x80
        beg: cylinder    0, head   1, sector  1
        end: cylinder  259, head   0, sector  4
1: sysid 169 (NetBSD)
    start 2088579, size 4193277 (2047 MB), flag 0x0
        beg: cylinder  259, head   0, sector  4
        end: cylinder  779, head   0, sector  1
2: <UNUSED>
3: <UNUSED>
Note: this example uses the wd0 hard disk: substitute the device for your hard disk.
The output of the fdisk command shows that the DOS partition begins at sector 63 and has a size of 2088516 sectors. The NetBSD partition begins at sector 2088579 (2088579 = 2088516 + 63). You will use this data to modify the BSD disklabel: all you have to do is add one line which defines the position and type of the MS-DOS partition, choosing one of the still unused partition id letters. Use the disklabel command to modify the disklabel. If you give the -e option to disklabel it will invoke your favourite editor ($EDITOR) to modify the disklabel. For example:
# disklabel -e wd0
...
#        size   offset     fstype  [fsize bsize  cpg]
...
  e:  3450624  2831232    4.2BSD    1024  8192    16   # (Cyl.  2808* - 6231)
  f:  2088516       63    MSDOS
The partitions from "a" to "e" were already used by NetBSD and the first available id was "f". The "size" and "offset" fields have been filled with the previously calculated numbers. Next, the mount point must be created. For example:
# mkdir /msdos
finally, a line will be added to the /etc/fstab file.
/dev/wd0f /msdos msdos rw,noauto 1 3
Note: a disklabel can also be generated automatically using the mbrlabel command. Please read the mbrlabel(8) manpage for more information.
Now the MS-DOS partition can be mounted with a simple command:
# mount /msdos
With this method you can mount FAT and FAT32 partitions. If you want to mount the partition(s) automatically at startup, remove the "noauto" option from /etc/fstab.
/dev/wd0f /msdos msdos rw 1 3
6.5 Adding users
It's time to add new users to the system, since you don't want to use the root account for your daily work. NetBSD doesn't have a program to create new users; instead you should read the adduser manpage.
# man adduser
Following the instructions on the page you'll also begin using vipw which is the basic administration tool for new accounts under NetBSD.
Note: NetBSD 1.4.2 has a set of user administration tools; a useradd command and other commands too. For example, to create a new user:
# useradd -m joeThe defaults for the useradd command can be changed; see the useradd(8) man page.
If you have an earlier version of NetBSD and don't want to add new accounts manually you can install a package like, for example, addnerd from the packages collection. I suggest that you take a look at the man page and add at least one account manually, though.
6.6 Shadow passwords
Shadow passwords are enabled by default on NetBSD and can't be disabled: all the passwords in /etc/passwd contain an '*'; the encrypted passwords belong to another file, /etc/master.passwd, that can be read only by root. When you start vipw to edit the password file, the program opens a copy of /etc/master.passwd; when you exit, vipw checks the validity of the copy, creates a new /etc/passwd and installs a new /etc/master.passwd file. Finally, vipw launches pwd_mkdb, which creates the files /etc/pwd.db and /etc/spwd.db, two databases equivalent to /etc/passwd and /etc/master.passwd but faster to process.
As you can see, passwords are handled automatically by NetBSD; if you use vipw to edit the password file you don't need any special administration procedure.
It's very important to always use vipw and the other tools for account administration (chfn, chsh, chpass, passwd) and to never modify directly /etc/master.passwd.
6.7 Stopping and rebooting the system
The command used to halt and/or reboot the system is shutdown.
# shutdown -h now
# shutdown -r now
Two other commands perform the same tasks:
# halt
# reboot
halt/reboot and shutdown are not synonyms: the latter is more sophisticated. On a multiuser system you should really use shutdown: you can also schedule a shutdown, notify users, etc. For a more detailed description, see shutdown(8), halt(8) and reboot(8).
Chapter 7 Printing
This chapter describes a simple configuration for printing, using an HP Deskjet 690C connected to the first parallel port as an example. First, the system will be configured to print text documents, and next the configuration will be extended to print PostScript documents using the Ghostscript program.
7.1 Enabling the printer daemon
After installation it is not yet possible to print, because the lpd printer spooler daemon is not enabled. To enable lpd, one line in the /etc/rc.conf file must be changed from:
lpd=NO
to
lpd=YES
The change will come into effect at the next boot, but the daemon can be started manually now:
# lpd -s
To check if lpd is active, type the following command:
# ps ax | grep lpd
  179 ??  Is     0:00.01 lpd
If you don't see an entry for lpd in the output of the previous command, the daemon is not active.
Before configuring /etc/printcap it is better to make a printer test, to check if the connection is working. For example:
# lptest 20 10 > /dev/lpt0
To see what the output should look like, try the same command without redirecting the output to the printer:
# lptest 20 10
A frequent problem is that the output on the printer is not correctly aligned in columns but has a "staircase" configuration. This usually means that the printer is configured to begin a new line at the left margin after receiving both a <CR> (carriage return, ASCII 13) character and a <LF> (line feed, ASCII 10) character. NetBSD only sends a <LF> character. You can fix this problem:
-
changing the configuration of the printer
-
using a simple printer filter (described later)
Note: in the previous example the lpd spooler is not involved because the program output is sent directly to the printer device (/dev/lpt0) and is not spooled.
7.2 Configuring /etc/printcap
This section explains how to configure the example printer to print text documents.
The printer must have an entry in the /etc/printcap file; the entry contains the printer id (the name of the printer) and the printer description. The lp id, is the default used by many programs.
Example 7-1. /etc/printcap
lp|local printer|HP DeskJet 690C:\
        :lp=/dev/lpa0:sd=/var/spool/lpd/lp:lf=/var/log/lpd-errs:\
        :sh:pl#66:pw#80:if=/usr/local/libexec/lpfilter:
The file format and options are described in detail in printcap(5). Please note that an input filter has been specified (with the if option) which will take care of eliminating the staircase problem.
if=/usr/local/libexec/lpfilter
Printer driver and HP printers: Example 7-1 uses the lpa# device (polled driver) for the printer, instead of the lpd# (interrupt driven driver). Using interrupts there is a communication problem with some printers, and the HP Deskjet 690C is one of them: printing is very slow and one PostScript page can take hours. The problem is solved using the lpa driver. It is also possible to compile a custom kernel where lpd is polled.
The printcap entry for the printer also specifies a spool directory, which must be created; this directory will be used by the lpd daemon to accumulate the data to be printed.
# cd /var/spool/lpd
# mkdir lp
# chown daemon:daemon lp
# chmod 770 lp
The only missing part is the lpfilter input filter, which must be written. The only task performed by this filter is to configure the printer for the elimination of the staircase problem before sending the text to be printed. The printer used in this example requires the following initialization string: "ESC &k2G".
Example 7-2. /usr/local/libexec/lpfilter
#!/bin/sh
# Treat LF as CR+LF
printf "\033&k2G" && cat && exit 0
exit 2
# cd /usr/local/libexec
# chmod 755 lpfilter*
Note: there is another filter that can be used:
\:if=/usr/libexec/lpr/lpf:This filter is much more complex than the one presented before. It is written to process the output of nroff and handles underline and overprinting, expands tab characters and converts LF to CR + LF. The source to this filter program can be found in /usr/src/usr.sbin/lpr/filters/lpf.c.
The lptest command can be run again now, this time using the lpd spooler.
# lptest 20 10 | lpr -h
The lpr program prints text using the spooler to send data to the printer; the -h option turns off the printing of a banner page (not really necessary, because of the sh option in /etc/printcap).
You can solve the staircase problem using a variety of tools and methods, for example C programs. The solution presented has the benefit of being very simple.
7.3 Configuring Ghostscript
Now that basic printing works, the functionality for printing PostScript files can be added. The simple printer used in this example does not support native printing of PostScript files; a program must be used capable of converting a PostScript document in a sequence of commands that can be understood by the printer. The Ghostscript program, from the packages collection, can be used to this purpose (see Chapter 10). This section explains how to configure Ghostscript to print PostScript files on the HP Deskjet 690C.
A second id for the printer will be created in /etc/printcap: this new id will use a different input filter, which will call Ghostscript to perform the actual print of the PostScript document. Therefore, text documents will be printed on the lp printer and PostScript documents on the ps printer: both entries use the same physical printer but have different printing filters.
The same result can be achieved using different configurations. For example, a single entry with a filter could be used: the filter should be able to automatically determine the format of the document being printed and use the appropriate printing program. This approach is simpler but leads to a more complex filter; if you like it you should consider installing the magicfilter program from the packages collection: it does this and many other things automatically.
The new /etc/printcap file looks like this:
Example 7-3. /etc/printcap
lp|local printer|HP DeskJet 690C:\
        :lp=/dev/lpa0:sd=/var/spool/lpd/lp:lf=/var/log/lpd-errs:\
        :sh:pl#66:pw#80:if=/usr/local/libexec/lpfilter:
ps|Ghostscript driver:\
        :lp=/dev/lpa0:sd=/var/spool/lpd/ps:lf=/var/log/lpd-errs:\
        :mx#0:sh:if=/usr/local/libexec/lpfilter-ps:
Option mx#0 is very important for printing PostScript files because it eliminates size restrictions on the input file; PostScript documents tend to be very big. The if option points to the new filter. There is also a new spool directory.
The last step is the creation of the new spool directory and of the filter program.
# cd /var/spool/lpd
# mkdir ps
# chown daemon:daemon ps
# chmod 770 ps
The filter program for PostScript output is more complex than the text base one: the file to be printed is fed to the interpreter which, in turn, sends to the printer a sequence of commands in the printer's control language. We have achieved to transform a cheap color printer in a device suitable for PostScript output, by virtue of the NetBSD operating system and some powerful freeware packages. The options used to configure Ghostscript are described in the Ghostscript documentation: cdj550 is the device used to drive the HP printer.
Example 7-4. /usr/local/libexec/lpfilter-ps
#!/bin/sh
# Treat LF as CR+LF
printf "\033&k2G" || exit 2
# Print the postscript file
/usr/pkg/bin/gs -dSAFER -dBATCH -dQUIET -dNOPAUSE -q -sDEVICE=cdj550 \
-sOutputFile=- -sPAPERSIZE=a4 - && exit 0
exit 2
To summarize: two different printer names have been created on the system, which point to the same physical printer but use different options, different filters and different spool directories. Text files and PostScript files can be printed. To print PostScript files the Ghostscript package must be installed on the system.
7.4 Printer management commands
This section lists some useful BSD commands for printer and print jobs administration. Besides the already mentioned lpr and lpd commands, we have:
- lpq
-
examine the printer job queue.
- lprm
-
delete jobs from the printer's queue.
- lpc
-
check the printing system, enable/disable printers and printer features.
7.5 Remote printing
It is possible to configure the printing system in order to print on a printer connected to a remote host. Let's say that, for example, you work on the wotan host and you want to print on the printer connected to the loge host. The /etc/printcap file of loge is the one of Example 7-3. From wotan it will be possible to print Postscript files using Ghostscript on loge.
The first step is to enable on the loge host the print jobs submitted from the wotan host. This is accomplished inserting a line with the wotan host name in the /etc/hosts.lpd file on loge. The format of this file is very simple: each line contains the name of a host to be enabled.
Next, the /etc/printcap file on wotan must be configured in order to send print jobs to loge. For example:
lp|line printer on loge:\
        :lp=:sd=/var/spool/lpd/lp:lf=/var/log/lp-errs:\
        :rm=loge:rp=lp
ps|Ghostscript driver on loge:\
        :lp=:sd=/var/spool/lpd/lp:lf=/var/log/lp-errs:\
        :mx#0:\
        :rm=loge:rp=ps
There are four main differences between this configuration and the one of Example 7-3.
-
The definition of "lp" is empty.
-
The "rm" entry defines the name of the host to which the printer is connected.
-
The "rp" entry defines the name of the printer connected to the remote host.
-
It is not necessary to specify input filters because the definitions on the loge host will be used.
Now the print jobs for "lp" and "ps" on wotan will be sent automatically to printer connected to loge.
Chapter 8 Using the build.sh Front End
NetBSD 1.6 and forward comes equipped with an improved toolchain that can be used to easily perform system builds, new kernels, and cross compile with a relative amount of ease. In this chapter, the use of the build.sh cross compiling a kernel, cross compiling a build, and creating a release are covered. Native kernel builds are covered in Chapter 9.
Before we do anything, the sources must be retrieved. See Chapter 19 for getting the sources.
8.1 Building the tools
Once the sources have been obtained, the native platform tools have to be built before doing anything else. Doing this is simple, we will use the default object directory.
# mkdir /usr/obj
# cd /usr/src
# ./build.sh tools
If the tools have already been built and they only need updated, then the update option can be used to only rebuild tools that have changed.
# ./build.sh -u tools
Now that the native tools have been built, the tools for another target system can be created. In our example, sparc64 will be used.
# ./build.sh -m sparc64 tools
When the tools are finished building, information about them and several environment variables is printed out:
Summary of results:
         build.sh command: ./build.sh -u -m sparc64 tools
         build.sh started: Mon Jul 28 11:08:30 UTC 2003
         Bootstrapping nbmake
         MACHINE:          sparc64
         MACHINE_ARCH:     sparc64
         TOOLDIR path:     /usr/src/tooldir.NetBSD-1.6U-i386
         DESTDIR path:     /usr/src/destdir.sparc64
         RELEASEDIR path:  /usr/src/releasedir
         Created /usr/src/tooldir.NetBSD-1.6U-i386/bin/nbmake
         makewrapper:      /usr/src/tooldir.NetBSD-1.6U-i386/bin/nbmake-sparc64
         Updated /usr/src/tooldir.NetBSD-1.6U-i386/bin/nbmake-sparc64
         Tools built to /usr/src/tooldir.NetBSD-1.6U-i386
         build.sh started: Mon Jul 28 11:08:30 UTC 2003
         build.sh ended:   Mon Jul 28 11:11:14 UTC 2003
Now that the tools for sparc64 have been built, it is time to cross compile the kernel.
8.2 Cross Compiling a Kernel
A cross compiled kernel can be done by either going to the architecture conf directory and explicitly calling the cross compiled tools or the easier method of using build.sh.
Configuring the kernel is the same:
# cd /usr/src/sys/arch/sparc64/conf
# cp GENERIC MYKERNEL
Then edit MYKERNEL. Once finished, all that needs to be done is to use build.sh to build the kernel (it will also configure it):
# cd /usr/src
# ./build.sh -u -m sparc kernel=MYKERNEL
Notice that update was specified, the tools are already built, there is no reason to rebuild all of the tools. Once the kernel is built, build.sh will print out the location of it along with other information:
Summary of results:
         build.sh command: ./build.sh -u -m sparc64 tools
         build.sh started: Mon Jul 28 11:08:30 UTC 2003
         Bootstrapping nbmake
         MACHINE:          sparc64
         MACHINE_ARCH:     sparc64
         TOOLDIR path:     /usr/src/tooldir.NetBSD-1.6U-i386
         DESTDIR path:     /usr/src/destdir.sparc64
         RELEASEDIR path:  /usr/src/releasedir
         Created /usr/src/tooldir.NetBSD-1.6U-i386/bin/nbmake
         makewrapper:      /usr/src/tooldir.NetBSD-1.6U-i386/bin/nbmake-sparc64
         Updated /usr/src/tooldir.NetBSD-1.6U-i386/bin/nbmake-sparc64
         Building kernel without building new tools
         Building kernel:  MYKERNEL
         Build directory:  /usr/src/sys/arch/i386/compile/MYKERNEL
         Kernels built from MYKERNEL:
           /usr/src/sys/arch/sparc64/compile/MYKERNEL/netbsd
         build.sh started: Mon Jul 28 11:08:30 UTC 2003
         build.sh ended:   Mon Jul 28 11:11:14 UTC 2003
8.3 Build & Release
By now it is probably becoming clear that the toolchain actually works in stages. First is the native tools build (which actually has a step before it, makewrappers), then a kernel. Since build.sh will attempt to rebuild the tools at every invocation, using update saves time. It is also probably clear that outside of a few options, the build.sh semantics are basically [ build.sh command ]. So, it stands to reason that creating a build and/or release, is a matter of using the right commands.
It should be no surprise that building and creating a release would look like the following:
# ./build.sh -u -m sparc build
# ./build.sh -u -m sparc release
Looking at the information about environment variables (since so far only the defaults have been used), a build would be at:
/usr/src/destdir.sparc64
The release would be located at:
RELEASEDIR path: /usr/src/releasedir
8.4 Environment Variables
Not unlike the old building method, the toolchain has a lot of variables that can be used to direct things like where certain files go, what (if any) tools are used and so on. A look in src/BUILDING covers most of them. In this section two examples of changing default variables are given in two different ways.
8.4.1 Changing the Destination Directory
Many people like to track current and perform cross compiles of architectures that they use. The logic for this is simple, sometimes a new feature or device becomes available and someone may wish to use it. By keeping track of changes and building every now and again, one can be assured that they can create their own release.
It is reasonable to assume that if one is tracking and building for more than one architecture, they might want to keep the builds in a different location than the default. There are two ways to go about this, use a script to set the new DESTDIR, or simply do so interactively. In any case, it can be set the same way as any other variable (depending on your shell of course).
For the bourne or korn shells:
# export DESTDIR=/usr/builds/sparc64
For the c shell:
# setenv DESTDIR /usr/builds/shark
Simple enough. When the build is run, the binaries and files will be sent to /usr/builds.
8.4.2 Static Builds
The NetBSD Toolchain builds dynamically by default. Many users still prefer to be able to build statically. Sometimes a small system can be created without having libs is a good example of a full static build. If a particular build machine will always need one environment variable set in a particular way, then it is easiest to simply add the changed setting to /etc/mk.conf.
To make sure a build box always builds statically, simply add the following line to /etc/mk.conf:
LDSTATIC=-static
Chapter 9 Compiling the kernel
Most NetBSD users will, sooner or later, compile a customized kernel. This gives you several benefits:
-
you can dramatically reduce kernel size and, therefore, memory occupation (for example, from 2.5 MB to 1.2 MB). On version 1.5 of NetBSD compiling a custom kernel reduced the size from 4.7 MB to 1.9 MB.
-
you can improve performance.
-
you can tune the system.
-
you can solve problems of detection/conflicts of peripherals.
-
you can customize some options (for example keyboard layout, BIOS clock offset, ...)
-
you can get a deeper knowledge of the system.
9.1 Installing the kernel sources
Be patient: this operation lasts many minutes, because the repository contains hundreds of files. The sources live in /usr/src/sys; the symbolic link sys points to this directory. Therefore the following commands have the same effect:
# cd /usr/src/sys
# cd /sys
Once the sources are checked out, you can create a custom kernel: this is not as difficult as you think. In fact, a new kernel can be created in a few steps which will be described in the following sections.
9.2 Italian keyboard layout
Before compiling the kernel, Italian users should consider modifying the predefined layout for the italian keyboard, which is defined in the source file /sys/dev/pckbc/wskbdmap_mfii.c. In the default layout some characters useful for programmers are missing (for example, left and right braces and tilde). This is an alternative layout:
static const keysym_t pckbd_keydesc_it[] = {
...
KC(8),   KS_7,          KS_slash,       KS_braceleft,
KC(9),   KS_8,          KS_parenleft,   KS_bracketleft,
KC(10),  KS_9,          KS_parenright,  KS_bracketright,
KC(11),  KS_0,          KS_equal,       KS_braceright,
KC(12),  KS_apostrophe, KS_question,    KS_grave,
KC(13),  KS_igrave,     KS_asciicircum, KS_asciitilde,
KC(26),  KS_egrave,     KS_eacute,      KS_bracketleft, KS_braceleft,
KC(27),  KS_plus,       KS_asterisk,    KS_bracketright,KS_braceright,
...
The previous layout defines the following mappings:
| Keys | Character |
|---|---|
| Alt Gr + 7 | { |
| Alt Gr + 8 | [ |
| Alt Gr + 9 | ] |
| Alt Gr + 0 | } |
| Alt Gr + ' | ` |
| Alt Gr + ě | ~ |
| Alt Gr + é | [ |
| Alt Gr + + | ] |
| Shift + Alt Gr + č | { |
| Shift + Alt Gr + + | } |
Console driver: starting with version 1.4, NetBSD uses the wscons multiplatform console driver to handle screen, keyboard and mouse. Previous versions used pccons or pcvt. For a detailed description, see Chapter 14.
9.3 Recompiling the kernel
To recompile the kernel you must have installed the compiler set (comp.tgz).
Basic steps for kernel compilation
-
Build the toolchain
-
Create/modify the kernel configuration file
-
Configure the kernel
-
Generate dependencies
-
"Make" the kernel
-
Install the kernel
9.4 Build the toolchain
The NetBSD toolchain provides a simple mechanism for compiling the NetBSD system both natively or when the need arises, cross compiling for other targets. In this example, a native toolchain is built (as root) by simply typing:
# cd /usr/src
#  ./build.sh tools
Once the tools are built, the kernel can be reconfigured and compiled.
9.5 Creating the kernel configuration file
Note: The directories described in this section are i386 specific. Users of other architectures must substitute the appropriate directories (usually subdirectories of arch.)
The kernel configuration file defines the type, the number and the characteristics of the devices supported by the kernel as well as several kernel configuration options. Kernel configuration files are located in the /sys/arch/i386/conf directory. The easiest way to create a new file is to copy an existing one and modify it: usually the best choice on most platforms is the GENERIC configuration. In the configuration file there are comments describing the options; a more detailed description is found in the options(4) man page.
# cd /sys/arch/i386/conf/
# cp GENERIC MYKERNEL
# vi MYKERNEL
Kernel names: the names of the kernel configuration files are historically in all uppercase.
The modification of a kernel configuration file basically involves three operations:
-
support for hardware devices is included/excluded in the kernel (for example, SCSI support can be removed if it is not needed.)
-
support for kernel features is enabled/disabled (for example, enable NFS client support, enable Linux compatibility, ...)
-
tuning kernel parameters.
Lines beginning with "#" are comments; lines are disabled by commenting them and enabled by removing the comment character. It is better to comment lines instead of deleting them; it is always possible uncomment them later.
The output of the dmesg command can be used to determine which lines can be disabled. For each line of the type:
<XXX> at <YYY>
both XXX and YYY must be active in the kernel configuration file. You'll probably have to experiment a bit before achieving a minimal configuration but on a desktop system without SCSI and PCMCIA you can halve the kernel size.
You should also examine the options in the configuration file and disable the ones that you don't need. Each option has a short comment describing it, which is normally sufficient to understand what the option does. Many options have a longer and more detailed description in the options(4) man page. While you are at it you should set correctly the options for the national keyboard support and for local time on the CMOS clock. For example, for Italy:
options RTC_OFFSET=-60
...
options PCKBD_LAYOUT="KB_IT"
The adjustkernel Perl script, which can be found at http://www.feyrer.de/Misc/adjustkernel, analizes the output of dmesg and automatically generates a minimal configuration file. To run it you need to have Perl installed on your system. The installation of new software is described in detail in the Chapter 10. If you want to install Perl now, download the pre-compiled package perl-5.00404.tgz and write the following command:
# pkg_add perl-5.00404.tgz
Now Perl is installed, configured and ready to work: easier than this it's impossible...
You can now run the script with:
# cd /sys/arch/i386/conf
# perl adjustkernel GENERIC > MYKERNEL
I tried this script and it worked very well, saving me a lot of manual editing. Beware that the script only configures the available devices: you must still configure manually the other options (eg. Linux emulation, ...)
9.6 Configuring the kernel
When you've finished modifying the kernel configuration file (which we'll call MYKERNEL), you should issue the following command:
# config MYKERNEL
If MYKERNEL contains no errors, the config program will create the necessary files for the compilation of the kernel, otherwise it will be necessary to correct the errors before running config again.
9.7 Generating dependencies and recompiling
Dependencies generation and kernel compilation is performed by the following commands:
# cd ../compile/MYKERNEL
# make depend
# make
It can happen that the compilation stops with errors; there can be a variety of reasons but the most common cause is an error in the configuration file which didn't get caught by config. Sometimes the failure is caused by a hardware problem (often faulty RAM chips): the compilation puts a higher stress on the system than most applications do. Another typical error is the following: option B, active, requires option A which is not active.
A full compilation of the kernel can last from some minutes to several hours, depending on the hardware. See the following table for some examples:
| CPU | RAM (MB) | Approx. time |
|---|---|---|
| 486 DX2 50 | 20 | 1 hour |
| P166 | 96 | 15 minutes |
| PIII | 128 | 5 minutes |
| 68030/25 | 8 | 4 hours |
The output of the make command is the netbsd file in the compile directory: this file should be copied in the root directory, after saving the previous version.
# mv /netbsd /netbsd.old
# mv netbsd /
Customization can considerably reduce the kernel's size. In the following example netbsd.old is the install kernel and netbsd is the new kernel.
-rwxr-xr-x  1 root  wheel  1342567 Nov 13 16:47 /netbsd
-rwxr-xr-x  1 root  wheel  3111739 Sep 27 01:20 /netbsd.old
The new kernel is activated after rebooting:
# reboot
9.8 If something went wrong
When the PC is restarted it can happen that the new new kernel doesn't work as expected or even doesn't boot at all. Don't worry: if this happens, just reboot with the previously saved kernel and remove the new one (it is better to reboot "single user".)
-
Reboot the machine
-
Press the space bar at the boot prompt during the 5 seconds countdown
boot:
-
Type
> boot netbsd.old -s
-
Now issue the following commands to restore the previous version of the kernel:
fsck /
mount /
mv netbsd.old netbsd
exit
Chapter 10 The package collection
The NetBSD package collection is a collection of tools that greatly simplify the compilation and installation of a huge quantity of free software for Unix systems. Only one or two commands are required to install a perfectly configured and working package.
The first contact with the NetBSD package system can generate a little confusion: apparently there are different commands that do the same thing. The question is actually very simple: here are two ways to install a program. You can
-
compile a package from source on your system. This is accomplished using the package collection, which can automatically download the sources from the Internet, compile them, install and configure the program and the documentation with only two commands. The Package Collection consists of a set of makefiles and configuration files which use the standard Unix tools installed with the base system. Another nice feaure of the package system is that it can automatically check the required dependencies and download and install the dependent packages too. The package collection is not installed automatically with the base system because it undergoes frequent updates: the following sections explain how to download and install it on your system. The NetBSD site contains a very thorough technical description of the package system.
-
install a precompiled and preconfigured version of the program. This is accomplished with the pkgtools set of utilities, which are installed with the base system. This method is faster but less flexible than the previous one (for example, you can't configure the compile time options.) The pkgtools are also used for the management of the installed programs (both from source and precompiled), which are recorded in a database: you can, for example, list the installed packages, remove a package, etc.
If you only want to install precompiled programs, you don't need to download the package collection.
The two aforementioned methods both require that someone else has "created a package", i.e. has ported and configured a program for NetBSD. Although the package collection comprises more that 3500 programs, it is possible that the one that you want is still not included. In this case you can compile it without using the package system and, once you get it working, create a package that can be added to the collection: other users will benefit from your work.
10.1 Installing the package collection
Before installing a program from source, you should download and install the package collection from the NetBSD site or from the mirror of your choice. This is described in the following steps.
-
Download the latest version of the package system sources, which include all the necessary makefiles and configuration files, from ftp://ftp.NetBSD.org/pub/NetBSD/NetBSD-current/tar_files/. The file to be downloaded is pkgsrc.tar.gz.
-
Remove the existing collection from your hard disk (if you already have installed it) with the following command:
# cd /usr
# rm -rf pkgsrc
-
Install the collection that you have downloaded:
# tar -xzvpf pkgsrc.tar.gz -C /usr
The execution of the previous command can last many minutes, because of the huge number of (small) files that are extracted. At the end, the framework required for the installation of new programs is ready and you can start installing them.
Note: by now it is probably clear that the previous commands installed the configuration files required for the automatic installation of programs on your system: you have not yet installed the programs! Basically, the system now has a list of the available packages and the instructions to fetch, compile and install them.
When you have installed the package collection you can browse it with Lynx or Netscape and read the details and the descriptions of all the available packages and package categories. For example:
$ cd /usr/pkgsrc
$ lynx README.html
10.2 Updating the package collection
The package collection is frequently updated: you can find a new version on the ftp site almost weekly. To update the collection on your system follow the same instructions as for first time installation.
Sometimes, when updating the package collection, it will be necessary to update the "pkgtools" utilities too. You can easily spot if you need to do it: when you try to install a program the package system complains that your pkgtools are outdated.
# make
===> Validating dependencies for gqmpeg-0.6.3
Your package tools need to be updated to 2000/02/02 versions.
The installed package tools were last updated on 1999/01/01.
Please make and install the pkgsrc/pkgtools/pkg_install package.
*** Error code 1
The easiest way to update is:
# cd /usr/pkgsrc/pkgtools/pkg_install
# make install
After this you can resume the installation of the package which issued the original error message.
Note: You can determine the required version examing the pkgsrc/mk/bsd.pkg.mk file: look for the line with:
PKGTOOLS_REQD = 20000202(the 20000202 date is only an example.) This means that the version of the programs that you need is in the pkg_install-20000202.tar.gz file, that you can find on the NetBSD ftp site under packages/distfiles/LOCAL_PORTS. pkg_install can be installed like any other package.
10.3 Example: installing a program from source
This section describes the installation of an example program: the cdrecord application, which simplifies the creation of new accounts on your system. First, cd to the /usr/pkgsrc/sysutils/cdrecord directory.
10.3.1 Downloading the sources
If you are connected to the Internet, the Makefile will automatically fetch the required sources and you don't need to read this section.
Otherwise you should take care of getting the tarballs yourself. In this case you need to know the name(s) of the tarball(s); look in the Makefile for the line
DISTNAME = cdrtools-2.0
The full name of the package is cdrtools-2.0.tar.gz.
You can achieve the same result in an easier way with the following commands:
# cd /usr/pkgsrc/sysutils/cdrecord
# make fetch-list
which also show a list of sites from where the package can be downloaded.
10.3.2 Compiling and installing
To compile the package write
# cd /usr/pkgsrc/sysutils/cdrecord
# make
The previous command fetches the source archive (if it is not already present in the distfiles directory), extracts the sources, applies the patches necessary to compile it on NetBSD and then builds the package.
To install it
# make install
The installation of the new program is recorded on your system: you can check with the pkg_info -a command.
Then cdrecord package is ready for use; you can make some room removing the intermediate files created by the compiler:
# make clean
# make clean-depends
The second command is needed if some dependent packages have been installed. The same result can be achieved with one command:
# make clean CLEANDEPENDS=1
10.4 Example: installing a binary package
I have already explained in the first part of this chapter that the package system can install program from source but can also install binary packages, prepared by someone else for NetBSD. This second form of installation is faster because the compilation of the package is not needed and the tarballs for the binary package are usually smaller and faster to fetch. To install a binary package the package collection is not needed: only the "pkgtools" utilities are needed.
The tarballs for the binary programs usually have the extension .tgz while the source tarballs usually end with .tar.gz.
Note: not all the source tarballs end with .tar.gz. The package system can handle other types of packages, for example .zip, .bz2, etc.
It is not strictly necessary to download binary packages prior to installation: you can also use ftp://-URLs. For example:
ftp://ftp.NetBSD.org/pub/NetBSD/packages/1.4.2/i386/All/tcsh-6.09.00.tgz
If you don't know what version of the package is available on the FTP site you can even leave out the version inormation and pkg_add will pick the latest version on the FTP server. For example:
# pkg_add ftp://ftp.NetBSD.org/pub/NetBSD/packages/1.4.2/i386/All/tcsh
It is also possible to set PKG_PATH to a ;-separated list of path and URLs and then omit that part for pkg_add:
# PKG_PATH="/cdrom;/usr/pkgsrc/packages/All;ftp://ftp.NetBSD.org/pub/NetBSD/packages/1.4.2/i386/All/"
export PKG_PATH
# pkg_add tcsh
The previous command installs the first tcsh binary package that it finds.
As an example, let's install the texinfo program in precompiled form.
-
Copy gtexinfo-3.12.tgz in a temporary directory.
-
Give the following command
# pkg_add -v gtexinfo-3.12.tgz
-
Check that the package has been installed with the command
# pkg_info
-
Remove the file gtexinfo-3.12.tgz from the temporary directory.
Precompiled packages are very practical to use because they require a minimal effort and time for installation, but source packages give more control because their compilation options can be customized. The installation is somewhat longer, because of the compilation, and this could be critical on some (older) platforms.
Before installing a precompiled package with pkg_add, it is better to examine it with the pkg_info command. For example:
# pkg_info -f jpeg-6b.tgz
It is worth examining the first CWD command, to check where the package is installed (base directory.) The most common base directories are /usr/pkg and /usr/X11R6. If the base directory is not what you want, you can change it with the -p of the pkg_add command. For example, the jpeg-6b.tgz package is installed in /usr/pkg by default, but you can install it in /usr/X11R6 if you extract it with the following command:
# pkg_add -p /usr/X11R6 -v jpeg-6b.tgz
10.5 Package management commands
The most important commands for package management are:
- pkg_add
-
adds precompiled packages.
- pkg_delete
-
removes installed packages. Package names can be given with or without version; if no version is given, pkg_delete will find out which version is installed. Wildcards can be used (but must be escaped for the shell); for example:
# pkg_delete "*emacs*"
The -r option is very powerful: it removes all the packages that require the package in question and then removes the package itself. For example:
# pkg_delete -r jpeg
will remove jpeg and all the packages that used it; this allows upgrading the jpeg package.
- pkg_info
-
shows information on packages, installed and not installed.
- pkg_create
-
creates new packages for the package collection. This program is used to create new precompiled packages. It's called automatically by the build system and there's no need to call it by hand.
- pkg_admin
-
executes various administrative functions on the package system.
10.6 Quick Start Packaging Guide
This section details a quick start method for building relatively small Packages for the NetBSD packaging system. For more details on some of the intricacies on the NetBSD packaging system see pkgsrc documentation.
10.6.1 Tools
There are three primary tools for rapidly building a small package addition to NetBSD:
| url2pkg |
| a template package |
| pkglint |
10.6.1.1 url2pkg
The url2pkg utility can be installed from the pkgsrc tree. This tool helps the package builder quickly fill in and test rudimentry aspects of package building.
10.6.1.2 Template package
A template package example, bison, is provided in the appendices of the pkgsrc documentation.
10.6.1.3 pkglint
The pkglint utility can be installed from the pkgsrc tree. This tool basically checks for package correctness.
10.6.2 Getting Started
Starting the process is fairly simple. It is important that the builder (e.g. you) have already tested building the package from the sources on a NetBSD system. Otherwise setting up a new package could be problematic if if fails to build. It should be noted that most often, a patch can be written for the sources and included in the package to fix any build problems. That is beyond the scope of this quick start guide (see the pkgsrc documentation for details).
10.6.2.1 Using url2pkg
The next step is to use url2pkg.
Following are the steps for using url2pkg to create some of the initial files needed for a new package:
-
Make the directory under the appropiate pkgsrc directory for the new package. Do not put anything in it yet.
-
cd into the new directory.
-
type
$ url2pkg
-
You will be prompted to enter a url at this point, enter the url and hit <Return>.
-
A vi session will begin
The vi session is for the Makefile of the new package. You must enter the package name, package maintainer email and the category that the package will fall under.Note: this uses the default location of vi on NetBSD, by default it is nvi. If you normally use another vi clone such as vim you may get .exrc errors.
-
Save the file and exit.
-
url2pkg will automatically fetch the package and put it in the work subdirectory.
-
Next, url2pkg will generate md5 files.
That ends a url2pkg session, please note url2pkg does not fill in any other files except the Makefile. It will generate an empty PLIST file.
10.6.3 Filling in the Rest
Now that the Makefile has been generated, the remaining files must be created. Using your template package, copy over the following files from the template package's pkg subdirectory:
- DESCR
-
A multi-line description of the piece of software. This should include credits as well.
- COMMENTS
-
A one-line description of the piece of software. There is no need to mention the package's name - this will automatically be added by the pkg_* tools when they are invoked.
- PLIST
-
This file contains the location of files to be installed on the system, for a small package (e.g. one binary and one or two man pages) peeking at the distribution's Makefile, install script etc. should easily illustrate where to put these.
10.6.4 Checking with pkglint
With all of the files ready, it is time to check the package with the pkglint tool. Often the Makefile needs a section moved, changed or added, however, for the first time around it is helpful just to run pkglint before hand so you know exactly what you may need to change, following is some sample output taken from the pkgsrc documentation pkglint session:
$ pkglint
OK: checking pkg/COMMENT.
OK: checking pkg/DESCR.
OK: checking Makefile.
OK: checking files/md5.
OK: checking patches/patch-aa.
looks fine.
If an error occured, it is normally pretty straightforward, here is a sample error I got while building a package:
extract suffix not required
I did not need to define an extract suffix in the Makefile.
10.6.5 Running and Checking Build/Installs
At this point if pkglint has passed, I normally run a complete check of the fetch, build and installation. To do this properly I must delete the work subdirectory and the distfile(s) from /usr/pkgsrc/distfiles. This way I can ensure I will be doing a full and complete test.
10.6.6 Submitting a Package Using send-pr
First make an archive of the package tree itself (including the pkg/work subdirectory) like so:
$ tar -czf packagename.tgz package_dir
Next, upload the archive to a location that NetBSD package maintainers can access it from, if you cannot upload the archive, contact NetBSD to see if there is some other method you might try to make your archive available to package maintainers.
The preferred method of notifying NetBSD package maintainers is to use the send-pr utility with a category of "pkg", a synopsis which includes the package name and version number, a short description of the package and the URL of the tar file.
You can use either the send-pr utility on your NetBSD system or the online form at http://www.NetBSD.org/cgi-bin/sendpr.cgi?gndb=netbsd if for some reason you cannot get send-pr to work locally.
10.6.7 Final Notes
Again this little guide is for small packages that contain only a few files to be installed on a NetBSD system. It makes the assumption that the package does not require any patches and can build with no dependancies.
For more advanced issues, be sure to read the full pkgsrc documentation.
Chapter 11 Networking
11.1 Introduction to TCP/IP Networking
11.1.1 Audience
This networking section of this guide explains various aspects of networking and is intended to help people with little knowledge about networks to get started. It is devided into three sections. We start by giving a general overview of how networking works and introduce the basic concepts. Then we go into details for setting up various types of networking in the second section, and the third section covers any "advanced" topics that go beyond the scope of basic operation as introduced in the first two sections.
The reader is assumed to know about basic system administration tasks: how to become root, edit files, change permissions, stop processes, etc. See [AeleenFrisch] for further information on this topic. Besides that, you should know how to handle the utilities we're going to set up here, i. e. you should know how to use telnet, FTP, ... I will not explain the basic features of those utilities, please refer to the appropriate man-pages, the references listed or of course the other parts of this document instead.
This Introduction to TCP/IP Networking was written with the intention in mind to give starters a basic knowledge. If you really want to know what's it all about, read [CraigHunt]. This book does not only cover the basics, but goes on and explains all the concepts, services and how to set them up in detail. It's great, I love it! :-)
11.1.2 Supported Networking Protocols
There are several protocol suites supported by NetBSD, most of which were inherited from NetBSD's predecessor, 4.4BSD, and subsequently enhanced and improved. The first and most important one today is DARPA's Transmission Control Protocoll/Internet Protocoll (TCP/IP). Other protocol suites available in NetBSD include the Xerox Network System (XNS) which was only implemented at UCB to connect isolated machines to the net, Apple's AppleTalk protocol suite and the ISO protocol suite, CCITT X.25 and ARGO TP. They are only used in some special applications these days.
Today, TCP/IP is the most widespread protocol of the ones mentioned above. It is implemented on almost every hardware and operating system, and it is also the most-used protocol in heterogenous environments. So, if you just want to connect your computer running NetBSD to some other machine at home, or you want to integrate it into your company's or university's network, TCP/IP is the right choice.
IPv6 (TCP/IP protocol issue 6, current version IPv4) is still under development, and the KAME project's IPv6 code was merged into NetBSD and shipped starting with the NetBSD 1.5 release.
There are other protocol suites such as DECNET, Novell's IPX/SPX or Microsoft's NetBIOS, but these are not currently supported by NetBSD. These two protocols differ from the protocols mentioned above in that they are proprietary, in contrast to the others, which are well-defined in several RFCs and other open standards.
11.1.3 Supported Media
TCP/IP can be used on a wide range of media. Among the ones supported by NetBSD are Ethernet (10/100/1000MBd), Arcnet, serial line, ATM, FDDI, Fiber Channel, USB, HIPPI, FireWire (IEEE 1394), Token Ring, serial lines and others.
11.1.3.1 Serial Line
There are a couple of reasons for using TCP/IP over a serial line.
-
If your remote host is only reachable via telephone, you can use a modem to access it.
-
Almost every computer has a serial port today, and the cable needed is rather cheap.
The disadvantage of a serial connection is that it's slower than other methods. NetBSD can use at most 115200 bit/s, making it a lot slower than e.g Ethernet's minimum 10 Mbit/s and Arcnet's 4 Mbit/s.
There are two possible protocols to connect a host running NetBSD to another host using a serial line (possibly over a phone-line):
-
Serial Line IP (SLIP)
-
Point to Point Protocol (PPP)
The choice here depends on whether you use a dial-up connection through a modem or if you use a static connection (null-modem or leased line). If you dial up for your IP connection, it's wise to use PPP as it offers some possibilities to auto-negotiate ip-addresses and routes, which can be quite painful to do by hand. If you want to connect to another machine which is directly connected, use SLIP, as this is supported by about every operating system and more easy to set up with fixed addresses and routes.
PPP on a direct connection is a bit difficult to setup, as it's easy to timeout the initial handshake; with SLIP, there's no such initial handshake, i.e. you start up one side, and when the othersite has its first packet, it will send it over the line.
[RFC1331] and [RFC1332] describe PPP and TCP/IP over PPP. SLIP is defined in [RFC1055].
11.1.3.2 Ethernet
Ethernet is the medium commonly used to build local area networks (LANs) of interconnected machines within a limited area such as an office, company or university campus. Ethernet is based on a bus that many machines can connect to, and communication always happens between two nodes at a time. When two or more nodes want to talk at the same time, both will restart communication after some timeout. The technical term for this is CSMA/CD (Carrier Sense w/ Multiple Access and Collision Detection).
Initially, Ethernet hardware consisted of a thick (yellow) cable that machines tapped into using special connectors that poked through the cable's outer shielding. The successor of this was called 10base5, which used BNC-type connectors for tapping in special T-connectors and terminators on both ends of the bus. Today, ethernet is mostly used with twisted pair lines which are used in a collapsed bus system that are contained in switches or hubs. The twisted pair lines give this type of media it's name - 10baseT for 10 Mbit/s networks, and 100baseT for 100 MBit/s ones. In switched environments there's also the distinction if communication between the node and the switch can happen in half- or in full duplex mode.
11.1.4 TCP/IP Address Format
TCP/IP uses 4-byte (32-bit) addresses in the current implementations (IPv4), also called IP-numbers (Internet-Protocol numbers), to address hosts.
TCP/IP allows any two machines to communicate directly. To permit this all hosts on a given network must have a unique IP address. To assure this, IP addresses are administrated by one central organisation, the InterNIC. They give certain ranges of addresses (network-addresses) directly to sites which want to participate in the internet or to internet-providers, which give the addresses to their customers.
If your university or company is connected to the Internet, it has (at least) one such network-address for it's own use, usually not assigned by the InterNIC directly, but rather through an Internet Service Provider (ISP).
If you just want to run your private network at home, see below on how to "build" your own IP addresses. However, if you want to connect your machine to the (real :-) Internet, you should get an IP addresses from your local network-administrator or -provider.
IP addresses are usually written in "dotted quad"-notation - the four bytes are written down in decimal (most significant byte first), separated by dots. For example, 132.199.15.99 would be a valid address. Another way to write down IP-addresses would be as one 32-bit hex-word, e.g. 0x84c70f63. This is not as convenient as the dotted-quad, but quite useful at times, too. (See below!)
Being assigned a network means nothing else but setting some of the above-mentioned 32 address-bits to certain values. These bits that are used for identifying the network are called network-bits. The remaining bits can be used to address hosts on that network, therefore they are called host-bits.
In the above example, the network-address is 132.199.0.0 (host-bits are set to 0 in network-addresses), the host's address is 15.99 on that network.
How do you know that the host's address is 16 bit wide? Well, this is assigned by the provider from which you get your network-addresses. In the classless inter-domain routing (CIDR) used today, host fields are usually between as little as 2 to 16 bits wide, and the number of network-bits is written after the network address, seperated by a "/", e.g. 132.199.0.0/16 tells that the network in question has 16 network-bits. When talking about the "size" of a network, it's usual to only talk about it as "/16", "/24", etc.
Before CIDR was used, there used to be four classes of networks. Each one starts with a certain bit-pattern identifying it. Here are the four classes:
-
Class A starts with "0" as most significant bit. The next seven bits of a class A address identify the network, the remaining 24 bit can be used to address hosts. So, within one class A network there can be 224 hosts. It's not very likely that you (or your university, or company, or whatever) will get a whole class A address.
The CIDR notation for a class A network with it's eight network bits is an "/8".
-
Class B starts with "10" as most significant bits. The next 14 bits are used for the networks address, the remaining 16 bits can be used to address more than 65000 hosts. Class B addresses are very rarely given out today, they used to be common for companies and universities before IPv4 address space went scarce.
The CIDR notation for an class B network with it's 16 network bits is an "/16".
Returning to our above example, you can see that 132.199.15.99 (or 0x84c70f63, which is more appropriate here!) is on a class B network, as 0x84... = 1000... (base 2).
Therefore, the address 132.199.15.99 can be split into an network-address of 132.199.0.0 and an host-address of 15.99.
-
Class C is identified by the MSBs being "110", allowing only 256 (actually: only 254, see below) hosts on each of the 221 possible class C networks. Class C addresses are usually found at (small) companies.
The CIDR notation for an class C network with it's 24 network bits is an "/24".
-
There are also other addresses, starting with "111". Those are used for special purposes (e. g. multicast-addresses) and are not of interrest here.
Please note that the bits which are used for identifying the network-class are part of the network-address.
When seperating host-addresses from network-addresses, the "netmask" comes in handy. In this mask, all the network-bits are set to "1", the host-bits are "0". Thus, putting together IP-address and netmask with a locical AND-function, the network-address remains.
To continue our example, 255.255.0.0 is a possible netmask for 132.199.15.99. When applying this mask, the network-address 132.199.0.0 remains.
For addresses in CIDR notation, the number of network-bits given also says how many of the most significant bits of the address must be set to "1" to get the netmask for the corresponding network. For classfull addressing, every network-class has a fixed default netmask assigned:
-
Class A (/8): default-netmask: 255.0.0.0, first byte of address: 1-127
-
Class B (/16): default-netmask: 255.255.0.0, first byte of address: 128-191
-
Class C (/24): default-netmask: 255.255.255.0, first byte of address: 192-223
Another thing to mention here is the "broadcast-address". When sending to this address, all hosts on the corresponding network will receive the message sent. The broadcast address is characterized by having all host-bits set to "1".
Taking 132.199.15.99 with its netmask 255.255.0.0 again, the broadcast-address would result in 132.199.255.255.
You'll ask now: But what if I want a hosts address to be all bits "0" or "1"? Well, this doesn't work, as network- and broadcast-address must be present! Because of this, a class B (/16) network can contain at most 216-2 hosts, a class C (/24) network can hold no more than 28-2 = 254 hosts.
Besides all those categories of addresses, there's the special IP-address 127.0.0.1 which always refers to the "local" host, i. e. if you talk to 127.0.0.1 you'll talk to yourself without starting any network-activity. This is sometimes useful to use services installed on your own machine or to play around if you don't have other hosts to put on your network.
Let's put together the things we've introduced in this section:
- IP-address
-
32 bit-address, with network- and host-bits.
- Network-address
-
IP-address with all host bits set to "0".
- Netmask
-
32-bit mask with "1" for network- and "0" for host-bits.
- Broadcast
-
IP-address with all host bits set "1".
- locahost's address
-
The local host's IP address is always 127.0.0.1.
11.1.5 Subnetting and Routing
After talking so much about netmasks, network-, host- and other addresses, I have to admit that this is not the whole truth.
Imagine the situation at your university, which usually has a class B (/16) address, allowing it to have up to 216 ~= 65534 hosts on that net. Maybe it would be a nice thing to have all those hosts on one single network, but it's simply not possible due to limitations in the transport media commonly used today.
For example, when using thinwire ethernet, the maximum length of the cable is 185 meters. Even with repeaters in between, which refresh the signals, this is not enough to cover all the locations where machines are located. Besides that, there is a maximum number of 1024 hosts on one ethernet wire, and you'll loose quite a bit of performance if you go to this limit.
So, are you hosed now? Having an address which allows more than 60000 hosts, but being bound to media which allows far less than that limit?
Well, of course not! :-)
The idea is to divide the "big" class B net into several smaller networks, commonly called sub-networks or simply subnets. Those subnets are only allowed to have, say, 254 hosts on them (i.e. you divide one big class B network into several class C networks!).
To do this, you adjust your netmask to have more network- and less host-bits on it. This is usually done on a byte-boundary, but you're not forced to do it there. So, commonly your netmask will not be 255.255.0.0 as supposed by a class B network, but it will be set to 255.255.255.0.
In CIDR notation, you now write a "/24" instead of the "/16" to show that 24 bits of the address are used for identifying the network and subnet, instead of the 16 that were used before.
This gives you one additional network-byte to assign to each (physical!) network. All the 254 hosts on that subnet can now talk directly to each other, and you can build 256 such class C nets. This should fit your needs.
To explain this better, let's continue our above example. Say our host 132.199.15.99 (I'll call him dusk from now; we'll talk about assigning hostnames later) has a netmask of 255.255.255.0 and thus is on the subnet 132.199.15.0/24. Let's furthermore introduce some more hosts so we have something to play around with, see Figure 11-1.
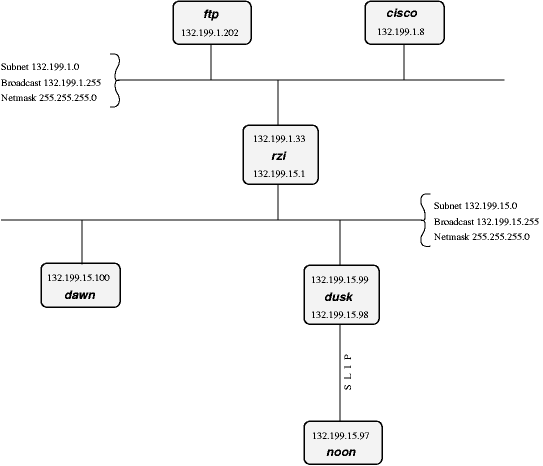
In the above network, dusk can talk directly to dawn, as they are both on the same subnet. (There are other hosts attached to the 132.199.15.0/24-subnet but they are not of importance for us now)
But what, if dusk wants to talk to a host on another subnet?
Well, the traffic will then go through one or more gateways (routers), which are attached to two subnets. Because of this, a router always has two different addresses, one for each of the subnets it is on. The router is functionally transparent, i.e. you don't have to address it to reach hosts on the "other" side. Instead, you address that host directly and the packets will be routed to it correctly.
Example. Let's say dusk wants to get some files from the local ftp-server. As dusk can't reach ftp directly (because it's on a different subnet), all its packets will be forwarded to it's "defaultrouter" rzi (132.199.15.1), which knows where to forward the packets to.
Dusk knows the address of it's defaultrouter in its network (rzi, 132.199.15.1), and it will forward any packets to it which are not on the same subnet, i.e. it will forward all IP-packets in which the third address-byte isn't 15.
The (default)router then gives the packets to the appropriate host, as it's also on the FTP-server's network.
In this example, all packets are forwarded to the 132.199.1.0/24-network, simply because it's the network's backbone, the most important part of the network, which carries all the traffic that passes between several subnets. Almost all other networks besides 132.199.15.0/24 are attached to the backbone in a similar manner.
But what, if we had hooked up another subnet to 132.199.15.0/24 instead of 132.199.1.0/24? Maybe something the situation displayed in Figure 11-2.
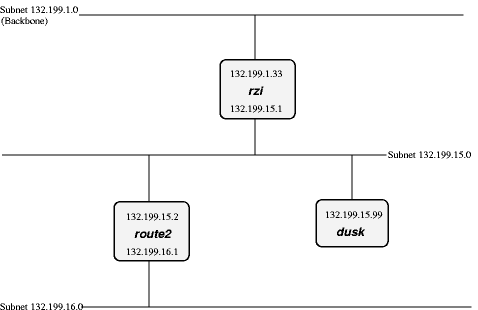
When we now want to reach a host which is located in the 132.199.16.0/24-subnet from dusk, it won't work routing it to rzi, but you'll have to send it directly to route2 (132.199.15.2). Dusk will have to know to forward those packets to route2 and send all the others to rzi.
When configuring dusk, you tell it to forward all packets for the 132.199.16.0/24-subnet to route2, and all others to rzi. Instead of specifying this default as 132.199.1.0/24, 132.199.2.0/24, etc., 0.0.0.0 can be used to set the default-route.
Returning to Figure 11-1, there's a similar problem when dawn wants to send to noon, which is connected to dusk via a serial line running. When looking at the IP-addresses, noon seems to be attached to the 132.199.15.0-network, but it isn't really. Instead, dusk is used as gateway, and dawn will have to send its packets to dusk, which will forward them to noon then. The way dusk is forced into accepting packets that aren't destined at it but for a different host (noon) instead is called "proxy arp".
The same goes when hosts from other subnets want to send to noon. They have to send their packets to dusk (possibly routed via rzi),
11.1.6 Name Service Concepts
In the previous sections, when we talked about hosts, we referred to them by their IP-addresses. This was necessary to introduce the different kinds of addresses. When talking about hosts in general, it's more convenient to give them "names", as we did when talking about routing.
Most applications don't care whether you give them an IP address or an hostname. However, they'll use IP addresses internally, and there are several methods for them to map hostnames to IP addresses, each one with its own way of configuration. In this section we'll introduce the idea behind each method, in the next chapter, we'll talk about the configuration-part.
The mapping from hostnames (and domainnames) to IP-addresses is done by a piece of software called the "resolver". This is not an extra service, but some library routines which are linked to every application using networking-calls. The resolver will then try to resolve (hence the name ;-) the hostnames you give into IP addresses. See [RFC1034] and [RFC1035] for details on the resolver.
Hostnames are usually up to 10 characters long, and contain letters, numbers and dashes ("-"); case is ignorred.
Just as with networks and subnets, it's possible (and desirable) to group hosts into domains and subdomains. When getting your network-address, you usually also obtain a domainname by your provider. As with subnets, it's up to you to introduce subdomains. Other as with IP-addresses, (sub)domains are not directly related to (sub)nets; for example, one domain can contain hosts from several subnets.
Figure 11-1 shows this: Both subnets 132.199.1.0/24 and 132.199.15.0/24 (and others) are part of the subdomain "rz.uni-regensburg.de". The domain the University of Regensburg got from it's IP-provider is "uni-regensburg.de" (".de" is for Deutschland, Germany), the subdomain "rz" is for Rechenzentrum, computing center.
Hostnames, subdomain- and domainnames are separated by dots ("."). It's also possible to use more than one stage of subdomains, although this is not very common. An example would be fox_in.socs.uts.edu.au.
A hostname which includes the (sub)domain is also called a fully qualified domain name (FQDN). For example, the IP-address 132.199.15.99 belongs to the host with the FQDN dusk.rz.uni-regensburg.de.
Further above I told you that the IP-address 127.0.0.1 always belongs to the local host, regardless what's the "real" IP-address of the host. Therefore, 127.0.0.1 is always mapped to the name "localhost".
The three different ways to translate hostnames into IP addresses are: /etc/hosts, the Domain Name Service (DNS) and the Network Information Service (NIS).
11.1.6.1 /etc/hosts
The first and most simplest way to translate hostnames into IP-addresses is by using a table telling which IP address belongs to which hostname(s). This table is stored in the file /etc/hosts and has the following format:
IP-address hostname [nickname [...]]
Lines starting with a hash mark ("#") are treated as comments. The other lines contain one IP-address and the corresponding hostname(s).
It's not possible for a hostname to belong to several IP addresses, even if I made you think so when talking about routing. rzi for example has really two distinct names for each of its two addresses: rzi and rzia (but please don't ask me which name belongs to which address!).
Giving a host several nicknames can be convenient if you want to specify your favourite host providing a special service with that name, as is commonly done with FTP-servers. The first (leftmost) name is usually the real (canonical) name of the host.
Besides giving nicknames, it's also convenient to give a host's full name (including domain) as its canonical name, and using only its hostname (without domain) as a nickname.
Important: There must be an entry mapping localhost to 127.0.0.1!
11.1.6.2 Domain Name Service (DNS)
/etc/hosts bears an inherent problem, especially in big networks: when one host is added or one hosts's address changes, all the /etc/hosts' on all machines have to be changed! This is not only time-consuming, it's also very likely that there will be some errors and inconsistencies, leading to problems.
Another appoach is to hold only one hostnames-table (-database) for a network, and make all the clients query that "nameserver". Updates will be made only on the nameserver.
This is the basic idea behind the Domain Name Service (DNS).
Usually, there's one nameserver for each domain (hence DNS), and every host (client) in that domain knows which domain it is in and which nameserver to query for its domain.
When the DNS gets a query about an host which is not in its domain, it will forward the query to a DNS which is either the DNS of the domain in question or knows which DNS to ask for the specified domain. If the DNS forwarded the query doesn't know how to handle it, it will forward that query again to a DNS one step higher. This is not ad infinitum, there are several "root"-servers, which know about any domain.
See Chapter 12 for details on DNS.
11.1.6.3 Network Information Service (NIS/YP)
Yellow Pages (YP) was invited by Sun Microsystems. The name has been changed into Network Information Service (NIS) because YP was already a trademark of the british telecom. So, when I'll talk about NIS you'll know what I mean. ;-)
There are quite some configuration files on a unix-system, and often it's desired to maintain only one set of those files for a couple of hosts. Those hosts are grouped together in a NIS-domain (which has nothing to do with the domains built by using DNS!) und are usually contained in one workstation cluster.
Examples for the config-files shared among those hosts are /etc/passwd, /etc/group and - last but not least - /etc/hosts.
So, you can "abuse" NIS for getting a unique name-to-address-translation on all hosts throughout one (NIS-)domain.
There's only one drawback, which prevents NIS from actually being used for that translation: In contrast to the DNS, NIS provides no way to resolve hostnames which are not in the hosts-table. There's no hosts "one level up" which the NIS-server can query, and so the translation will fail! Suns NIS+ takes measures against that problem, but as NIS+ is only available on Solaris-systems, this is of little use for us now.
Don't get me wrong: NIS is a fine thing for managing e.g. user-information (/etc/passwd, ...) in workstation-clusters, it's simply not too useful for resolving hostnames.
11.1.6.4 Other
The name resolving methods described above are what's used commonly today to resolve hostsnames into IP addresses, but they aren't the only ones. Basically, every database mechanism would do, but none is implemented in NetBSD. Let's have a quick look what you may encounter.
With NIS lacking hierarchy in data structures, NIS+ is intended to help out in that field. Tables can be setup in a way so that if a query cannot be answered by a domain's server, there can be another domain "above" that might be able to do so. E.g. you could choose to have a domain that lists all the hosts (users, groups, ...) that are valid in the whole company, one that defines the same for each division, etc. NIS+ is not used a lot today, even Sun went back to ship back NIS by default.
Last century, the X.500 standard was designed to accomodate both simple databases like /etc/hosts as well as comples, hierarchical systems as can be found e.g. in DNS today. X.500 wasn't really a success, mostly due to the fact that it tried to do too much at the same time. A cut-down version is available today as the Lightweight Directory Access Protocol (LDAP), which is becoming popular in the last years to manage data like users but also hosts and others in small to medium sized organisations.
11.1.7 Next generation Internet protocol - IPv6
11.1.7.1 The Future of the Internet
According to experts, the Internet as we know it will face a serious problem in a few years. Due to it's rapid growth and the limitations in it's design, there will be a point at which no more free addresses are available for connecting new hosts. At that point, no more new web servers can be set up, no more users can sign up for accounts at ISPs, no more new machines can be setup to access the web or participate in online games - some people may call this a serious problem.
Several approaches have been made to solve the problem. A very popular one is to not assign a worldwide unique address to every users' machine, but rather to assign them "private" addresses, and hide several machines behind one official, globally unique address. This approach is called "Network Address Translation" (NAT, also known as IP Masquerading). It has problems, as the machines hidden behind the global address can't be addressed, and as a result of this, opening connections to them - which is used in online gaming, peer to peer networking, etc. - is not possible. For a more in-depth discussion of the drawbacks of NAT, see [RFC3027].
A different approach to the problem of internet addresses getting scarce is to abandon the old Internet protocol with it's limited addressing capabilities, and use a new protocol that does not have these limitations. The protocol - or actually, a set of protocols - used by machines connected to form today's Internet is know as the TCP/IP (Transmission Control Protocol, Internet Protocol) suite, and version 4 currently in use has all the problems described above. Switching to a different protocol version that does not have these problems of course requires for a 'better' version to be available, which actually is. Version 6 of the Internet Protocol (IPv6) does fulfill any possible future demands on address space, and also addresses further features such as privacy, encryption, and better support of mobile computing.
Assuming a basic understanding of how today's IPv4 works, this text is intended as an introduction to the IPv6 protocol. The changes in address formats and name resolution are covered. With the background given here, Section 11.3.4 will show how to use IPv6 even if your ISP doesn't offer it by using a simple yet efficient transition mechanism called 6to4. The goal is to to get online with IPv6, giving example configuration for NetBSD.
11.1.7.2 What good is IPv6?
When telling people to migrate from IPv4 to IPv6, the question you usually hear is "why?". There are actually a few good reasons to move to the new version:
-
Bigger address space
-
Support for mobile devices
-
Built-in security
11.1.7.2.1 Bigger Address Space
The bigger address space that IPv6 offers is the most obvious enhancement it has over IPv4. While today's internet architecture is based on 32-bit wide addresses, the new version has 128 bit available for addressing. Thanks to the enlarged address space, work-arounds like NAT don't have to be used any more. This allows full, unconstrained IP connectivity for today's IP based machines as well as upcoming mobile devices like PDAs and cell phones will benefit from full IP access through GPRS and UMTS.
11.1.7.2.2 Mobility
When mentioning mobile devices and IP, another important point to note is that some special protocol is needed to support mobility, and implementing this protocol - called "Mobile IP" - is one of the requirements for every IPv6 stack. Thus, if you have IPv6 going, you have support for roaming between different networks, with everyone being updated when you leave one network and enter the other one. Support for roaming is possible with IPv4 too, but there are a number of hoops that need to be jumped in order to get things working. With IPv6, there's no need for this, as support for mobility was one of the design requirements for IPv6. See [RFC3024] for some more information on the issues that need to be addressed with Mobile IP on IPv4.
11.1.7.2.3 Security
Besides support for mobility, security was another requirement for the successor to today's Internet Protocol version. As a result, IPv6 protocol stacks are required to include IPsec. IPsec allows authentication, encryption and compression of any IP traffic. Unlike application level protocols like SSL or SSH, all IP traffic between two nodes can be handled, without adjusting any applications. The benefit of this is that all applications on a machine can benefit from encryption and authentication, and that policies can be set on a per-host (or even per-network) base, not per application/service. An introduction to IPsec with a roadmap to the documentation can be found in [RFC2411], the core protocol is described in [RFC2401].
11.1.7.3 Changes to IPv4
After giving a brief overview of all the important features of IPv6, we'll go into the details of the basics of IPv6 here. A brief understanding of how IPv4 works is assumed, and the changes in IPv6 will be hilighted. Starting with IPv6 addresses and how they're split up we'll go into the various types of addresses there are, what became of broadcasts, then after discussing the IP layer go into changes for name resolving and what's new in DNS for IPv6.
11.1.7.3.1 Addressing
An IPv4 address is a 32 bit value, that's usually written in "dotted quad" representation, where each "quad" represents a byte value between 0 and 255, for example:
127.0.0.1
This allows a theoretical number of 232 or ~4 billion hosts to be connected on the internet today. Due to grouping, not all addresses are available today.
IPv6 addresses use 128 bit, which results in 2128 theoretically addressable hosts. This allows for a Really Big number of machines to addressed, and it sure fits all of today's requirements plus all those nifty PDAs and cell phones with IP phones in the near future without any sweat. When writing IPv6 addresses, they are usually divided into groups of 16 bits written as four hex digits, and the groups are separated by colons. An example is:
fe80::2a0:d2ff:fea5:e9f5
This shows a special thing - a number of consecutive zeros can be abbreviated by a single "::" once in the IPv6 address. The above address is thus equivalent to fe80:0:00:000:2a0:d2ff:fea5:e9f5 - leading zeros within groups can be omitted.
To make addresses manageable, they are split in two parts, which are the bits identifying the network a machine is on, and the bits that identify a machine on a (sub)network. The bits are known as netbits and hostbits, and in both IPv4 and IPv6, the netbits are the "left", most significant bits of an IP address, and the host bits are the "right", least significant bits, as shown in Figure 11-3.

In IPv4, the border is drawn with the aid of the netmask, which can be used to mask all net/host bits. Typical examples are 255.255.0.0 that uses 16 bit for addressing the network, and 16 bit for the machine, or 255.255.255.0 which takes another 8 bit to allow addressing 256 subnets on e.g. a class B net.
When addressing switched from classful addressing to CIDR routing, the borders between net and host bits stopped being on 8 bit boundaries, and as a result the netmasks started looking ugly and not really manageable. As a replacement, the number of network bits is used for a given address, to denote the border, e.g.
10.0.0.0/24
is the same as a netmask of 255.255.255.0 (24 1-bits). The same scheme is used in IPv6:
2001:638:a01:2::/64
tells us that the address used here has the first (leftmost) 64 bits used as the network address, and the last (rightmost) 64 bits are used to identify the machine on the network. The network bits are commonly referred to as (network) "prefix", and the "prefixlen" here would be 64 bits.
Common addressing schemes found in IPv4 are the (old) class B and class C nets. With a class C network (/24), you get 24 bits assigned by your provider, and it leaves 8 bits to be assigned by you. If you want to add any subnetting to that, you end up with "uneven" netmasks that are a bit nifty to deal with. Easier for such cases are class B networks (/16), which only have 16 bits assigned by the provider, and that allow subnetting, i.e. splitting of the rightmost bits into two parts. One to address the on-site subnet, and one to address the hosts on that subnet. Usually, this is done on byte (8 bit) boundaries. Using a netmask of 255.255.255.0 (or a /24 prefix) allows flexible management even of bigger networks here. Of course there is the upper limit of 254 machines per subnet, and 256 subnets.
With 128 bits available for addressing in IPv6, the scheme commonly used is the same, only the fields are wider. Providers usually assign /48 networks, which leaves 16 bits for a subnetting and 64 hostbits.
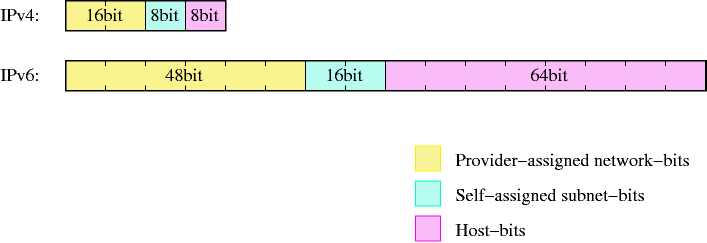
Now while the space for network and subnets here is pretty much ok, using 64 bits for addressing hosts seems like a waste. It's unlikely that you will want to have several billion hosts on a single subnet, so what is the idea behind this?
The idea behind fixed width 64 bit wide host identifiers is that they aren't assigned manually as it's usually done for IPv4 nowadays. Instead, IPv6 host addresses are recommended (not mandatory!) to be built from so-called EUI64 addresses. EUI64 addresses are - as the name says - 64 bit wide, and derived from MAC addresses of the underlying network interface. E.g. for ethernet, the 6 byte (48 bit) MAC address is usually filled with the hex bits "fffe" in the middle and a bit is set to mark the address as unique (which is true for Ethernet), e.g. the MAC address
01:23:45:67:89:ab
results in the EUI64 address
03:23:45:ff:fe:67:89:ab
which again gives the host bits for the IPv6 address as
::0323:45ff:fe67:89ab
These host bits can now be used to automatically assign IPv6 addresses to hosts, which supports autoconfiguration of IPv6 hosts - all that's needed to get a complete IPv6 address is the first (net/subnet) bits, and IPv6 also offers a solution to assign them automatically.
When on a network of machines speaking IP, there's usually one router which acts as the gateway to outside networks. In IPv6 land, this router will send "router advertisement" information, which clients are expected to either receive during operation or to solicit upon system startup. The router advertisement information includes data on the router's address, and which address prefix it routes. With this information and the host-generated EUI64 address, a IPv6-host can calculate it's IP address, and there is no need for manual address assignment. Of course routers still need some configuration.
The router advertisement information they create are part of the Neighbor Discovery Protocol (NDP, see [RFC2461]), which is the successor to IPv4's ARP protocol. In contrast to ARP, NDP does not only do lookup of IPv6 addresses for MAC addresses (the neighbor solicitation/advertisement part), but also does a similar service for routers and the prefixes they serve, which is used for autoconfiguration of IPv6 hosts as described in the previous paragraph.
11.1.7.3.2 Multiple Addresses
In IPv4, a host usually has one IP address per network interface or even per machine if the IP stack supports it. Only very rare applications like web servers result in machines having more than one IP address. In IPv6, this is different. For each interface, there is not only a globally unique IP address, but there are two other addresses that are of interest: The link local address, and the site local address. The link local address has a prefix of fe80::/64, and the host bits are built from the interface's EUI64 address. The link local address is used for contacting hosts and routers on the same network only, the addresses are not visible or reachable from different subnets. If wanted, there's the choice of either using global addresses (as assigned by a provider), or using site local addresses. Site local addresses are assigned the network address fec0::/10, and subnets and hosts can be addressed just as for provider-assigned networks. The only difference is, that the addresses will not be visible to outside machines, as these are on a different network, and their "site local" addresses are in a different physical net (if assigned at all). As with the 10/8 network in IPv4, site local addresses can be used, but don't have to. For IPv6 it's most common to have hosts assigned a link-local and a global IP address. Site local addresses are rather uncommon today, and are no substitute for globally unique adresses if global connectivity is required.
11.1.7.3.3 Multicasting
In IP land, there are three ways to talk to a host: unicast, broadcast and multicast. The most common one is by talking to it directly, using it's unicast address. In IPv4, the unicast address is the "normal" IP address assigned to a single host, with all address bits assigned. The broadcast address used to address all hosts in the same IP subnet has the network bits set to the network address, and all host bits set to "1" (which can be easily done using the netmask and some bit operations). Multicast addresses are used to reach a number of hosts in the same multicast group, which can be machines spread over the whole internet. Machines must join multicast groups explicitly to participate, and there are special IPv4 addresses used for multicast addresses, allocated from the 224/8 subnet. Multicast isn't used very much in IPv4, and only few applications like the MBone audio and video broadcast utilities use it.
In IPv6, unicast addresses are used the same as in IPv4, no surprise there - all the network and host bits are assigned to identify the target network and machine. Broadcasts are no longer available in IPv6 in the way they were in IPv4, this is where multicasting comes into play. Addresses in the ff::/8 network are reserved for multicast applications, and there are two special multicast addresses that supersede the broadcast addresses from IPv4. One is the "all routers" multicast address, the others is for "all hosts". The addresses are specific to the subnet, i.e. a router connected to two different subnets can address all hosts/routers on any of the subnets it's connected to. Addresses here are:
-
ff0X::1 for all hosts and
-
ff0X::2 for all routers,
where "X" is the scope ID of the link here, identifying the network. Usually this starts from "1" for the "node local" scope, "2" for the first link, etc. Note that it's perfectly ok for two network interfaces to be attached to one link, thus resulting in double bandwidth:

One use of the "all hosts" multicast is in the neighbor solicitation code of NDP, where any machine that wants to communicate with another machine sends out a request to the "all hosts" group, and the machine in question is expected to respond.
11.1.7.3.4 Name Resolving in IPv6
After talking a lot about addressing in IPv6, anyone still here will hope that there's a proper way to abstract all these long & ugly IPv6 addresses with some nice hostnames as one can do in IPv4, and of course there is.
Hostname to IP address resolving in IPv4 is usually done in one of three ways: using a simple table in /etc/hosts, by using the Network Information Service (NIS, formerly YP) or via the Domain Name System (DNS).
As of this writing, NIS/NIS+ over IPv6 is currently only available on Solaris 8, for both database contents and transport, using a RPCextension.
Having a simple address<->name map like /etc/hosts is supported in all IPv6 stacks. With the KAME implementation used in NetBSD, /etc/hosts contains IPv6 addresses as well as IPv4 addresses. A simple example is the "localhost" entry in the default NetBSD installation:
127.0.0.1               localhost
::1                     localhost
For DNS, there are no fundamentally new concepts. IPv6 name resolving is done with AAAA records that - as the name implies - point to an entity that's four times the size of an A record. The AAAA record takes a hostname on the left side, just as A does, and on the right side there's an IPv6 address, e.g.
noon IN AAAA 3ffe:400:430:2:240:95ff:fe40:4385
For reverse resolving, IPv4 uses the in-addr.arpa zone, and below that it writes the bytes (in decimal) in reversed order, i.e. more significant bytes are more right. For IPv6 this is similar, only that hex digits representing 4 bits are used instead of decimal numbers, and the resource records are also under a different domain, ip6.int.
So to have the reverse resolving for the above host, you would put into your /etc/named.conf something like:
zone "0.3.4.0.0.0.4.0.e.f.f.3.IP6.INT" {
        type master;
        file "db.reverse";
};
and in the zone file db.reverse you put (besides the usual records like SOA and NS):
5.8.3.4.0.4.e.f.f.f.5.9.0.4.2.0.2.0.0.0 IN PTR noon.ipv6.example.com.
The address is reversed here, and written down one hex digit after the other, starting with the least significant (rightmost) one, separating the hex digits with dots, as usual in zone files.
One thing to note when setting up DNS for IPv6 is to take care of the DNS software version in use. BIND 8.x does understand AAAA records, but it does not offer name resolving via IPv6. You need BIND 9.x for that. Beyond that, BIND 9.x supports a number of resource records that are currently being discussed but not officially introduced yet. The most noticeable one here is the A6 record which allows easier provider/prefix changing.
To sum up, this section talked about the technical differences between IPv4 and IPv6 for addressing and name resolving. Some details like IP header options, QoS and flows were deliberately left out to not make the this document more complex than necessary.
11.2 Practice
11.2.1 A walk throught the kernel configuration
Before we dive into configuring various aspects of network setup, we want to walk through the necessary bits that have to or can be present in the kernel. See Chapter 9 for more details on compiling the kernel, we will concentrate on the configuration of the kernel here. We will take the i386/GENERIC config file as an example here. Config files for other platforms should contain similar information, the comments in the config files give additional hints. Besides the information given here, each kernel option is also documented in the options(4) manpage, and there is usually a manpage for each driver too, e.g. tlp(4).
# $NetBSD: GENERIC,v 1.354.2.15 2001/05/06 15:18:54 he Exp $
The first line of each config file shows the version, which is 1.354.2.15 here. It can be used to compare against other versions via CVS, or when reporting bugs.
options NTP # NTP phase/frequency locked loop
If you want to run the Network Time Protocol (NTP), this option can be enabled for maximum precision. If the option is not present, NTP will still work. See ntpd(8) for more information.
file-system NFS # Network File System client
If you want to use another machine's harddisk via the Network File System (NFS), this option is needed. Section 11.3.2 gives more information on NFS.
options NFSSERVER # Network File System server
This option includes the server side of the NFS remote file sharing protocol. Enable if you want to allow other machines to use your harddisk. Section 11.3.2 contains more information on NFS.
#options GATEWAY # packet forwarding
If you want to setup a router that forwards packets between networks or network interfaces, setting this option is needed. If doesn't only switch on packet forwarding, but also increases some buffers. See options(4) for details.
options INET # IP + ICMP + TCP + UDP
This enables the TCP/IP code in the kernel. Even if you don't want/use networking, you will still need this for machine-internal communication of subsystems like the X Window System. See inet(4) for more details.
options INET6 # IPV6
If you want to use IPv6, this is your option. If you don't want IPv6, which is part of NetBSD since the 1.5 release, you can remove/comment out that option. See the inet6(4) manpage and Section 11.1.7 for more information on the next generation Internet protocol.
#options IPSEC # IP security
Includes support for the IPsec protocol, including key and policy management, authentication and compression. This option can be used without the previous option INET6, if you just want to use IPsec with IPv4, which is possible. See ipsec(4) for more information.
#options IPSEC_ESP # IP security (encryption part; define w/IPSEC)
This option is needed in addition to IPSEC if encryption is wanted in IPsec.
#options MROUTING # IP multicast routing
If multicast services like the MBone services should be routed, this option needs to be included. Note that the routing itself is controlled by the mrouted(8) daemon.
options         NS              # XNS
#options        NSIP            # XNS tunneling over IP
These options enables the Xerox Network Systems(tm) protocol family. It's not related to the TCP/IP protocol stack, and in rare use today. The ns(4) manpage has some details.
options         ISO,TPIP        # OSI
#options        EON             # OSI tunneling over IP
These options include the OSI protocol stack, that was said for a long time to be the future of networking. It's mostly history these days. :-) See the iso(4) manpage for more information.
options CCITT,LLC,HDLC # X.25
These options enable the X.25 protocol set for transmission of data over serial lines. It is/was used mostly in conjunction with the OSI protocols and in WAN networking.
options NETATALK # AppleTalk networking protocols
Include support for the AppleTalk protocol stack. Userland server programs are needed to make use of that. See pkgsrc/net/netatalk and pkgsrc/net/netatalk-asun for such packages. More information on the AppleTalk protocol and protocol stackk are available in the atalk(4) manpage.
options         PPP_BSDCOMP     # BSD-Compress compression support for PPP
options         PPP_DEFLATE     # Deflate compression support for PPP
options         PPP_FILTER      # Active filter support for PPP (requires bpf)
These options tune various aspects of the Point-to-Point protocol. The first two determine the compression algorithms used and available, while the third one enables code to filter some packets.
options         PFIL_HOOKS      # pfil(9) packet filter hooks
options         IPFILTER_LOG    # ipmon(8) log support
These options enable firewalling in NetBSD, using IPfilter. See the ipf(4) and ipf(8) manpages for more information on operation of IPfilter, and Section 11.3.1.1 for a configuration example.
# Compatibility with 4.2BSD implementation of TCP/IP.  Not recommended.
#options        TCP_COMPAT_42
This option is only needed if you have machines on the network that still run 4.2BSD or a network stack derived from it. If you've got one or more 4.2BSD-systems on your network, you've to pay attention to set the right broadcast-address, as 4.2BSD has a bug in its networking code, concerning the broadcast address. This bug forces you to set all host-bits in the broadcast-address to "0". The TCP_COMPAT_42 option helps you ensuring this.
options NFS_BOOT_DHCP,NFS_BOOT_BOOTPARAM
These options enable lookup of data via DHCP or the BOOTPARAM protocol if the kernel is told to use a NFS root file system. See the diskless(8) manpage for more information.
# Kernel root file system and dump configuration.
config          netbsd  root on ? type ?
#config         netbsd  root on sd0a type ffs
#config         netbsd  root on ? type nfs
These lines tell where the kernel looks for it's root file system, and which filesystem type it is expected to have. If you want to make a kernel that uses a NFS root filesystem via the tlp0 interface, you can do this with "root on tlp0 type nfs". If a ? is used instead of a device/type, the kernel tries to figure one out on it's own.
# ISA serial interfaces
com0    at isa? port 0x3f8 irq 4        # Standard PC serial ports
com1    at isa? port 0x2f8 irq 3
com2    at isa? port 0x3e8 irq 5
If you want to use PPP or SLIP, you will need some serial (com) interfaces. Others with attachment on USB, PCMCIA or PUC will do as well.
# Network Interfaces
This rather long list contains all sort of network drivers. Please pick the one that matches your hardware, according to the comments. For most drivers, there's also a manual page available, e.g. tlp(4), ne(4), etc.
# MII/PHY support
This section lists media independent interfaces for network cards. Pick one that matches your hardware. If in doubt, enable them all and see what the kernel picks. See the mii(4) manpage for more information.
# USB Ethernet adapters
aue*    at uhub? port ?         # ADMtek AN986 Pegasus based adapters
cue*    at uhub? port ?         # CATC USB-EL1201A based adapters
kue*    at uhub? port ?         # Kawasaki LSI KL5KUSB101B based adapters
USB-ethernet adapters only have about 2MBit/s bandwidth, but they are very convenient to use. Of course this needs other USB related options which we won't cover here, as well as the necessary hardware. See the corresponding manpages for more information.
# network pseudo-devices
pseudo-device   bpfilter        8       # Berkeley packet filter
This pseudo-device allows sniffing packets of all sorts. It's needed for tcpdump, but also rarpd and some other applications that need to know about network traffic. See bpf(4) for more information.
pseudo-device ipfilter # IP filter (firewall) and NAT
This one enables the IPfilter's packet filtering kernel interface used for firewalling, NAT (IP Masquerading) etc. See ipf(4) and Section 11.3.1.1 for more information.
pseudo-device loop # network loopback
This is the "lo0" software loopback network device which is used by some programs these days, as well as for routing things. Should not be omited. See lo(4) for more details.
pseudo-device ppp 2 # Point-to-Point Protocol
If you want to use PPP either over a serial interface or ethernet (PPPoE), you will need this option. See ppp(4) for details on this interface.
pseudo-device sl 2 # Serial Line IP
Serial Line IP is a simple encapsulation for IP over (well :) serial lines. It does not include negotiation of IP addresses and other options, which is the reason that it's not in widespread use today any more. See sl(4).
pseudo-device strip 2 # Starmode Radio IP (Metricom)
If you happen to have one of the old Metricon Ricochet packet radio wireless network devices, use this pseudo-device to use it. See the strip(4) manpage for detailled information.
pseudo-device tun 2 # network tunneling over tty
This network device can be used to tunnel network packets to a device file, /dev/tun*. Packets routed to the tun0 interface can be read from /dev/tun0, and data written to /dev/tun0 will be sent out the tun0 network interface. This can be used to implement e.g. QoS routing in userland. See tun(4) for details.
pseudo-device gre 2 # generic L3 over IP tunnel
The GRE encapsulation can be used to tunnel arbitrary layer 3 packets over IP, e.g. to implement VPNs. See gre(4) for more.
pseudo-device ipip 2 # IP Encapsulation within IP (RFC 2003)
Another IP-in-IP encapsulation device, with a different encapsulation format. See the ipip(4) manpage for details.
pseudo-device gif 4 # IPv[46] over IPv[46] tunnel (RFC 1933)
Using the GIF interface allows to tunnel e.g. IPv6 over IPv4, which can be used to get IPv6 connectivity if no IPv6-capable uplink (ISP) is available. Other mixes of operations are possible, too. See the gif(4) manpage for some examples.
#pseudo-device faith 1 # IPv[46] tcp relay translation i/f
The faith interface captures IPv6 TCP traffic, for implementing userland IPv6-to-IPv4 TCP relays e.g. for protocol transitions. See the faith(4) manpage for more details on this device.
#pseudo-device stf 1 # 6to4 IPv6 over IPv4 encapsulation
This add a network device that can be used to tunnel IPv6 over IPv4 without setting up a configured tunnel before. The source address of outgoing packets contains the IPv4 address, which allows routing replies back via IPv4. See the stf(4) manpage and Section 11.3.4 for more details.
pseudo-device vlan # IEEE 802.1q encapsulation
This interface provides support for IEEE 802.1Q Virtual LANs, which allows tagging Ethernet frames with a "vlan" ID. Using properly configured switchens (that also have to support VLAN, of course), this can be used to build virtual LANs where one set of machines doesn't see traffic from the other (broadcast and other). The vlan(4) manpage tells more about this.
11.2.2 Overview of the network configuration files
The following is a list of the files used to configure the network. The usage of these files, some of which have already been met the first chapters, will be described in the following sections.
- /etc/hosts
-
Local hosts database file. Each line contains information regarding a known host and contains the internet address, the host's name and the aliases. Small networks can be configured using only the hosts file, without a name server.
- /etc/resolv.conf
-
This file specifies how the routines which provide access to the Internet Domain Name System should operate. Generally it contains the addresses of the name servers.
- /etc/ifconfig.xxx
-
This file is used for the automatic configuration of the network card at boot.
- /etc/mygate
-
Contains the IP address of the gateway.
- /etc/nsswitch.conf
-
Name service switch configuration file. It controls how a process looks up various databases containing information regarding hosts, users, groups, etc. Specifically, this file defines the order to look up the databases. For example, the line:
hosts: files dns
specifies that the hosts database comes from two sources, files (the local /etc/hosts file) and DNS, (the Internet Domain Name System) and that the local files are searched before the DNS.
It is usually not necessary to modify this file.
11.2.3 Connecting to the Internet
There are many types of Internet connections: this section explains how to connect to a provider using a modem over a telephone line using the PPP protocol, a very common setup. In order to have a working connection, the following steps must be done:
-
Get the necessary information from the provider.
-
Edit the file /etc/resolv.conf and check /etc/nsswitch.conf.
-
Create the directories /etc/ppp and /etc/ppp/peers if they don't exist.
-
Create the connection script, the chat file and the pppd options file.
-
Created the user-password authentication file.
Judging from the previous list it looks like a complicated procedure that requires a lot of work. Actually, the single steps are very easy: it's just a matter of modifying, creating or simply checking some small text files. In the following example it will be assumed that the modem is connected to the second serial port /dev/tty01 (COM2 in DOS.)
11.2.3.1 Getting the connection information
The first thing to do is ask the provider the necessary information for the connection, which means:
-
The phone number of the nearest POP.
-
The authentication method to be used.
-
The username and password for the connection.
-
The IP addresses of the name servers.
11.2.3.2 resolv.conf and nsswitch.conf
The /etc/resolv.conf file must be configured using the information supplied by the provider, expecially the addresses of the DNS. In this example the two DNS will be "194.109.123.2" and "191.200.4.52".
Note: the last line (lookup file bind) indicates that the name servers will be used only for the names which are not present in the /etc/hosts file. The line is commented, because starting with NetBSD 1.4 it is not needed any more; this type of information is now defined in the /etc/nsswitch.conf file. The new Name Service Switch changes the access to the databases used by programs to find the base system information.
And now an example of the /etc/nsswitch.conf file.
Example 11-2. nsswitch.conf
# /etc/nsswitch.conf
group:         compat
group_compat:  nis
hosts:         files dns
netgroup:      files [notfound=return] nis
networks:      files
passwd:        compat
passwd_compat: nis
Note: only one line has been modified, the one beginning with the word "hosts:"; when resolving host names, the local hosts file will be searched before resorting to DNS.
11.2.3.3 Creating the directories for pppd
The directories /etc/ppp and /etc/ppp/peers will contain the configuration files for the PPP connection. After a fresh install of NetBSD they don't exist and must be created (chmod 700.)
11.2.3.4 Connection script and chat file
The connection script will be used as a parameter on the pppd command line; it is located in /etc/ppp/peers and has usually the name of the provider. For example, if the provider's name is BigNet and your user name for the connection to the provider is alan, an example connection script could be:
Example 11-3. Connection script
# /etc/ppp/peers/bignet
connect '/usr/sbin/chat -v -f /etc/ppp/peers/bignet.chat'
noauth
user alan
remotename bignet.it
In the previous example, the script specifies a chat file to be used for the connection. The options in the script are detailed in the pppd(8) man page.
Note: if you are experiencing connection problems, add the following two lines to the connection script
debug
kdebug 4
You will get a log of the operations performed when the system tries to connect. See pppd(8), syslog.conf(5).
The connection script calls the chat application to deal with the physical connection (modem initialization, dialing, ...) The parameters to chat can be specified inline in the connection script, but it is better to put them in a separate file. If, for example, the telephone number of the POP to call is 02 99999999, an example chat script could be:
Example 11-4. Chat file
# /etc/ppp/peers/bignet.chat
ABORT BUSY
ABORT "NO CARRIER"
ABORT "NO DIALTONE"
'' ATDT0299999999
CONNECT ''
Note: if you have problems with the chat file, you can try connecting manually to the POP with the cu program and verify the exact strings that you are receiving. See cu(1).
11.2.3.5 Authentication
During authentication each of the two systems verifies the identity of the other system, although in practice you are not supposed to authenticate the provider, but only to be verified by him, using one of the following methods.
-
login
-
PAP/CHAP
Most providers use a PAP/CHAP authentication.
11.2.3.5.1 PAP/CHAP authentication
The authentication information is stored in the /etc/ppp/pap-secrets for PAP and in /etc/ppp/chap-secrets for CHAP. The lines have the following format:
user * password
For example:
alan * pZY9o
Note: for security reasons the pap-secrets and chap-secrets files should be owned by root and have permissions "600".
11.2.3.5.2 Login authentication
This type of authentication is not widely used today; if the provider uses login authentication, user name and password must be supplied in the chat file instead of the PAP/CHAP files, because the chat file simulates an interactive login. In this case, set up appropriate permissions for the chat file.
The following is an example chat file with login authentication:
11.2.3.6 pppd options
The only thing left to do is the creation of the pppd options file, which is /etc/ppp/options (chmod 644).
Check the pppd(8) man page for the meaning of the options.
11.2.3.7 Testing the modem
Before activating the link it is a good idea to make a quick modem test, in order to verify that the physical connection and the communication with the modem works. For the test the cu program can be used, as in the following example.
-
Create the file /etc/uucp/port with the following lines:
type modem
port modem
device /dev/tty01
speed 115200
(substitute the correct device in place of /dev/tty01.)
-
Write the command cu -p modem to start sending commands to the modem. For example:
# cu -p modem
  Connected.
  ATZ
  OK
  ~.
  Disconnected.
  #
In the previous example the reset command (ATZ) was sent to the modem, which replied with OK: the communication works. To exit cu, write ~ (tilde) followed by . (dot), as in the example.
If the modem doesn't work, check that it is connected to the correct port (i.e. you are using the right port with cu. Cables are a frequent cause of trouble, too.
Note: when you start cu, if a message saying "Permission denied" appears, check who is the owner of the /dev/tty## device: it must be uucp. For example:
$ ls -l /dev/tty00
crw-------  1 uucp  wheel  8, 0 Mar 22 20:39 /dev/tty00
If the owner is root, the following happens:
$ ls -l /dev/tty00
crw-------  1 root  wheel  8, 0 Mar 22 20:39 /dev/tty00
$ cu -p modem
cu: open (/dev/tty00): Permission denied
cu: All matching ports in use
11.2.3.8 Activating the link
At last everything is ready to connect to the provider with the following command:
# pppd call bignet
where bignet is the name of the already described connection script. To see the connection messages of pppd, give the following command:
# tail -f /var/log/messages
To disconnect, do a kill -HUP of pppd.
11.2.3.9 Using a script for connection and disconnection
When the connection works correctly, it's time to write a couple of scripts to avoid repeating the commands every time. These two scripts can be named, for example, ppp-up and ppp-down.
ppp-up is used to connect to the provider:
Example 11-7. ppp-up
#!/bin/sh
MODEM=tty01
POP=bignet
if [ -f /var/spool/lock/LCK..$MODEM ]; then
  echo ppp is already running...
else
  pppd call $POP
  tail -f /var/log/messages
fi
ppp-down is used to close the connection:
Example 11-8. ppp-down
#!/bin/sh
MODEM=tty01
if [ -f /var/spool/lock/LCK..$MODEM ]; then
  echo -f killing pppd...
  kill -HUP `cat /var/spool/lock/LCK..$MODEM`
  echo done
else
  echo ppp is not active
fi
The two scripts take advantage of the fact that when pppd is active, it creates the file LCK..tty01 in the /var/spool/lock directory. This file contains the pid of the pppd process.
The two scripts must be executable:
# chmod u+x ppp-up ppp-down
11.2.4 Creating a small home network
Networking is one of the main strengths of Unix and NetBSD is no exception: networking is both powerful and easy to set up and inexpensive too, because there is no need to buy additional software to communicate or to build a server. Section 11.3.1 explains how to configure a NetBSD machine to act as a gateway for a network: with IPNAT all the hosts of the network can reach the Internet with a single connection to a provider made by the gateway machine. The only thing to be checked before creating the network is to buy network cards supported by NetBSD (check the INSTALL file for a list of supported devices.)
First, the network cards must be installed and connected to a hub, switch or directly (see Figure 11-6.)
Next, check that the network cards are recognized by the kernel, studying the output of the dmesg command. In the following example the kernel recognized correctly an NE2000 clone:
...
ne0 at isa0 port 0x280-0x29f irq 9
ne0: NE2000 Ethernet
ne0: Ethernet address 00:c2:dd:c1:d1:21
...
If the card is not recognized by the kernel, check that it is enabled in the kernel configuration file and then that the card's IRQ matches the one that the kernel expects. For example, this is the isa NE2000 line in the configuration file; the kernel expects the card to be at IRQ 9.
...
ne0 at isa? port 0x280 irq 9 # NE[12]000 ethernet cards
...
If the card's configuration is different, it will probably not be found at boot. In this case, either change the line in the kernel configuration file and compile a new kernel or change the card's setup (usually through a setup disk or, for old cards, a jumper on the card.)
The following command shows the network card's current configuration:
# ifconfig ne0
ne0: flags=8822<BROADCAST,NOTRAILERS,SIMPLEX,MULTICAST> mtu 1500 media: Ethernet 10base2
The software configuration of the network card is very easy. The IP address "192.168.1.1" (which is reserved for internal networks) is assigned to the card.
# ifconfig ne0 inet 192.168.1.1 netmask 0xffffff00
Repeating the previous command now gives a different result:
# ifconfig ne0
ne0: flags=8863<UP,BROADCAST,NOTRAILERS,RUNNING,SIMPLEX,MULTICAST> mtu 1500
          media: Ethernet 10base2
          inet 192.168.1.1 netmask 0xffffff00 broadcast 192.168.1.255
The output of ifconfig has now changed: the IP address is now printed and there are two new flags, "UP" and "RUNNING" If the interface isn't "UP", it will not be used by the system to send packets.
The host was given the IP address 192.168.1.1, which belongs to the set of addresses reserved for internal networks which are not reachable from the Internet. The configuration is finished and must now be tested; if there is another active host on the network, a ping can be tried. For example, if 192.168.1.2 is the address of the active host:
# ping 192.168.1.2
PING ape (192.168.1.2): 56 data bytes
64 bytes from 192.168.1.2: icmp_seq=0 ttl=255 time=1.286 ms
64 bytes from 192.168.1.2: icmp_seq=1 ttl=255 time=0.649 ms
64 bytes from 192.168.1.2: icmp_seq=2 ttl=255 time=0.681 ms
64 bytes from 192.168.1.2: icmp_seq=3 ttl=255 time=0.656 ms
^C
----ape PING Statistics----
4 packets transmitted, 4 packets received, 0.0% packet loss
round-trip min/avg/max/stddev = 0.649/0.818/1.286/0.312 ms
With the current setup, at the next boot it will be necessary to repeat the configuration of the network card. In order to avoid repeating the card's configuration at each boot, two things need to be done: first, create the file /etc/ifconfig.ne0 containing the following line:
inet 192.168.1.1 netmask 0xffffff00
Next, in the /etc/rc.conf file, set the following option
auto_ifconfig=YES
At the next boot the network card will be configured automatically.
The /etc/hosts file is a database of IP addresses and textual aliases: it should contain the addresses of all the hosts belonging to the internal network. For example:
Example 11-9. /etc/hosts
#     $NetBSD: hosts,v 1.6 2000/08/15 09:33:05 itojun Exp $
#
# Host Database
# This file should contain the addresses and aliases
# for local hosts that share this file.
# It is used only for "ifconfig" and other operations
# before the nameserver is started.
#
#
127.0.0.1             localhost
#
# RFC 1918 specifies that these networks are "internal".
# 10.0.0.0    10.255.255.255
# 172.16.0.0  172.31.255.255
# 192.168.0.0 192.168.255.255
192.168.1.1   ape.insetti.net ape
192.168.1.2   vespa.insetti.net vespa
192.168.1.0   insetti.net
The /etc/nsswitch.conf should be modified as explained in Example 11-2.
Note: in this example the file /etc/ifconfig.ne0 was created because the network card was recognized as ne0 by the kernel; if you are using a different adapter, substitute the appropriate name in place of ne0.
Summing up, to configure the network the following must be done: the network adapters must be installed and physically connected. Next they must be configured (with ifconfig) and, finally, the /etc/hosts and /etc/nsswitch.conf files must be modified. This type of network management in very simplified and is suited only for small networks without sophisticated needs.
11.2.5 Connecting two PCs through a serial line
If you need to transfer files between two PCs which are not networked there is a simple solution which is particularly handy when copying the files to a floppy is not practical: the two machines can be networked with a serial cable (a null modem cable.) The following sections describe some configurations.
11.2.5.1 Connecting NetBSD with BSD or Linux
The easiest case is when both machines run NetBSD: making a connection with the SLIP protocol is very easy. On the first machine write the following commands:
# slattach /dev/tty00
# ifconfig sl0 inet 192.168.1.1 192.168.1.2
On the second machine write the following commands:
# slattach /dev/tty00
# ifconfig sl0 inet 192.168.1.2 192.168.1.1
Now you can test the connection with ping; for example, on the second PC write:
# ping 192.168.1.1
If everything worked there is now an active network connection between the two machines and ftp, telnet and other similar commands can be executed. The textual aliases of the machines can be written in the /etc/hosts file.
-
In the previous example both PC's used the first serial port (/dev/tty0). Substitute the appropriate device if you are using another port.
-
IP addresses like 192.168.x.x are reserved for "internal" networks. The first PC has address 192.168.1.1 and the second 192.168.1.2.
-
To achieve a faster connection the -s speed option to slattach can be specified.
-
ftp can be used to transfer files only if inetd is active and the ftpd server is enabled.
Linux: if one of the two PC's runs Linux, the commands are slightly different (on the Linux machine only.) If the Linux machine gets the 192.168.1.2 address, the following commands are needed:
# slattach -p slip -s 115200 /dev/ttyS0 &
# ifconfig sl0 192.168.1.2 pointopoint 192.168.1.1 up
# route add 192.168.1.1 dev sl0
Don't forget the "&" in the first command.
11.2.5.2 Connecting NetBSD and Windows NT
NetBSD and Windows NT can be (almost) easily networked with a serial null modem cable. Basically what needs to be done is to create a "Remote Access" connection under Windows NT and to start pppd on NetBSD.
Start pppd as root after having created a .ppprc in /root. Use the following example as a template.
connect '/usr/sbin/chat -v CLIENT CLIENTSERVER'
local
tty00
115200
crtscts
lock
noauth
nodefaultroute
:192.168.1.2
The meaning of the first line will be explained later in this section; 192.168.1.2 is the IP address that will be assigned by NetBSD to the Windows NT host; tty00 is the serial port used for the connection (first serial port.)
On the NT side a null modem device must be installed from the Control Panel (Modem icon) and a Remote Access connection using this modem must be created. The null modem driver is standard under Windows NT 4 but it's not a 100% null modem: when the link is activated, NT sends the string CLIENT and expects to receive the answer CLIENTSERVER. This is the meaning of the first line of the .ppprc file: chat must answer to NT when the connection is activated or the connection will fail.
In the configuration of the Remote Access connection the following must be specified: use the null modem, telephone number "1" (it's not used, anyway), PPP server, enable only TCP/IP protocol, use IP address and namservers from the server (NetBSD in this case.) Select the hardware control flow and set the port to 115200 8N1.
Now everything is ready to activate the connection.
-
Connect the serial ports of the two machines with the null modem cable.
-
Launch pppd on NetBSD. To see the messages of pppd: tail -f /var/log/messages).
-
Activate the Remote Access connection on Windows NT.
11.2.5.3 Connecting NetBSD and Windows 95
The setup for Windows 95 is similar to the one for Windows NT: Remote Access on Windows 95 and the PPP server on NetBSD will be used. Most (if not all) Windows 95 releases don't have the null modem driver, which makes things a little more complicated. The easiest solution is to find one of the available null modem drivers on the Internet (it's a small .INF file) and repeat the same steps as for Windows NT. The only difference is that the first line of the .ppprc file (the one that calls chat) can be removed.
If you can't find a real null modem driver for Windows 95 it's still possible to use a little trick:
-
Create a Remote Access connection like the one described in Section 11.2.5.2 but using the "Standard Modem".
-
In .ppprc substitute the line that calls chat with the following line
connect '/usr/sbin/chat -v ATH OK AT OK ATE0V1 OK AT OK ATDT CONNECT'
-
Activate the connection as described in Section 11.2.5.2.
In this way the chat program, called when the connection is activated, emulates what Windows 95 thinks is a standard modem, returning to Windows 95 the same answers that a standard modem would return. Whenever Windows 95 sends a modem command string, chat returns OK.
11.3 Advanced Topics
11.3.1 IPNAT
The mysterious acronym IPNAT hides the Internet Protocol Network Address Translation, which enables the routing of an internal network on a real network (Internet.) This means that with only one "real" IP, static or dynamic, belonging to a gateway running IPNAT, it is possible to create simultaneous connections to the Internet for all the hosts of the internal network.
Some usage examples of IPNAT can be found in the subdirectory /usr/share/examples/ipf: look at the files BASIC.NAT and nat-setup.
The setup for the example described in this section is detailed in Figure 11-6: host 1 can connect to the Internet calling a provider with a modem and getting a dynamic IP address. host 2 and host 3 can't communicate with the Internet with a normal setup: IPNAT allows them to do it: host 1 will act as a gateway for hosts 2 and 3.
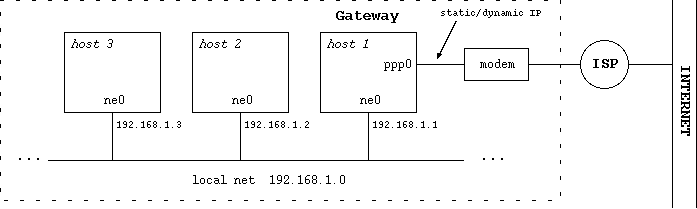
11.3.1.1 Configuring the gateway/firewall
To use IPNAT, in the kernel configuration file the "pseudo-device ipfilter" must be enabled in the kernel. To check if it is enabled in the current kernel:
# sysctl net.inet.ip.forwarding
net.inet.ip.forwarding = 1
If the result is "1" as in the previous example, the option is enabled, otherwise, if the result is "0" the option is disabled. You can do two things:
-
Compile a new kernel, with the GATEWAY option enabled by default.
-
Enable the option in the current kernel with the following command:
# sysctl -w net.inet.ip.forwarding=1
You can add sysctl settings to /etc/sysctl.conf to have them set automatically at boot. In this case you would want
net.inet.ip.forwarding=1
The rest of this section explains how to create an IPNAT configuration that is automatically started every time that a connection to the provider is activated with the PPP link. With this configuration all the host of a home network (for example) will be able to connect to the Internet through the gateway machine, even if they don't use NetBSD.
First, create the /etc/ipnat.conf file containing the following rules:
map ppp0 192.168.1.0/24 -> 0/32 proxy port ftp ftp/tcp
map ppp0 192.168.1.0/24 -> 0/32 portmap tcp/udp 40000:60000
map ppp0 192.168.1.0/24 -> 0/32
192.168.1.0/24 are the network addresses that should be mapped The first line of the configuration file is optional: it enables active FTP to work through the gateway. The second line is used to handle correctly tcp and udp packets; the portmapping is necessary because of the many to one relationship.) The third line is used to enable ICMP, ping, etc.
Create the /etc/ppp/ip-up file; it will be called automatically every time that the PPP link is activated.
#!/bin/sh
# /etc/ppp/ip-up
/etc/rc.d/ipnat forcestart
Create the file /etc/ppp/ip-down; it will be called automatically when the PPP link is closed.
#!/bin/sh
# /etc/ppp/ip-down
/etc/rc.d/ipnat forcestop
Both ip-up and ip-down must be executable:
# chmod u+x ip-up ip-down
The gateway machine is now ready.
11.3.1.2 Configuring the clients
Create a /etc/resolv.conf file like the one on the gateway machine.
Write the following command:
# route add default 192.168.1.1
192.168.1.1 is the address of the gateway machine configured in the previous section.
Of course you don't want to give this command every time, so it's better to define the "defaultroute" entry in the /etc/rc.conf file or, which is the same, write the address of the gateway in the /etc/mygate file: the default route will be set automatically during system initialization, using the contents of /etc/mygate (or the defaultroute option) as an argument to the route add default command.
If the client machine is not using NetBSD, the configuration will be different. On Windows PC's you need to set the gateway property of the TCP/IP protocol to the IP address of the NetBSD gateway.
That's all that needs to be done on the client machines.
11.3.1.3 Some useful commands
The following commands can be useful for diagnosing problems:
- ping
-
- netstat -r
-
Displays the routing tables (similar to route show).
- traceroute
-
On the client it shows the route followed by the packets to their destination.
- tcpdump
-
Use on the gateway to monitor TCP/IP traffic.
11.3.2 NFS
Now that the network is working it is possible to share files and directories over the network using NFS. From the point of view of file sharing, the computer which gives access to its files and directories is called the server, and the computer using these files and directories is the client. A computer can be client and server at the same time.
-
A kernel must be compiled with the appropriate options for the client and the server (the options are easy to find in the kernel configuration file. See Section 11.2.1 for more information on NFS related kernel options.
-
The server must enable its RPC services in /etc/inetd.conf.
-
In /etc/rc.conf the server must enable the inetd and portmap daemons and the nfs_server option.
-
In /etc/rc.conf the client must enable inetd and nfs_client.
-
The server must list the exported directories in /etc/exports and then run the command kill -HUP `cat /var/run/mountd.pid.
A client host can access a remote directory through NFS if:
-
The server host exports the directory.
-
The client host mounts the remote directory with the command mount server:/xx/yy /mnt
The mount command has a rich set of options for remote directories which are not very intuitive (to say the least.)
11.3.2.1 NFS setup example
Warning: I have taken this rather complicated example from a NetBSD mailing list and I haven't tested it; it should give an idea of how NFS works.
The scenario is the following: five client machines (cli1, ..., cli5) share some directories on a server (buzz.toys.org.) Some of the directories exported by the server are reserved for a specific client, the other directories are common for all client machines. All the clients boot from the server and must mount the directories.
The directories exported from the server are:
- /export/cli?/root
-
the five root directories for the five client machines. Each client has its own root directory.
- /export/cli?/swap
-
Five swap directories for the five swap machines.
- /export/common/usr
-
/usr directory; common for all client hosts.
- /usr/src
-
Common /usr/src directory for all client machines.
The following file systems exist on the server
/dev/ra0a on /
/dev/ra0f on /usr
/dev/ra1a on /usr/src
/dev/ra2a on /export
Each client needs the following file systems
buzz:/export/cli?/root on /
buzz:/export/common/usr on /usr
buzz:/usr/src on /usr/src
The server configuration is the following:
# /etc/exports
/usr/src -network 123.45.67.0 -mask 255.255.255.0
/export  -alldirs -maproot=root -network 123.45.67.0 -mask 255.255.255.0
On the client machines /etc/fstab contains
buzz:/export/cli?/root / nfs rw
buzz:/export/common/usr /usr nfs rw,nodev,nosuid
buzz:/usr/src /usr/src rw,nodev,nosuid
Each client machine has its number substituted to the "?" character in the first line of the previous example.
11.3.3 Setting up /net with amd
11.3.3.1 Introduction
The problem with NFS (and other) mounts is, that you usually have to be root to make them, which can be rather inconvenient for users. Using amd you can set up a certain directory (I'll take /net), under which one can make any NFS-mount as a normal user, as long as the filesystem about to be accessed is actually exported by the NFS server.
To check if a certain server exports a filesystem, and which ones, use the showmount-command with the -e (export) switch:
$ showmount -e wuarchive.wustl.edu
Exports list on wuarchive.wustl.edu:
/export/home                       onc.wustl.edu
/export/local                      onc.wustl.edu
/export/adm/log                    onc.wustl.edu
/usr                               onc.wustl.edu
/                                  onc.wustl.edu
/archive                           Everyone
If you then want to mount a directory to access anything below it (for example /archive/systems/unix/NetBSD), just change into that directory:
$ cd /net/wuarchive.wustl.edu/archive/systems/unix/NetBSD
The filesystem will be mounted (by amd), and you can a access any files just as if the directory was mounted by the superuser of your system.
11.3.3.2 Actual setup
You can set up such a /net directory with the following steps (including basic amd configuration):
-
in /etc/rc.conf, set the following variable:
amd=yes
-
mkdir /amd
-
mkdir /net
-
Taking /usr/share/examples/amd/master, put the following into /etc/amd/master:
/net /etc/amd/net
-
Taking /usr/share/examples/amd/net as example, put the following into /etc/amd/net:
/defaults type:=host;rhost:=${key};fs:=${autodir}/${rhost}/root * host==${key};type:=link;fs:=/ \ host!=${key};opts:=ro,soft,intr,nodev,nosuid,noconn -
Reboot, or (re)start amd by hand:
# sh /etc/rc.d/amd restart
11.3.4 IPv6 Connectivity & Transition via 6to4
This section will concentrate on how to get network connectivity for IPv6 and - as that's still not easy to get native today - talk in length about the alternatives to native IPv6 connectivity as a transitional method until native IPv6 peers are available.
Finding an ISP that offers IPv6 natively needs quite some luck. What you need next is a router that will be able to handle the traffic. To date, not all router manufacturers offer IPv6 support for their machines, and even if they do, it's unlikely that they offer hardware accelerated IPv6 routing or switching. A rather cheap alternative to the router hardware commonly in use today is using a standard PC and configure it as a router, e.g. by using some Linux or BSD derived operating system like NetBSD, and use software like Zebra for handling the routing protocols. This solution is rather common today for sites that want IPv6 connectivity today. The drawbacks are that you need an ISP that supports IPv6, and that you need dedicated uplink only for IPv6.
If this is not an option for you, you can still get IPv6 connectivity by using tunnels. Instead of talking IPv6 on the wire, the IPv6 packets are encapsulated in IPv4 packets, as shown in Figure 11-7. Using existing IPv4 infrastructure, the encapsulated packets are sent to a IPv6-capable uplink that will then remove the encapsulation, and forward the IPv6 packets via native IPv6.

When using tunnels, there are two possibilities. One is to use a so-called "configured" tunnel, the other is called an "automatic" tunnel. A "configured" tunnel is one that required preparation from both ends of the tunnel, usually connected with some kind of registration to exchange setup information. An example for such a configured tunnel is the IPv6-over-IPv4 encapsulation described in [RFC1933], and that's implemented e.g. by the gif(4) device found in NetBSD.
An "automatic" tunnel consists of a public server that has some kind of IPv6 connectivity, e.g. via 6Bone. That server has made it's connectivity data public, and also runs a tunneling protocol that does not require an explicit registration of the sites using it as uplink. A well-used example of such a protocol is the 6to4 mechanism described in [RFC3056], and that is implemented in the stf(4) device found in NetBSD's. Another mechanism that does not require registration of IPv6-information is the 6over4 mechanism, which implements transporting of IPv6 over a multicast-enabled IPv4 network, instead of e.g. ethernet or FDDI. 6over4 is documented in [RFC2529]. It's main drawback is that you do need existing multicast infrastructure. If you don't have that, setting it up is about as much effort as setting up a configured IPv6 tunnel directly, so it's usually not worth bothering in that case.
11.3.4.1 Getting 6to4 IPv6 up & running
6to4 is an easy way to get IPv6 connectivity for hosts that only have an IPv4 uplink, esp. if you have the background given in Section 11.1.7. It can be used with static as well as dynamically assigned IPv4 addresses, e.g. as found in modem dialup scenarios today. When using dynamic IPv4 addresses, a change of IP addresses will be a problem for incoming traffic, i.e. you can't run persistent servers.
Example configurations given in this section is for NetBSD 1.5.2.
11.3.4.2 Obtaining IPv6 Address Space for 6to4
The 6to4 IPv6 setup on your side doesn't consist of a single IPv6 address; Instead, you get a whole /48 network! The IPv6 addresses are derived from your (single) IPv4 address. The address prefix "2002:" is reserved for 6to4 based addresses (i.e. IPv6 addresses derived from IPv4 addresses). The next 32 bits are your IPv4 address. This results in a /48 network that you can use for your very own purpose. It leaves 16 bits space for 216 IPv6 subnets, which can take up to 264 nodes each. Figure 11-8 illustrates the building of your IPv6 address (range) from your IPv4 address.
Thanks to the 6to4 prefix and your worldwide unique IPv4 address, this address block is unique, and it's mapped to your machine carrying the IPv4 address in question.
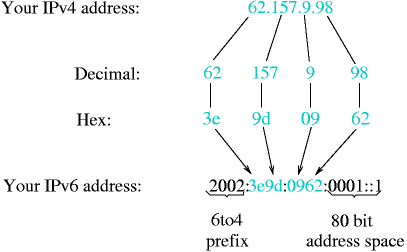
11.3.4.3 How to get connected
In contrast to the configured "IPv6-over-IPv4 tunnel" setup, you do not have to register at a 6bone-gateway, which will then forward you any IPv6 traffic (encapsulated in IPv4). Instead, as your IPv6 address is derived from your IPv4 address, any answers can be sent through your nearest 6to4 gateway to you. De-encapsulation of the packet is done via a 6to4-capable network interface, which then forwards the resulting IPv6 package according to your routing setup (in case you have more than one machine connected on your 6to4 assigned network).
For sending out IPv6 packets, the 6to4-capable network interface will take the IPv6 packet, and encapsulate it into a IPv4 packet. You still need a 6bone-connected 6to4-gateway as uplink that will de-encapsulate your packets, and forward them on over the 6Bone. Figure 11-9 illustrates this.
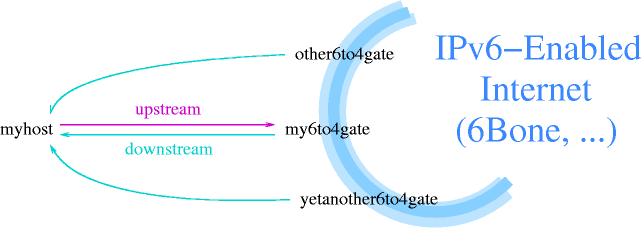
11.3.4.4 Security Considerations
In contrast to the "configured tunnel" setup, you usually can't setup packet filters to block 6to4-packets from unauthorized sources, as this is exactly how (and why) 6to4 works at all. As such, malicious users can send packets with invalid/hazardous IPv6 payload. If you don't already filter on your border gateways anyways, packets with the following characteristics should not be allowed as valid 6to4 packets, and some firewalling seems to be justified for them:
-
unspecified IPv4 source/destination address: 0.0.0.0/8
-
loopback address in outer (v4) source/destination: 127.0.0.0/8
-
IPv4 multicast in source/destination: 224.0.0.0/4
-
limited broadcasts: 255.0.0.0/8
-
subnet broadcast address as source/destination: depends on your IPv4 setup
The NetBSD stf(4) manual page documents some common configuration mistakes intercepted by default by the KAME stack as well as some further advice on filtering, but keep in mind that because of the requirement of these filters, 6to4 is not perfectly secure. Still, if forged 6to4 packets become a problem, you can use IPsec authentication to ensure the IPv6 packets are not modified.
11.3.4.5 Data Needed for 6to4 Setup
In order to setup and configure IPv6 over 6to4, a few bits of configuration data must be known in advance. These are:
-
Your local IPv4 address. It can be determined using either the 'ifconfig -a' or 'netstat -i' commands on most Unix systems. If you use a NATing gateway or something, be sure to use the official, outside-visible address, not your private (10/8 or 192.168/16) one.
We will use 62.224.57.114 as the local IPv4 address in our example.
-
Your local IPv6 address, as derived from the IPv4 address. See Figure 11-8 on how to do that.
For our example, this is 2002:3ee0:3972:0001::1 (62.224.57.114 == 0x3ee03972, 0001::1 arbitrarily chosen).
-
The IPv6-address of the 6to4 uplink gateway you want to use. The IPv6 address will do, as it also contains the IPv4 address in the usual 6to4 translation.
We will use 2002:c25f:6cbf::1 (== 194.95.108.191 == 6to4.ipv6.fh-regensburg.de).
11.3.4.6 Kernel Preparation
To process 6to4 packets, the operating system kernel needs to know about them. For that a driver has to be compiled in that knows about 6to4, and how to handle it.
For a NetBSD kernel, put the following into your kernel config file to prepare it for using IPv6 and 6to4, e.g. on NetBSD use:
options INET6                 # IPv6
pseudo-device stf             # 6to4 IPv6 over IPv4 encapsulation
Note that the stf(4) device is not enabled by default. Rebuild your kernel, then reboot your system to use the new kernel. Please consult Chapter 9 for further information on configuring, building and installing a new kernel!
11.3.4.7 6to4 Setup
This section describes the commands to setup 6to4. In short, the steps performed here are:
-
Configure interface
-
Set default route
-
Setup Router Advertisement, if wanted
The first step in setting up 6to4 is assigning an IPv6 address to the 6to4 interface. This is achieved with the ifconfig(8) command. Assuming the example configuration above, the command for NetBSD is:
# ifconfig stf0 inet6 2002:3ee0:3972:1::1 prefixlen 16 alias (local)
After configuring the 6to4 device with these commands, routing needs to be setup, to forward all IPv6 traffic to the 6to4 (uplink) gateway. The best way to do this is by setting a default route, the command to do so is, for NetBSD:
# route add -inet6 default 2002:cdb2:5ac2::1 (remote)
Note that NetBSD's stf(4) device determines the IPv4 address of the 6to4 uplink from the routing table. Using this feature, it is easy to setup your own 6to4 (uplink) gateway if you have a IPv6 uplink, e.g. via 6Bone.
After these commands, you are connected to the IPv6-enabled world - Congratulations! Assuming name resolution is still done via IPv4, you can now ping a IPv6-site like www.kame.net or www6.NetBSD.org:
# /sbin/ping6 www.kame.net
As a final step in setting up IPv6 via 6to4, you will want to setup Router Advertisement if you have several hosts on your network. While it is possible to setup 6to4 on each node, doing so will result in very expensive routing from one node to the other - packets will be sent to the remote 6to4 gateway, which will then route the packets back to the neighbor node. Instead, setting up 6to4 on one machine and talking native IPv6 on-wire is the preferred method of handling things.
The first step to do so is to assign a IPv6-address to your ethernet. In the following example we will assume subnet "2" of the IPv6-net is used for the local ethernet and the MAC address of the ethernet interface is 12:34:56:78:9a:bc, i.e. your local gateway's ethernet interface's IP address will be 2002:3ee0:3972:2:1234:56ff:fe78:9abc. Assign this address to your ethernet interface, e.g.
# ifconfig ne0 inet6 alias 2002:3ee0:3972:2:1234:56ff:fe78:9abc
Here, "ne0" is an example for your ethernet card interface. This will most likely be different for your setup, depending on what kind of card is used.
Next thing that needs to be ensured for setting up the router is that it will actually forward packets from the local 6to4 device to the ethernet device and back. To enable IPv6 packet forwarding, set "ip6mode=router" in NetBSD's /etc/rc.conf, which will result in the "net.inet6.ip6.forwarding" sysctl being set to "1":
# sysctl -w net.inet6.ip6.forwarding=1
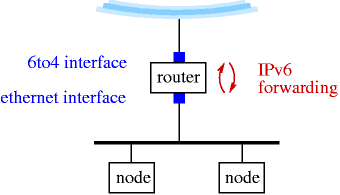
To setup router advertisement on BSD, the file /etc/rtadvd.conf needs to be checked. It allows configuration of many things, but usually the default config of not containing any data is ok. With that default, IPv6 addresses found on all of the router's network interfaces will be advertised.
After checking the router advertisement configuration is correct and IPv6 forwarding is turned on, the daemon handling it can be started. Under NetBSD, it is called 'rtadvd'. Start it up either manually (for testing it the first time) or via the system's startup scripts, and see all your local nodes automagically configure the advertised subnet address in addition to their already-existing link local address.
# rtadvd
11.3.4.8 Quickstart using pkgsrc/net/6to4
So far, we have described how 6to4 works and how to set it up manually. For an automated way to make everything happen e.g. when going online, the '6to4' package is convenient. It will determine your IPv6 address from the IPv4 address you got assigned by your provider, then set things up that you are connected.
Steps to setup the pkgsrc/net/6to4 package are:
-
Install the package either by compiling it from pkgsrc, or by pkg_add'ing the 6to4-1.1nb1 package.
# cd /usr/pkgsrc/net/6to4
# make install
-
Make sure you have the stf(4) pseudo-device in your kernel, see above.
-
Configure the '6to4' package. Frist, copy /usr/pkg/etc/6to4.conf-example to /usr/pkg/etc/6to4.conf, then adjust the variables. Note that the file is in perl syntax.
# cd /usr/pkg/etc
# cp 6to4.conf-example 6to4.conf
# vi 6to4.conf
Please see the 6to4(8) manpage for an explanation of all the variables you can set in 6to4.conf. If you have diapup IP via PPP, and don't want to run Router Advertizing for other IPv6 machines on your home or office network, you don't need to configure anything. If you want to setup Router Advertising, you need to set the in_if to the internal (ethernet) interface, e.g.
$in_if="rtk0"; # Inside (ethernet) interface
-
Now dial up, then start the 6to4 command manually:
# /usr/pkg/sbin/6to4.pl start
After that, you should be connected, use ping6(8) etc. to see if everything works. If it does, you can put the following lines into your /etc/ppp/ip-up script to run the command each time you go online:
logger -p user.info -t ip-up Configuring 6to4 IPv6
/usr/pkg/sbin/6to4.pl stop
/usr/pkg/sbin/6to4.pl start
-
If you want to route IPv6 for your LAN, you can instruct 6to4.pl to setup Router Advertising for you too:
# /usr/pkg/sbin/6to4 rtadvd-start
You can put that command into /etc/ppp/ip-up as well to make it permanent.
-
If you have changed /etc/ppp/ip-up to setup 6to4 automatically, you will most likely want to change /etc/ppp/ip-down too, to shut it down when you go offline. Here's what to put into /etc/ppp/ip-down:
logger -p user.info -t ip-down Shutting down 6to4 IPv6
/usr/pkg/sbin/6to4.pl rtadvd-stop
/usr/pkg/sbin/6to4.pl stop
11.3.4.9 Known 6to4 Gateway
There are not many public 6to4 gateways available today, and from the few available, you will want to chose the one closest to you, netwise. A list of known working 6to4 gateways is available at http://www.kfu.com/~nsayer/6to4/. In tests, only 6to4.kfu.com and 6to4.ipv6.microsoft.com were found working. Cisco has another one that you have to register to before using it, see http://www.cisco.com/ipv6/.
There's also an experimental 6to4 server located in Germany, 6to4.ipv6.fh-regensburg.de. This server runs under NetBSD 1.5 and was setup using the configuration steps described above. The whole configuration of the machine can be seen at http://www.feyrer.de/IPv6/netstart.local.
11.3.4.10 Conclusion & Further Reading
Compared to where IPv4 is today, IPv6 is still in it's early steps. It is working, there are all sort of services and clients available, only the userbase is missing. It is hoped the information provided here helps people better understand what IPv6 is, and to start playing with it.
A few links should be mentioned here for interested parties:
-
An example script to setup 6to4 on BSD based machines is available at http://www.NetBSD.org/packages/net/hf6to4/. The script determines your IPv6 address and sets up 6to4 and (if wanted) router advertising. It was designed to work in dialup setups with changing IPv4 addresses.
-
Given that there isn't a standard for IPv6 in Linux land today, there are different setup instructions for most distributions. The setup of IPv6 on Debian Linux can be found at http://people.debian.org/~csmall/ipv6/setup.html and http://www.mailgate.org/linux/linux.debian.ipv6/msg00137.html.
-
The BSD Unix implementations have their own IPv6 documentation each, interresting URLs are http://www.NetBSD.org/Documentation/network/ipv6/ for NetBSD, http://www.freebsd.org/doc/en_US.ISO8859-1/books/handbook/network-ipv6.html for FreeBSD and pages 61 and 62 of the BSD/OS Administrator's Guide at http://www.bsdi.com/products/internet/release-notes/rn42.pdf.
-
Projects working on implementing IPv6 protocol stacks for free Unix like operating systems are KAME for BSD and USAGI for Linux. Their web sites can be found at http://www.kame.net/ and http://www.linux-ipv6.org/. A list of host and router implementations can be found at http://playground.sun.com/pub/ipng/html/ipng-implementations.html.
-
Besides the official RFC archive at ftp://ftp.isi.edu/in-notes, information on IPv6 can be found at several web sites. First and foremost, the 6Bone's web page at http://www.6bone.net/ must be mentioned. 6Bone was started as the testbed for IPv6, and is now an important part of the IPv6-connected world. Other web pages that contain IPv6-related contents include http://www.ipv6.org/, http://playground.sun.com/pub/ipng/html/ and http://www.ipv6forum.com/. Most of these sites carry further links - be sure to have a look!
Bibliography
[RFC1055] J. L. Romkey, 1988, RFC 1055: Nonstandard for transmission of IP datagrams over serial lines: SLIP.
[RFC1331] W. Simpson, 1992, RFC 1331: The Point-to-Point Protocol (PPP) for the Transmission of Multi-protocol Datagrams over Point-to-Point Links.
[RFC1933] R. Gilligan and E. Nordmark, 1996, RFC 1933: Transition Mechanisms for IPv6 Hosts and Routers.
[RFC2461] T. Narten, E. Nordmark, and W. Simpson, 1998, RFC 2461: Neighbor Discovery for IP Version 6 (IPv6).
[RFC2529] B. Carpenter and C. Jung, 1999, RFC 2529: Transmission of IPv6 over IPv4 Domains without Explicit Tunnels.
Chapter 12 The Domain Name System
The Domain Name System on NetBSD. This chapter describes setting up a simple small domain with one Domain Name Server (DNS) on a NetBSD system. It does not provide a detailed overview of what DNS is, however, a brief explanation is offered. Further information can be obtained from the DNS Resources Directory (DNSRD) at http://www.dns.net/dnsrd/.
12.1 Notes and Pre-Requisites
The examples in this chapter refer to BIND major version 8, however, it should be noted that the data- base format and named.conf are almost 100% compatible between version. The only difference I noticed was that the "$TTL" information was not required.
The reader should have a good understanding of basic hosts to IP address mapping and IP address class specifications.
12.2 What is DNS?
The Domain Name System converts machine names to IP addresses. The mapping is done from name to address and address to name. The difference between just plain hosts IP mapping and Domain mapping is that DNS uses a hierarchichal naming standard. This hierarchy works from right-to-left with the highest level being on the right. As an example, here is a simple domain break-out:
TOP-LEVEL .org
|
MID-LEVEL .diverge.org
______________________|________________________
| | |
BOTTOM-LEVEL strider.diverge.org samwise.diverge.org wormtongue.diverge.org
It seems simple enough, however, the system can also be logically divided even further if one wishes at different points. The example shown above shows three nodes on the diverge.org domain, but we could even divide diverge.org into subdomains such as strider.net1.diverge.org, samwise.net2.diverge.org and wormtongue.net2.diverge.org, in this case, 2 nodes reside on net2.diverge.org and one on net1.diverge.org.
12.3 The DNS Files
Now let's look at actually setting up a small DNS enabled network. We will continue to use the examples mentioned above, before we begin we must make a few assumptions:
-
Our host-to-ip is working correctly
-
We have IPNAT working correctly
-
Currently all hosts use the ISP for DNS
Note: this type of configuration was described in Chapter 11.
Our Name Server will be the "strider" host, it also runs IPNAT and our two clients use strider as a gateway. It is not really relevant as to what type of interface is on strider, but for argument's sake we will say a 56k dial up connection.
So, before going any further, let's look at our hosts file on strider before we have made the alterations to use DNS.
Example 12-1. strider's /etc/hosts file
127.0.0.1       localhost
192.168.1.1     strider
192.168.1.2     samwise sam
192.168.1.3     wormtongue worm
not exactly a huge network, it is worth noting that the same rules apply for larger networks as we discuss in the context of this section.
12.3.1 /etc/namedb/named.conf
The NetBSD Operating System provides a set of default files for you to use or go from, they are stored in /etc/namedb, I strongly suggest making a backup copy of this directory for reference purposes.
The default directory contains the following files:
-
127
-
localhost
-
loopback.v6
-
named.conf
-
root.cache
You will see modified versions of these files in my configuration.
The first file we want to look at is /etc/namedb/named.conf. This file is the config file for bind (hence the catchy name). Setting up system like the one we are doing is relatively simple. First, here is what mine looks like:
options {
        directory "/etc/namedb";
        allow-transfer { 192.168.1.0/24; };
        recursion yes;
        allow-query { 192.168.1.0/24; };
        listen-on port 53 { 192.168.1.1; };
};
zone "localhost" {
   type master;
   notify no;
   file "localhost";
};
zone "127.IN-ADDR.ARPA" {
   type master;
   notify no;
   file "127";
};
zone "0.0.0.0.0.0.0.0.0.0.0.0.0.0.0.0.0.0.0.0.0.0.0.0.0.0.0.0.0.0.0.ip6.int" {
   type master;
   file "loopback.v6";
};
zone "diverge.org" {
   type master;
   notify no;
   file "diverge.org";
};
zone "1.168.192.in-addr.arpa" {
   type master;
   notify no;
   file "1.168.192";
};
zone "." in {
   type hint;
   file "root.cache";
};
Note that in my named.conf the root section is last, that is because there is another domain called diverge.org on the internet (I happen to own it) so I want the resolver to look out on the internet last. This is not normally the case on most systems.
Another very important thing to remember here is that if you have an internal setup, in other words no live internet connection and/or no need to do root server lookups, comment out the root zone. It may cause lookup problems if a particular client decides it wants to reference a domain on the internet.
Looks like a pretty big mess, upon closer examination it is revealed that many of the lines in each section are somewhat redundant. So we should only have to explain them a few times.
Lets go through the sections of named.conf:
12.3.1.1 options
This section defines some global parameters, most noticeable is the location of the DNS tables, on this particular system, they will be put in /etc/named.
Following are the rest of the params:
- allow-transfer
-
for remote DNS servers acting as secondaries and need zone file information from you.
- allow-query
-
what network may query this name server
- listen-on port
-
the port this server will run named on
The rest of the named.conf file consists of "zones", each zone has a file associated with and tables within that file for resolving that particular area (or, zone) of the domain. As is readily apparent, their format in named.conf is strikingly similar, so I will highlight just one of their records:
12.3.1.2 zone "diverge.org"
- type
-
the type of zone in all cases except "." they are master
- notify
-
do you want to send out notifications when your zone changes? Obviously not in this setup.
- file
-
the filename in our named directory where records about this particular zone may be found.
12.3.2 /etc/namedb/localhost
For the most part, the zone files look quite similar, however, each one does have some unique properties. Here is what the localhost file looks like:
Example 12-2. localhost
 1|$TTL    3600
 2|@              IN SOA  strider.diverge.org. hostmaster.diverge.org. (
 3|                        1       ; Serial
 4|                        8H      ; Refresh
 5|                        2H      ; Retry
 6|                        1W      ; Expire
 7|                        1D)     ; Minimum TTL
 8|                        IN NS   localhost.
 9|localhost.              IN      A       127.0.0.1
10|                        IN      AAAA    ::1
Line by line:
- Line 1
-
This is the Time To Live for lookups, this is generally the same in all of the files.
- Line 2
-
This line is generally the same in all zone files except root. Of specific interest on this line are strider.diverge.org. and root.diverge.org. Obviously one is the name of this server and the other is the contact for this DNS server, in most cases root seems a little ambiguous, it is preferred that a regular email account be used for the contact information (for example, mine would be jrf.diverge.org.).
- Line 3
-
This line is the serial number, most people use the date they installed the server in a format like so: MMDDYYYY. The serial number should be incremented each time there is a change to the file after it has been initially installed. That is why I prefer to just start with 1.
- Line 4
-
This is the refresh rate of the server, in this file it is set to once every 8 hours.
- Line 5
-
The retry rate.
- Line 6
-
Lookup expiry.
- Line 7
-
The minimum Time To Live
- Line 8
-
This is the Nameserver line, as you can see it is set to localhost.
- Line 9
-
This is the local host entry.
- Line 10
-
This line is the ipv6 entry.
12.3.3 /etc/named/zone.127.0.0
This is the reverse lookup file (or zone) for the localhost. It looks like this:
 1| $TTL    3600
 2| @              IN SOA  strider.diverge.org. root.diverge.org. (
 3|                        1       ; Serial
 4|                        8H      ; Refresh
 5|                        2H      ; Retry
 6|                        1W      ; Expire
 7|                        1D)     ; Minimum TTL
 8|                 IN NS   localhost.
 9| 1.0.0           IN PTR  localhost.
In this file, all of the lines are the same as the localhost zonefile with exception of line 9, this is the reverse lookup record. It is defined in a separate file because it is the localhost and has a totally different address than the remaining zones. Something we will discuss after looking at all of the zone files.
12.3.4 /etc/namedb/diverge.org
This zone file is populated by records for all of our hosts on the 192.168.1.0/24 network. Here is what it looks like:
 1| $TTL    3600
 2| @              IN SOA  strider.diverge.org. root.diverge.org. (
 3|                         1       ; serial
 4|                         8H      ; refresh
 5|                         2H      ; retry
 6|                         1W      ; expire
 7|                         1D )    ; minimum seconds
 8|                 IN NS   strider.diverge.org.
 9|                 IN MX   10 maila.diverge.org.   ; primary mail server
10|                 IN MX   20 mailb.diverge.org.   ; secondary mail server
11| strider         IN A     192.168.1.1
12| maila           IN CNAME strider.diverge.org.
13| samwise         IN A     192.168.1.2
14| www             IN CNAME samwise.diverge.org.
15| mailb
16| worm            IN A     192.168.1.3
There is a lot of new stuff here, so lets just look over each line that is new here:
- Line 12
-
This line shows our mail handler, in this case it is strider, but for scaling reasons, we want to call it maila. As you will see below this is not a big deal, the number that precedes maila.diverge.org. is the priority number, the lower the number their higher the priority. The way we are setup here is if strider cannot handle the mail, then mailb (which is really samwise) will.
- Line 12
-
CNAME stands for canonical name, or in lamens, an alias. So we have aliased the following:
maila.diverge.org to strider.diverge.org
mailb.diverge.org to samwise.diverge.org
www.diverge.org to samwise.diverge.org
The rest of the records are simply mappings of IP address to a full name.
12.3.5 /etc/namedb/1.168.192
This zone file is the reverse file for all of the host records, the format is similar to that of the localhost version with the obvious exception being the addresses are different:
 1|$TTL    3600
 2|@              IN SOA  strider.diverge.org. root.diverge.org. (
 3|                     1       ; serial
 4|                     8H      ; refresh
 5|                     2H      ; retry
 6|                     1W      ; expire
 7|                     1D )    ; minimum seconds
 8|                IN NS   strider.diverge.org.
 9|1               IN PTR  strider.diverge.org.
10|2               IN PTR  samwise.diverge.org.
11|3               IN PTR  worm.diverge.org.
12.3.6 /etc/namedb/root.cache
This file is a list of root servers for your server to query when it gets requests outside of it's own domain. Here are first few lines of a root zone file:
;       $NetBSD: root.cache,v 1.8 1997/08/24 15:50:47 perry Exp $
;
;       This file holds the information on root name servers needed to
;       initialize cache of Internet domain name servers
;       (e.g. reference this file in the "cache  .  file"
;       configuration file of BIND domain name servers).
;
;       This file is made available by InterNIC registration services
;       under anonymous FTP as
;           file                /domain/named.root
;           on server           FTP.RS.INTERNIC.NET
;       -OR- under Gopher at    RS.INTERNIC.NET
;           under menu          InterNIC Registration Services (NSI)
;              submenu          InterNIC Registration Archives
;           file                named.root
;
;       last update:    Aug 22, 1997
;       related version of root zone:   1997082200
;
;
; formerly NS.INTERNIC.NET
;
.                        3600000  IN  NS    A.ROOT-SERVERS.NET.
A.ROOT-SERVERS.NET.      3600000      A     198.41.0.4
;
; formerly NS1.ISI.EDU
;
.                        3600000      NS    B.ROOT-SERVERS.NET.
B.ROOT-SERVERS.NET.      3600000      A     128.9.0.107
;
; formerly C.PSI.NET
;
.                        3600000      NS    C.ROOT-SERVERS.NET.
C.ROOT-SERVERS.NET.      3600000      A     192.33.4.12
. . .
This file can be obtained from ISC at http://www.isc.org/ and usually comes with a distribution of BIND. A root.cache file is included with the NetBSD core Operating System.
12.4 Using DNS
In this section we will look at how to get DNS going and setup strider to use it's own services.
NetBSD already provides a dns caching server install (shown in the next section). Along with this are the tools to manage the server at runtime. Before that can start, however, we must look at how to properly initialize the server.
Setting up named to start automatically is quite simple. In /etc/defaults/rc.conf simply go to the line named and replace NO with YES. Additional options can be specified on that line in between the quotes, for example, I like to use -g nogroup -u nobody, so a non root account runs the named process.
In addition to being able to startup named at boot time, it can also be controlled with the ndc facility. In a nutshell the ndc facility can stop, start or restart the named server process. It can also do a great many other things (see the ndc man page for more details).
The general usage is ndc.
Next we want to point strider to itself for lookups. We have two simple steps, first, decide on our resolution order. On a network this small, it is likely that each host has a copy of the hosts table, so we can get away with using hosts then dns, however, on larger networks it is much easier to use DNS. Either way, the file where this is determined is /etc/nsswitch.conf (see Example 11-2.) Here is part of a typical nsswitch.conf:
. . .
group_compat:   nis
hosts:          files dns
netgroup:       files [notfound=return] nis
. . .
the line we are concerned with is hosts, files means the system uses /etc/hosts to determine ip to name translation. The entry on the left is the first method of resolution.
The next file is /etc/resolv.conf, this file is the dns resolution file, the format is pretty self explanatory but we will go over it anyway:
domain diverge.org
search diverge.org
nameserver 192.168.1.1
In a nutshell this file is telling the resolver that this machine belongs to diverge.org, should search it before looking elsewhere and the nameserver address is 192.168.1.1 .
To test our nameserver we can use several commands, for example:
# host www.blah.net
here is the output of running host www.yahoo.com:
www.yahoo.com is a nickname for www.yahoo.akadns.net
www.yahoo.akadns.net has address 216.32.74.50
www.yahoo.akadns.net has address 216.32.74.51
www.yahoo.akadns.net has address 216.32.74.52
www.yahoo.akadns.net has address 216.32.74.53
www.yahoo.akadns.net has address 216.32.74.55
The procedure for setting up the client hosts are the same, setup /etc/nsswitch.conf and /etc/resolv.conf.
12.5 Setting up a caching only name server
A caching only name server has no local zones; all the queries go to the root servers and the replies are accumulated in the local cache. The next time the query is performed the answer will be faster because the data is already in the server's cache. Since this type of server doesn't handle local zones, to resolve the names of the local hosts it will still be necessary to use the already known /etc/hosts file.
Since NetBSD supplies defaults for all the files needed by a caching only server, the configuration of this type of DNS is very easy, and can be performed with a few commands, without writing a single line in the configuration files.
Note: the number of the configuration files and their contents varies between versions of NetBSD.
The program which supplies the DNS server is the named daemon, which uses the named.conf configuration file for its setup. The default file supplied by NetBSD is located in the /etc/namedb directory, but the daemon looks for it in the /etc/ directory, so we start by creating a link:
# ln -s /etc/namedb/named.conf /etc/named.conf
The name server is ready for use! We can now tell to the system to use it adding the following line to the /etc/resolv.conf file:
nameserver 127.0.0.1
Now we can start named.
# named
Note: we have now started the name server manually. Once we have tested it and are confident that it works, we can launch it automatically at boot using the relevant option of the /etc/rc.conf file.
12.5.1 Testing the server
Now that the server is running we can test it using the nslookup program.
# nslookup
Default server: localhost
Address: 127.0.0.1
>
Let's try to resolve an host name, for example www.mclink.it (try a site near you.)
> www.mclink.it
Server:  localhost
Address:  127.0.0.1
Name:    www.mclink.it
Address:  195.110.128.8
If you repeat the query a second time, the result is slightly different:
> www.mclink.it
Server:  localhost
Address:  127.0.0.1
Non-authoritative answer:
Name:    www.mclink.it
Address:  195.110.128.8
As you've probably noticed, the address is the same, but the message "Non-authoritative answer", has appeared. This message indicates that the answer is not coming from an authoritative server for the domain mclink.it but from the cache of our own server.
The results of this first test confirm that the server is working correctly.
We can also try the host command, which gives the following result.
# host www.mclink.it
www.mclink.it has address 195.110.128.8
Chapter 13 Mail and news
This chapter explains how to set up NetBSD to use mail and news. Only a simple but very common setup is described: the configuration of a host connected to the Internet with a modem through a provider: think of this chapter as the continuation of Chapter 11, assuming a similar network configuration. Even this "simple" setup proves to be difficult if you don't know where to start or if you've only read introductory or technical documentation; in fact you will notice that some details are really challenging (for example, mapping your internal network names to "real" names requires a good knowledge of sendmail.) A general description of mail and news configuration is beyond the scope of this guide; please read a good Unix Administration book (some very good ones are listed on the NetBSD site.) The problem is in fact very complex because of the myriad of possible configurations and connections and because it's not enough to configure a single program: you need to correctly match the configuration of several cooperating components.
This chapter also briefly describes the configuration (but not the usage) of two popular applications, mutt for mail and tin for news. The usage is not described because they are easy to use and well documented. Obviously, both mutt and tin are not mandatory choices: many other similar applications exist but I think that they are a good starting point because they are widely used, simple, work well and don't use too much disk space and memory. Both are console mode programs; if you prefer graphics applications there are also many choices for X.
In short, the programs required for the configuration described in this chapter are:
-
sendmail
-
fetchmail
-
m4
-
mutt
-
tin
Of these, only sendmail and m4 are installed with the base system; you can install the other programs from the package collection.
Before continuing, remember that none of the programs presented in this chapter is mandatory: there are other applications performing similar tasks and many users prefer them. You'll find different opinions reading the mailing lists. You can also use different strategies for sending and receiving mail: the one explained here is only a starting point; once you understand how it works you'll probably want to modify it to suit your needs or to adopt a different method altogether.
At the opposite extreme of the example presented here, there is the usage of an application like Netscape Communicator, which does everything and frees you from the need of configuring many components: with Communicator you can browse the Internet, send and receive mail and read news. Besides, the setup is very simple. There is a price to pay, though: Communicator is a "closed" program that will not cooperate with other standard Unix utilities.
Another possibility is to use emacs to read mail and news. Emacs needs no introduction to Unix users but, in case you don't know, it is an extensible editor (although calling emacs an editor is somewhat reductive) which becomes a complete work environment, and can be used to read mail, news and to perform many operations. For many people emacs is the only environment that they need and they use it for all their work. The configuration of emacs for mail and news is described in the emacs manual.
In the rest of this chapter we will deal with a host connected to the Internet through a PPP connection via serial modem to a provider.
-
the local host's name is "ape" and the internal network is "insetti.net", which means that the FQDN (Fully Qualified Domain Name) is "ape.insetti.net".
-
the user's login name on ape is "carlo".
-
the provider's name is BigNet.
-
the provider's mail server is "mail.bignet.it".
-
the provider's news server is "news.bignet.it".
-
the user's ("carlo") account at the provider is "alan" with the password "pZY9o".
First some basic terminology:
- MUA (mail user agent)
-
a program to read and write mail. For example: mutt, elm and pine but also the simple mail application installed with the base system.
- MTA (mail transfer agent)
-
a program that transfers mail between two host but also locally (on the same host.) The MTA decides the path that the mail will follow to get to the destination. On BSD systems (but not only) the standard MTA is sendmail.
- MDA (mail delivery agent)
-
a program, usually used by the MTA, that delivers the mail; for example, it physically puts the messages in the recipient's mailbox. For example, sendmail uses one or more MDA to deliver mail.
Figure 13-1 depicts the mail system that we want to set up. Between the local network (or the single host) and the provider there is a modem PPP connection. The "bubbles" with the thick border are the programs launched manually by the user; the remaining bubbles are the programs that are launched automatically. The circled numbers refere to the logical steps of the mail cycle:
-
In step (1) mail is downloaded from the provider's POP server using fetchmail, which uses sendmail to put the messages in the user's mailbox.
-
In step (2) the user launches mutt (or another MUA) to read mail, reply and write new messages.
-
In step (3) the user "sends" the mail from within mutt. Messages are accumulated in the spool area.
-
In step (4) the user calls sendmail to transfer the messages to the provider's SMTP server, that will deliver them to the final destination (possibly through other mail servers.) The provider's SMTP server acts as a relay for our mail.
The connection with the provider must be up only during steps (1) and (4); for the remaining steps it is not needed.
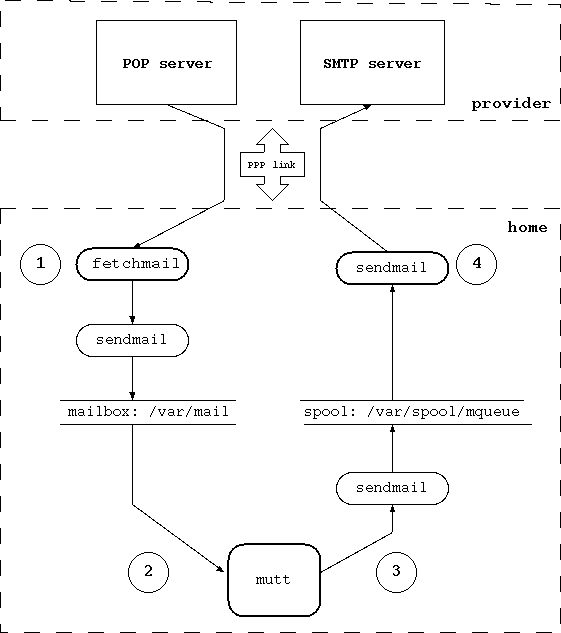
13.1 sendmail
When an MTA, sendmail in the default installation, must deliver a message, if it's a local message it delivers it directly. If the message is for a different domain, the MTA must find out the address of the mail server for that domain. Sendmail uses the DNS service (described in Chapter 12) to find the required address (stored as an MX record by the DNS server) and delivers the message to the destination mail server.
The most used MTA in the BSD world is probably sendmail. Sendmail is controlled by a set of configuration files and databases, of which /etc/mail/sendmail.cf is the most important. In general, if you are not an expert it is better not to modify the /etc/mail/sendmail.cf file directly; instead, use a set of predefined macros and the m4 preprocessor, which greatly (well, almost) simplify the configuration.
Note: prior to version 1.5 of NetBSD, the mail configuration files were in /etc instead of /etc/mail.
Even using the macros, the configuration of sendmail is not for the faint of heart, and the next sections only describe an example which can be modified to suit different needs and different configurations. If you connect to the Internet with a modem, the example configuration file will probably fit all your needs: just replace the fictitious data with yours.
The first problem to be solved is that the local network we are dealing with is an internal network, i.e. not directly accessible from the Internet. This means that the names used internally have no meaning on the Internet; in short, "ape.insetti.net" cannot be reached by an external host: no one will be able to reply to a mail sent with this return address (some mail systems will even reject the message because it comes from an unknown host.) The true address, the one visible from everybody, is assigned by the provider and, therefore, it is necessary to convert the local address "carlo@ape.insetti.net" to the real address "alan@bignet.it". Sendmail, if correctly configured, will take care of this when it transfers the messages.
You'll probably also want to configure sendmail in order to send the e-mails to the provider's mail server, using it as a relay. In the configuration described in this chapter, sendmail does not directly contact the recipient's mail server (as previously described) but relays all its mail to the provider's mail server.
Note: the provider's mail server acts as a relay, which means that it delivers mail which is not destined to its own domain, to another mail server. It acts as an intermediary between two servers.
Since the connection with the provider is not always active, it is not necessary to start sendmail as a daemon in /etc/rc.conf: you can disable it with the line "sendmail=NO". As a consequence it will be necessary to launch sendmail manually when you want to transfer mail to the provider. Local mail is delivered correctly even if sendmail is not active as a daemon.
Let's start configuring sendmail.
13.1.1 Configuration with genericstable
This type of configuration uses the file /etc/mail/genericstable which contains the mapping used by sendmail to rewrite the internal hostnames.
The first step is therefore to write the genericstable file. For example:
carlo:         alan@bignet.it
root:          alan@bignet.it
news:          alan@bignet.it
For the sake of efficiency, genericstable must be transformed with the following command:
# /usr/sbin/sendmail -bi -oA/etc/mail/genericstable
Now it's time to create the prototype configuration file which we'll use to create the sendmail configuration file.
# cd /usr/share/sendmail/m4
The new sendmail configuration file, which we'll call mycf.mc, contains:
divert(-1)dnl
include(`../m4/cf.m4')dnl
VERSIONID(`mycf.mc created by carlo@ape.insetti.net May 18 2001')dnl
OSTYPE(bsd4.4)dnl
dnl # Settings for masquerading.  Addresses of the following types
dnl # are rewritten
dnl #     carlo@ape.insetti.net
dnl #     carlo@ape
GENERICS_DOMAIN(ape.insetti.net ape)dnl
FEATURE(genericstable)dnl
FEATURE(masquerade_envelope)dnl
define(`SMART_HOST',`mail.bignet.it')dnl
FEATURE(redirect)dnl
FEATURE(nocanonify)dnl
dnl # The following feature is useful if sendmail is called by
dnl # fetchmail (which is usually the case.)  If sendmail cannot
dnl # resolve the name of the sender, the mail will not be delivered.
dnl # For example:
dnl #   MAIL FROM:<www-owner@NetBSD.org> SIZE=2718
dnl #   501 <www-owner@NetBSD.org>... Sender domain must exist
FEATURE(`accept_unresolvable_domains')dnl
dnl # accept_unqualified_senders is useful with some MUA, which send
dnl # mail as, for example:
dnl #   MAIL FROM:<carlo>
FEATURE(`accept_unqualified_senders')dnl
dnl # Mail for `smtp' mailer is marked `expensive' (`e' flag):
dnl # instead of connecting with the relay, sendmail puts it in
dnl # a queue for delayed processing.
dnl # Sendmail starts complaining about undelivered messages after
dnl # 16 hours.
define(`SMTP_MAILER_FLAGS',`e')dnl
define(`confCON_EXPENSIVE',`True')dnl
define(`confTO_QUEUEWARN', `16h')dnl
dnl # For european users
define(`confDEF_CHAR_SET',`ISO-8859-1')dnl
dnl # Enable the following three lines to use procmail as a local
dnl # delivery agent.  The third line is optional, only the first
dnl # two are required.
dnl # define(`PROCMAIL_MAILER_PATH', /usr/pkg/bin/procmail)dnl
dnl # FEATURE(local_procmail)dnl
dnl # MAILER(procmail)dnl
dnl # The following two mailers must always be defined
MAILER(local)dnl
MAILER(smtp)dnl
Note: in the previous example, everything after a "dnl" is considered a comment and will be discarded by the m4 preprocessor.
This configuration tells sendmail to rewrite the addresses of type "ape.insetti.net" using the real names found in the /etc/mail/genericstable file. It also says that mail should be sent to the "mail.bignet.it" server. The meaning of the options is described in detail in the file /usr/share/sendmail/README.
In order to create your own version of the example configuration file, you must change only two lines, substituting your real data:
GENERICS_DOMAIN(ape.insetti.net ape)dnl
define(`SMART_HOST',`mail.bignet.it')dnl
Finally, the new configuration file must be generated, after having saved the previous version:
# cp /etc/mail/sendmail.cf /etc/mail/sendmail.cf.bak
# m4 mycf.mc > /etc/mail/sendmail.cf
Note: in the /usr/share/sendmail/cf directory there is the file netbsd-proto.mc, which is used to create the default /etc/mail/sendmail.cf shipped with NetBSD. With the make command it can be rebuilt, if needed.
Another important file is /etc/mail/aliases, which can be left in the default configuration, although it is still necessary to give the following command:
# newaliases
Now everything is ready to start sending mail.
13.1.2 Testing the configuration
Sendmail is finally configured and ready to work, but before sending real mail it is better to do some simple tests. First let's try sending a local e-mail with the following command:
$ sendmail -v carlo
Subject: test
Prova
.
carlo... Connecting to local...
carlo... Sent
Please follow exactly the example above: leave a blank line after Subject: and end the message with a line containing only one dot. Now you should be able to read the message with your mail client and verify that the From: field has been correctly rewritten.
From: alan@bignet.it
Next you can verify the address rewriting rules directly, using sendmail in address test mode with option -bt. This mode shows the parsing performed by sendmail for an address and how it gets rewritten according to the rules in the configuration file. It is also possible to perform other tests and view some information.
$ sendmail -bt
ADDRESS TEST MODE (ruleset 3 NOT automatically invoked)
Enter <ruleset> <address>
>
You can display the help with the "?" command.
First, let's verify that the generictable map file works correctly:
/map generics carlo
map_lookup: generics (carlo) returns alan@bignet.it
Everything's ok here; sendmail found the local name and its real counterpart in the map.
Now we can test the rewriting of the envelope's sender address with the following commands:
/tryflags ES
/try smtp carlo@ape.insetti.net
The result should be similar to the following:
Trying envelope sender address carlo@ape.insetti.net for mailer smtp
rewrite: ruleset   3   input: carlo @ ape . insetti . net
rewrite: ruleset  96   input: carlo < @ ape . insetti . net >
rewrite: ruleset  96 returns: carlo < @ ape . insetti . net . >
rewrite: ruleset   3 returns: carlo < @ ape . insetti . net . >
rewrite: ruleset   1   input: carlo < @ ape . insetti . net . >
rewrite: ruleset   1 returns: carlo < @ ape . insetti . net . >
rewrite: ruleset  11   input: carlo < @ ape . insetti . net . >
rewrite: ruleset  51   input: carlo < @ ape . insetti . net . >
rewrite: ruleset  51 returns: carlo < @ ape . insetti . net . >
rewrite: ruleset  61   input: carlo < @ ape . insetti . net . >
rewrite: ruleset  61 returns: carlo < @ ape . insetti . net . >
rewrite: ruleset  94   input: carlo < @ ape . insetti . net . >
rewrite: ruleset  93   input: carlo < @ ape . insetti . net . >
rewrite: ruleset   3   input: alan @ bignet . it
rewrite: ruleset  96   input: alan < @ bignet . it >
rewrite: ruleset  96 returns: alan < @ bignet . it >
rewrite: ruleset   3 returns: alan < @ bignet . it >
rewrite: ruleset  93 returns: alan < @ bignet . it >
rewrite: ruleset  94 returns: alan < @ bignet . it >
rewrite: ruleset  11 returns: alan < @ bignet . it >
rewrite: ruleset   4   input: alan < @ bignet . it >
rewrite: ruleset   4 returns: alan @ bignet . it
Rcode = 0, addr = alan@bignet.it
>
As you can see, the local address has been rewritten to the real address, which will appear in your e-mails when they leave your system.
You can achieve a similar result with the following command:
/try smtp carlo
We can also verify the rewriting of the header's sender with the following commands:
/tryflags HS
/try smtp carlo@ape.insetti.net
13.1.3 Using an alternative MTA
Starting from version 1.4 of NetBSD sendmail is not called directly:
$ ls -l /usr/sbin/sendmail
lrwxr-xr-x  1 root  wheel  21 Nov  1 01:14 /usr/sbin/sendmail@ -> /usr/sbin/mailwrapper
The purpose of mailwrapper is to allow the usage of an alternative MTA instead of sendmail (for example, postfix). If you plan to use a different mailer I suggest that you read the mailwrapper(8) and the mailer.conf(5) manpages, which are very clear.
13.2 fetchmail
Mail is received by the provider and it is not automatically transfered to the local hosts; therefore it is necessary to download it. Fetchmail is a very popular program that downloads mail from a remote mail server and forwards it to the local system for delivery (usually using sendmail.) It is powerful yet easy to use and configure: after installation, the file ~/.fetchmailrc must be created and the program is ready to run (~/.fetchmailrc contains a password so appropriate permissions on the file are required.)
This is an example .fetchmailrc:
poll mail.bignet.it
protocol POP3
username alan there with password pZY9o is carlo here
flush
mda "/usr/sbin/sendmail -oem %T"
Note: The last line ("mda ...") is used only if sendmail is not active as daemon on the system. Please note that the mail server indicated in this file (mail.bignet.it) is not necessary the same as the mail relay used by sendmail.
Now the following command can be used to download and deliver mail to the local system:
$ fetchmail
The messages can now be read with mutt.
13.3 Reading and writing mail with mutt
Mutt is one of the most popular mail programs: it is "lightweight", easy to use and has lots of features. The man page mutt is very bare bones; the real documentation is in /usr/pkg/share/doc/mutt/, in particular manual.txt.
Mutt's configuration is defined by the ~/.muttrc file. The easiest way to create it is to copy mutt's example muttrc file (usually /usr/pkg/etc/Muttrc) to the home directory and modify it. The following example shows how to achieve some results:
-
Save a copy of sent mail.
-
Define a directory and two files for incoming and outgoing mail saved by mutt (in this example the directory is ~/Mail and the files are incoming and outgoing).
-
Define some colors.
-
Define an alias.
set copy=yes
set edit_headers
set folder="~/Mail"
unset force_name
set mbox="~/Mail/incoming"
set record="~/Mail/outgoing"
unset save_name
bind pager <up> previous-page
bind pager <down> next-page
color normal white black
color hdrdefault blue black
color indicator white blue
color markers red black
color quoted cyan black
color status white blue
color error red white
color underline yellow black
mono quoted standout
mono hdrdefault underline
mono indicator underline
mono status bold
alias pippo Pippo Verdi <pippo.verdi@pluto.net>
To start mutt:
$ mutt
Note: Mutt supports color, but this depends on the terminal settings. Under X you can use xterm-color; for example:
TERM=xterm-color mutt
13.4 Strategy for receiving mail
This section describes a simple method for receiving and reading mail. The connection to the provider is activated only for the time required to dowload the messages; mail is then read offline.
-
Activate the connection to the provider.
-
Run fetchmail.
-
Deactivate the connection.
-
Read mail with mutt.
13.5 Strategy for sending mail
When mail has been written and "sent" with mutt, the messages must be transferred to the provider with sendmail. Mail is sent from mutt with the y command, but this does not really send it; the messages are enqueued in the spool area; if sendmail is not active as a daemon it is necessary to start it manually or the messages will remain on the hard disk. The necessary steps are:
-
Write mail with mutt, send it and exit mutt.
-
Activate the connection with the provider.
-
Write the command /usr/sbin/sendmail -q -v to transfer the queued messages to the provider.
-
Deactivate the connection.
13.6 Advanced mail tools
When you start using mail, you won't probably have very sophisticated requirements and the already described standard configuration will satisfy all your needs. But for many users the number of daily messages will increase with time and a more rational organization of the mail storage will become necessary, for example subdividing mail in different mail boxes organized by topic. If, for example, you subscribe to a mailing list, you will likely receive many messages every day and you will want to keep them separate from the rest of your mail. You will soon find that you are spending too much time every day repeating the same manual operations to organize your mail boxes.
Why repeat manually the same operations when you can have a program perform them automatically for you? There are numerous tools that you can add to your mail system to increase its flexibility and automatically process your messages. Amongst the most known and used there are:
-
procmail, an advanced mail delivery agent and general purpose mail filter for local mail, which automatically processes incoming mail using user defined rulesets. It integrates smoothly with sendmail.
-
metamail, a tool to process attachments.
-
formail, a mail formatter.
In the remaining part of this section a sample configuration for procmail will be presented for a very common case: delivering automatically to a user defined mailbox all the messages coming from a mailing list. The configuration of sendmail will be modified in order to call procmail directly (procmail will be the local mailer used by sendmail.) and a custom configuration file for procmail will be created.
First, procmail must be installed using the package system (mail/procmail.)
Next, the configuration of sendmail must be changed, in order to use procmail as local mailer. Uncomment the following three lines from the mycf.mc sendmail M4 prototype file and recreate the sendmail configuration file.
define(`PROCMAIL_MAILER_PATH', /usr/pkg/bin/procmail)dnl
FEATURE(local_procmail)dnl
MAILER(procmail)dnl
The first line defines the path of the procmail program (you can see where procmail is installed with the command which procmail.) The second line tells sendmail to use procmail for local mail delivery and the third adds procmail to the list of sendmail's mailers. The third line adds procmail to the list of sendmail's mailers (this line is optional.)
The last step is the creation of the procmail configuration file, containing the recipes for mail delivery.
Let's say that, for example, you subscribed to a mailing list on roses whose address is <roses@flowers.org> and that every message from the list contains the following line in the header:
Delivered-To: roses@flowers.org
The procmail configuration file (.procmailrc) looks like this:
PATH=/bin:/usr/bin:/usr/pkg/bin
MAILDIR=$HOME/mail
LOGFILE=$MAILDIR/from
:0
* ^Delivered-To: roses@flowers.org
roses_list
The previous file contains only one rule, beginning with the line containing ":0". The following line identifies all messages containing the string "Delivered-To: roses@flowers.org" and the last line says that the selected messages must go to the roses_list mailbox (which you should have created in $MAILDIR.) The remaining messages will be delivered to the default mailbox. Note that $MAILDIR is the same directory that you have configured with mutt:
set folder="~/Mail"
Of course the mailing list is only an example; procmail is a very versatile tool which can be used to filter mail based on many criteria. As usual, refer to the man pages for more details: procmail(1), procmailrc(5), and procmailex(5) (this last one contains many examples of configuration files.)
You can check that procmail is used as local mailer by sendmail if you run the latter in test mode:
$ /usr/sbin/sendmail -bt
ADDRESS TEST MODE (ruleset 3 NOT automatically invoked)
Enter <ruleset> <address>
>
The following command displays the list of mailers known to sendmail:
> =M
You should find a line like the following one:
mailer 3 (local): P=/usr/pkg/bin/procmail S=EnvFromL/HdrFromL ...
13.7 News with tin
The word news indicates the set of articles of the USENET newsgroups, a service available on the Internet. Each newsgroup contains articles related to a specific topic. Reading a newsgroup is different than reading a mailing list: when you subscribe to a mailing list you receive the articles by mail and you read them with a standard mail program like mutt, which you use also to send replies. News, instead, are read directly from a news server with a dedicated program called newsreader like, for example, tin. With tin you can subscribe to the newsgroups that you're interested in and follow the threads.
thread: a thread is a sequence of articles which all derive from an article that we could call "original". In short, a message is sent to the group, someone answers, other people answer to those who answered in the first place and so on, creating a tree like structure of messages and replies: without a newsreader it is impossible to understand the correct sequence of messages.
After the installation of tin (from the package collection as usual) the only thing left to do is to write the name of the NNTP server in the file /usr/pkg/etc/nntp/server. For example:
news.bignet.it
Once this has been done, the program can be started with the command rtin. On the screen something similar to the following example will be displayed:
$ rtin
Connecting to news.bignet.it...
news.bignet.it InterNetNews NNRP server INN 1.7.2 08-Dec-1997 ready (posting ok).
Reading groups from active file...
Checking for new groups...
Reading attributes file...
Reading newsgroups file...
Creating newsrc file...
Autosubscribing groups...
Reading newsrc file...
Be patient when you connect for the first time, because tin downloads an immense list of newsgroups to which you can subscribe and this takes several minutes. When the donwload is finished, the program's main screen is displayed; usually no groups are displayed; to see the list of groups press y. To subscribe to a group, move on the group's name and press y.
Once that you have subscribed to some newsgroups you can start tin more quickly with the command rtin -Q. The search for new groups is disabled (-q), only active groups are searched (-n) and newsgroup description are not loaded (-d): it will not be possible to use the y (yank) command in tin. When tin is started with these option it can't tell if a newsgroup is moderated or not.
Note: if you are connecting from an internal network (like in our example), when you send a message the address at the beginning of the message will be wrong (because it is the internal address.) To solve the problem, use the option "mail_address" in the tin configuration file (~/.tin/tinrc) or set the REPLYTO environment variable.
Chapter 14 Console drivers
In NetBSD versions before 1.4 the user could choose between two different drivers for screen and keyboard, pccons (specific for i386) and pcvt. In version 1.4 the new wscons multiplatform driver appeared, which is supposed to substitute the two previous drivers (which are still supported.)
14.1 wscons
Wscons is NetBSD's new console driver. It offers virtual terminal, support for international keyboards, mouse handling, etc. The capabilities of wscons can vary depending on the port (wscons is not available on all ports): the i386 version is very feature rich.
If you are compiling a customized kernel, to enable wscons you must activate the relevant options and comment out the options of pcvt and pccons (they can't be enabled at the same time.) For example
#pc0    at isa? port 0x60 irq 1   # pccons generic PC console driver
#vt0    at isa? port 0x60 irq 1   # PCVT console driver
In the kernel configuration file you can also enable a foreign keyboard. For example, to use the italian keyboard by default:
options PCKBD_LAYOUT="KB_IT"
Note: the layout of the italian keyboard is not ideal for programming tasks. To modify it see Chapter 5.
The number of pre-allocated virtual console is controlled by the following option
options WSDISPLAY_DEFAULTSCREENS=4
Other consoles can be added by enabling the relevant lines in the /etc/wscons.conf file: the comment mark (#) must be removed from the lines beginning with "screen x". In the following example a fifth console is added to the four pre-allocated ones:
# screens to create
#       idx     screen  emul
#screen 0       -       vt100
screen 1        -       vt100
screen 2        -       vt100
screen 3        -       vt100
screen  4       -       -
#screen 4       80x25bf vt100
#screen 5       80x50   vt100
The rc.wscons script transforms each of the non commented lines in a call to the wsconscfg command: the columns become the parameters of the call. The idx column becomes the index parameter, the screen column becomes the -t type parameter (which defines the type of screen: rows and columns, number of colors, ...) and the emul column becomes the -e emul parameter, which defines the emulation. For example:
screen 3 - vt100
becomes a call to:
wsconscfg -e vt100 3
Note: it is possible to have a (harmless) conflict between the consoles pre-allocated by the kernel and the consoles allocated at boot time through /etc/wscons.conf. If during boot the system tries to allocate an already allocated screen, the following message will be displayed:
wsconscfg: WSDISPLAYIO_ADDSCREEN: Device busyThe soulution is to comment out the offending lines in /etc/wscons.conf.
The virtual console must also be active in /etc/ttys. For example:
console "/usr/libexec/getty Pc"         pc3     off secure
ttyE0   "/usr/libexec/getty Pc"         vt220   on secure
ttyE1   "/usr/libexec/getty Pc"         vt220   on secure
ttyE2   "/usr/libexec/getty Pc"         vt220   on secure
ttyE3   "/usr/libexec/getty Pc"         vt220   off secure
...
The line
ttyE3 "/usr/libexec/getty Pc" vt220 off secure
of /etc/ttys is used by the X server to find a free terminal. To use a screen different from number 4, a parameter of the form vtn must be passed to the X server (n is the number of the function key used to activate the screen for X.)
For example, "screen 7" could be enabled in /etc/wscons.conf and X could be started with "vt8". If you use xdm you must edit /usr/X11R6/lib/X11/xdm/Xserver. For example:
:0 local /usr/X11R6/bin/X +kb dpms -bpp 16 dpms vt8
For xdm3d the path is different: /usr/X11R6/share/xdm3d/Xservers.
14.1.1 50 lines text mode with wscons
A text mode with 50 lines can be used starting with version 1.4.1 of NetBSD. This mode is activated in the /etc/wscons.conf. The following line must be uncommented:
font ibm - 8 ibm /usr/share/pcvt/fonts/vt220l.808
Then the following lines must be modified:
#screen 0       80x50   vt100
screen  1       80x50   vt100
screen  2       80x50   vt100
screen  3       80x50   vt100
screen  4       80x50   vt100
screen  5       80x50   vt100
screen  6       80x50   vt100
screen  7       80x50   vt100
This configuration enables eight screens, which can be accessed with the key combination Ctrl-Alt-Fn (where n varies from 1 to 8); the corresponding devices are ttyE0..ttyE7. To enable them and get a login prompt, /etc/ttys must be modified:
ttyE0   "/usr/libexec/getty Pc"         vt220   on secure
ttyE1   "/usr/libexec/getty Pc"         vt220   on secure
ttyE2   "/usr/libexec/getty Pc"         vt220   on secure
ttyE3   "/usr/libexec/getty Pc"         vt220   on secure
ttyE4   "/usr/libexec/getty Pc"         vt220   on secure
ttyE5   "/usr/libexec/getty Pc"         vt220   on secure
ttyE6   "/usr/libexec/getty Pc"         vt220   on secure
ttyE7   "/usr/libexec/getty Pc"         vt220   on secure
It is not possible to modify the 80x25 setting of screen 0, probably to guarantee that even in case of problems there is always a working screen.
14.2 pccons
This is the console driver found on the i386 install floppy. It doesn't offer virtual consoles and utility programs for configuration but takes up very little space.
14.3 pcvt
Pcvt is a VT220 terminal emulator and has more advanced functions than the simple pccons. It supports foreign keyboards and virtual consoles (with Ctrl-Alt-F1..F8 or with the F9..F12 function keys.) To activate pcvt the following lines must be uncommented in the kernel configuration file.
# Enable only one of the following lines
#pc0    at isa? port 0x60 irq 1
vt0     at isa? port 0x60 irq 1
# Options for PCVT console driver
#options FAT_CURSOR
options PCVT_NETBSD=132
options PCVT_NSCREENS=3
To use a foreign keyboard you must activate it at boot; it is also necessary to choose the correct terminal. For example:
/usr/local/bin/kcon -m i2
TERM=pcvt25;    export TERM
/etc/ttys must be modified accordingly. For example:
#console "/usr/libexec/getty Pc"   pcvt25  on secure
ttyv0    "/usr/libexec/getty Pc"   pcvt25  on secure
Pcvt italian keyboard: the definition of the i2 keyboard is not correct and the file /sys/arch/i386/isa/pcvt/Util/keycap/keycap.src must be modified. This is a working version, tested with NetBSD 1.3.3.
i2|italy142|Italian 142 mapping:\
            :A8={:A9=[:A10=]:A11=}:\
            :A12=`:A13=~:\
            :A17=@:A18=#:\
            :tc=italy141:
The settings for the foreign keyboard (the italian keyboard in this example) must be loaded at boot, for example in /etc/rc.local:
KCONP=/usr/local/bin
SCONP=/usr/local/bin
LDFNP=/usr/local/bin
ISPCP=/usr/sbin
CURSP=/usr/local/bin
set_keybd=YES
#------------------------------------------------------
# if desired, setup keyboard for italian keyboard layout
#------------------------------------------------------
if [ X${set_keybd} = X"YES" -a -x $KCONP/kcon ]
then
  echo
  echo 'switching to italian keyboard layout'
  $KCONP/kcon -m i2
fi
echo '.'
/etc/ttys must be also modified:
#console  "/usr/libexec/getty Pc" pcvt25  on secure
ttyv0   "/usr/libexec/getty Pc" pcvt25  on secure
ttyv1   "/usr/libexec/getty Pc" pcvt25  on secure
ttyv2   "/usr/libexec/getty Pc" pcvt25  on secure
The pcvt utility programs must be compiled and installed.
# cd /sys/arch/i386/isa/pcvt/Util
# make
# make install
14.3.1 Changing the screen size
With pcvt you can change the number of lines and columns on the screen. The following example script can be used to automatically switch between different configurations:
#!/bin/sh
# Set the screen to # lines
case $1 in
  25)
    /usr/local/bin/scon -s 25
    /usr/local/bin/cursor -s13 -e14
    ;;
  28)
    /usr/local/bin/loadfont -c1 -f
    /usr/share/misc/pcvtfonts/vt220l.814
    /usr/local/bin/loadfont -c2 -f
    /usr/share/misc/pcvtfonts/vt220h.814
    /usr/local/bin/scon -s 28
    /usr/local/bin/cursor -s12 -e14
    ;;
  40)
    /usr/local/bin/loadfont -c3 -f
    /usr/share/misc/pcvtfonts/vt220l.810
    /usr/local/bin/loadfont -c4 -f
    /usr/share/misc/pcvtfonts/vt220h.810
    /usr/local/bin/scon -s 40
    /usr/local/bin/cursor -s8 -e10
    ;;
  50)
    /usr/local/bin/loadfont -c5 -i
    /usr/share/misc/pcvtfonts/vt220l.808
    /usr/local/bin/loadfont -c6 -i
    /usr/share/misc/pcvtfonts/vt220h.808
    /usr/local/bin/scon -s 50
    /usr/local/bin/cursor -s6 -e8
    ;;
  *)
    echo "Invalid # of lines (25/28/40/50)"
    ;;
esac
Chapter 15 Editing
15.1 Introducing vi
It is not like the vi editor needs introducing to seasoned UNIX users. The vi editor, originally developed by Bill Joy of Sun Microsystems, is an endlessly extensible, easy to use light ASCII editor and the bane of the newbie existence. This section will introduce the vi editor to the newbie and perhaps toss in a few ideas for the seasoned user as well.
The first half of this section will overview editing, saving, yanking/putting and navigating a file within a vi session. The second half will be a step by step sample vi session to help get started.
This is intended as a primer for using thevi editor, it is not by any means a thorough guide. it is meant to get the first time user up and using vi with enough skills to make changes to and create files.
15.1.1 The vi interface
Using the vi editor really is not much different than any other terminal based software with one exception, it does not use a tab type (or curses if you will) style interface, although many versions of vi do use curses it does not give the same look and feel of the typical curses based interface. Instead it works in two modes, command and edit. While this may seem strange, it is not much different than windows based editing if you think about it. Take this as an example, if you are using say gedit and you take the mouse, highlight some text, select cut and then paste, the whole time you are using the mouse you are not editing (even though you can). In vi, the same action is done by simply deleting the whole line with dd in command mode, moving to the line you wish to place it below and hitting p in command mode. One could almost say the analogy is "mouse mode vs. command mode" (although they are not exactly identical, conceptually the idea is similar).
To start up a vi session, one simply begins the way they might with any terminal based software:
$ vi filename
One important note to remember here is that when a file is edited, it is loaded into a memory buffer. The rest of the text will make reference to the buffer and file in their proper context. A file only changes when the user has committed changes with one of the write commands.
15.1.2 Switching to Edit Mode
The vi editor sports a range of options one can provide at start up, for the time being we will just look at the default startup. When invoked as shown above, the editors default startup mode is command mode, so in essence you cannot commence to typing into the buffer. Instead you must switch out out of command mode to enter text. The following text describes edit start modes:
a Append after cursor.
A Append to end of line.
C Change the rest of current line.
cw Change the current word.
i Insert before cursor.
I Insert before first non blank line.
o Open a line below for insert
O Open a line above for insert.
15.1.3 Switching Modes & Saving Buffers to Files
Of course knowing the edit commands does not do much good if you can't switch back to command mode and save a file, to switch back simply hit the ESC key. To enter certain commands, the colon must be used. Write commands are one such set of commands. To do this, simply enter :.
Hitting the colon then will put the user at the colon (or command if you will) prompt at the bottom left corner of the screen. Now let us look at the save commands:
:w Write the buffer to file.
:wq Write the buffer to file and quit.
15.1.4 Yanking and Putting
What good is an editor if you cannot manipulate blocks of text? Of course vi supports this feature as well and as with most of the vi commands it somewhat intuitive. To yank a line but not delete it, simply enter yy or Y in command mode and the current line will be copied into a buffer. To put the line somewhere, navigate to the line above where the line is to be put and hit the p key for the "put" command. To move a line, simply delete the whole line with the dd command, navigate and put.
15.1.4.1 Oops I Did Not Mean to do that!
Undo is pretty simple, u undoes the last action and U undoes the last line deleted or changes made on the last line.
15.1.5 Navigation in the Buffer
Most vi primers or tutorials start off with navigation, however, not unlike most editors in order to navigate a file there must be something to navigate to and from (hence why this column sort of went in reverse). Depending on your flavor of vi (or if it even is vi and not say elvis, nvi or vim) you can navigate in both edit and command mode.
For the beginner I feel that switching to command mode and then navigating is a bit safer until one has practiced for awhile. The navigation keys for terminals that are not recognized or do not support the use of arrow keys are the following:
k Moves the cursor up one line.
j Moves the cursor down one line.
l Moves the cursor right one character.
h Moves the cursor left one character.
If the terminal is recognized and supports them, the arrow keys can be used to navigate the buffer in command mode.
In addition to simple "one spot navigation" vi supports jumping to a line by simply typing in the line number at the colon prompt. For example, if you wanted to jump to line 223 the keystrokes from editor mode would look like so:
ESC
:223
15.1.6 Searching a File, the Alternate Navigational Aid
The vi editor supports searching using regular expression syntax, however, it is slightly different to invoke from command mode. One simply hits the / key in command mode and enters what they are searching for, as an example let us say I am searching for the expression foo:
/foo
That is it, to illustrate a slightly different expression, let us say I am looking for foo bar:
/foo bar
15.1.6.1 Additional Navigation Commands
Searching and scrolling are not the only ways to navigate a vi buffer. Following is a list of succinct navigation commands available for vi:
0 Move to beginning of line.
$ Move to end of line.
b Back up one word.
w Move forward one word.
G Move to the bottom of the buffer.
H Move to the top line on the screen.
L Move to the last line on the screen.
M Move the cursor to the middle of the screen.
N Scan for next search match but opposite direction.
n Scan for next search match in the same direction.
15.1.7 A Sample Session
Now that we have covered the basics, let us run a sample session using a couple of the items discussed so far. First, we open an empty file into the buffer from the command line like so:
# vi foo.txt
Next we switch to edit mode and enter two lines separated by an empty line, remember our buffer is empty so we hit the i key to insert before cursor and enter some text:
This is some text
there we skipped a line
~
~
~
~
Now hit the ESC key to switch back into command mode.
Now that we are in command mode, let us save the file. First, hit the : key, the cursor should be sitting in the lower left corner right after a prompt. At the : prompt enter w and hit the ENTER or RETURN key. The file has just been saved. There should have been a message to that effect, some vi editors will also tell you the name, how many lines and the size of the file as well.
It is time to navigate, the cursor should be sitting wherever it was when the file was saved. Try using the arrow keys to move around a bit. If they do not work (or you are just plain curious) try out the hjkl keys to see how they work.
Finally, let us do two more things, first, navigate up to the first line and then to the first character. Try out some of the other command mode navigation keys on that line, hit the following keys a couple of times:
$
0
$
0
The cursor should hop to the end of line, back to the beginning and then to the end again.
Next, search for an expression by hitting the / key and an expression like so:
/we
The cursor should jump to the first occurance of we.
Now save the file and exit using write and quit:
:wq
15.2 Configuring vi
The standard editor supplied with NetBSD is, needless to say, vi, the most loved and hated editor in the world. If you don't use vi, skip this section, otherwise read it before installing other versions of vi. NetBSD's vi (nvi) was written by Keith Bostic of UCB to have a freely redistributable version of this editor and has many powerful extensions worth learning while being still very compatible with the original vi. Nvi has become the standard version of vi for BSD.
Amongst the most interesting extensions are:
-
Extended regular expressions (egrep style), enabled with option extended.
-
Tag stacks.
-
Infinite undo (to undo, press u; to continue undoing, press .).
-
Incremental search, enabled with the option searchincr.
-
Left-right scrolling of lines, enabled with the option leftright; the number of columns to scroll is defined by the sidescroll option.
-
Command line history editing, enabled with the option cedit.
-
Filename completion, enabled by the filec option.
-
Backgrounded screens and displays.
-
Split screen editing.
15.2.1 Extensions to .exrc
The following example shows a .exrc file with some extended options enabled.
set showmode ruler
set filec=^[
set cedit=^[
The first line enables the display of the cursor position (row and column) and of the current mode (Command, Insert, Append) on the status line. The second line (where ^[ is the ESC character) enables filename completion with the ESC character. The third line enables command line history editing (also with the ESC character.) For example, writing ":" and then pressing ESC opens a window with a list of the previous commands which can be edited and executed (pressing Enter on a command executes it.)
15.2.2 Documentation
The source tarball (src.tgz) contains a lot of useful documentation on (n)vi and ex, in the /usr/src/usr.bin/vi/docs directory. For example:
-
Edit: A tutorial
-
Ex Reference Manual
-
Vi man page
-
An Introduction to Display Editing with Vi by William Joy and Mark Horton
-
Ex/Vi Reference Manual by Keith Bostic
-
Vi Command & Function Reference
-
Vi tutorial (beginnner and advanced)
If you have never used vi, the "Vi tutorial" is a good starting point. It is meant to be read using vi and it gradually introduces the reader to all the vi commands, which can be tested while reading. An Introduction to Display Editing with Vi by William Joy and Mark Horton is also a very good starting point.
If you want to learn more about vi and the nvi extensions you should read the Ex/Vi Reference Manual by Keith Bostic which documents all the editor's commands and options.
15.3 Using tags with vi
This topic is not directly related to NetBSD but it can be useful, for example, for examining the kernel sources.
When you examine a set of sources in a tree of directories and subdirectories you can simplify your work using the tag feature of vi. The method is the following:
-
cd to the base directory of the sources.
$ cd /path
-
Write the following commands:
$ find . -name "*.[ch]" > filelist
$ cat filelist | xargs ctags
-
Add the following line to .exrc
set tags=/path/tags
(substitute the correct path instead of path.)
Chapter 16 X
16.1 What is X?
The X Window System is a graphical environment available for NetBSD and many Unix (and non Unix) systems. In fact it is much more than that: thanks to the usage of the X protocol, the X Window System is "network transparent" and can run distributed applications (client-server). This means, roughly, that you can run an application on one host (client) and transparently display the graphical output on another host (server); transparently means that you don't have to modify the application to achieve this result. The X Window System is produced and mantained by the X Consortium and the current release is X11R6. The flavour of X used by NetBSD is XFree86, a freely redistributable open source implementation of the X Window System.
When you start using X you'll find many new terms which you'll probably find confusing, at first. The basic elements to use X are:
-
Video hardware supported by XFree86.
-
An X server running on top of the hardware. The X server provides a standard way to open windows, do graphics (including fonts for text display), and get mouse/keyboard/other input. X is network-transparent, so that you can run X clients on one machine, and the X server (i.e., the display, with video hardware) on another machine.
-
A window manager running on the X server. The window manager is essentially a special client that is allowed to control placement of windows. It also "decorates" windows with standard "widgets" (usually these provide window-motion, resizing, iconifying, and perhaps a few other actions). A window manager also may provide backdrops, etc. Window managers can also let you kill windows/programs by clicking on their windows, and so forth.
-
A desktop manager (optional.) KDE and GNOME, for example, are desktops: they are suites of more-or-less integrated software designed to give you a well-defined range of software and a more or less common interface to each of the programs. These include a help browser of some kind, a "desktop-metaphor" access to your filesystem, custom terminals to replace xterm, software development environments, audio, picture/animation viewres, etc.
-
Any other applications (3rd party X clients) that you have. These talk to the X server and to the window manager. Unless the window manager is part of the destkop (if any), the desktop probably doesn't get involved in much of anything that these applications do. (However, e.g., GNOME may be able to detect that you've installed the GIMP, for example, and so offer a menu to launch the GIMP.)
To summarize: in order to use a graphical environment you need
-
the XFree86 system
-
a window manager (XFree86 already comes with a very basic window manager called twm.)
-
If you prefer a more sophisticated environment you'll probably want to install a desktop too, although this is not necessary. Desktops have some nice features that are helpful to users who come from environments such as MacIntosh or MS-WINDOWS (the KDE desktop, for example, has a very similar flavour to MS-WINDOWS.)
Note: by now it should be clear that desktops like GNOME and KDE do not provide X servers. They run on top of an existing X server supplied by XFree86. KDE and GNOME can make use of their own window manager or of a separately installed window manager.
Normally, you can run at most one window manager at any given time on a given X server. (But you can run multiple X servers on a single computer.) If you are not running a window manager of your choosing, and start KDE/GNOME, then that desktop environment will run a window manager for you.
16.2 Configuration
If you haven't chosen a minimal configuration during installation, X is already installed and ready to run on your computer; you only have to create the menacing /etc/XF86Config file. To get an idea of what this file looks like, examine the /usr/X11R6/lib/X11/XF86Config.eg file. The structure of the configuration file is described formally in XF86Config(5), which can be examined with the following command:
# man XF86Config
Before configuring the system it is advisable to carefully read the documentation found in /usr/X11R6/lib/X11/doc: there are various README's for the video cards, for the mouse and even a NetBSD specific one (README.NetBSD.) I suggest to start by reading QuickStart.doc. You might have the feeling that other systems let you start more quickly and with less effort, but the time spent reading this documentation is not wasted: the knowledge of X and of your configuration that you gain will turn out very useful on many future occasions and you'll be able to get the most from your hardware (and software too.)
You can create the /etc/XF86Config file manually with an editor or you can generate it automatically with an interactive configuration program. The best known programs are xf86config and XF86Setup. The former is a text mode program and is installed by default with X; the latter is a graphics program which can be installed from the package collection.
You may find that a mixed approach is better: first create the XF86Config with one of the two programs and then check it and tune it manually with an editor.
The interface of the two programs is different but they both require the same set of information:
-
the mouse type and the mouse device to be used
-
the keyboard type and its layout
-
the type of video card
-
the type of monitor
Before configuring the system you should collect the required information.
16.3 The mouse
The first thing to check is the type of mouse you are using (for example, serial or PS/2, ...) and the mouse device (for example, wsmouse requires a different protocol.) If you are using a serial mouse, choose the required protocol and specify the serial port to which it is connected. For example, for a serial mouse on the first serial port:
Section "Pointer"
  Protocol    "Microsoft"
  Device      "/dev/tty00"
EndSection
For a mouse using the wsmouse device you might have:
Section "Pointer"
  Protocol    "wsmouse"
  Device      "/dev/wsmouse0"
EndSection
In the "Device" field you can also specify /dev/mouse provided that you have created the correct link in the filesystem. For example:
# ln -sf /dev/wsmouse0 /dev/mouse
16.4 The keyboard
Even if you have already configured your keyboard for wscons, you need to configure it for X too, in order to get a non US layout.
An easy solution is to use the XKB protocol, specifying the keyboard type and layout.
This is one area in which that configuration programs are weak and you may want to choose the standard layout and modify the generated configuration file manually.
# XkbDisable
# XkbKeymap   "xfree86(us)"
XkbModel        "pc102"
XkbLayout       "de"
XkbVariant      "nodeadkeys"
If you want to use the "Windows" keys on your keyboard, use pc105 instead of pc102 for XkbModel.
16.5 The monitor
It is very important to correctly specify the values of the horizontal and vertical frequency of the monitor: a correct definition shields the monitor from damages deriving from an incompatible setup of the video card. This information can be found in the monitor's manual. In the X documentation directory there is a file containing the settings of many monitors; it can be used as a starting point to customize your own settings.
16.6 Video card and X server
The video card can be chosen from the database of the automatic configuration programs; the program will take care of all the needed setups.
When you have selected the correct video card you must choose the X server for the card. Usually, the configuration programs can automatically determine the correct server, but some video cards can be driven by more than one server (for example, S3 Virge is supported by the SVGA and S3V servers); in this case, study the documentation of the servers to decide which one you need: different servers usualy have different capabilities and a different degree of support for the video cards.
16.7 Starting X
When you exit the configuration program, it creates the file /etc/XF86Config, which can be further examined and modified by hand.
Before starting X you should:
-
check that the symbolic link /usr/X11R6/bin/X points to the correct X server:
# ls -l /usr/X11R6/bin/X
-
Verify that the configuration is correct. Launch:
# X -probeonly
and examine carefully the output.
Now you can start X with the following command:
# startx
If X doesn't fire up there is probably some error in the configuration file.
If X starts but doesn't work as expected (for example, you can't move the mouse pointer) you can exit quickly with the Ctrl-Alt-Backspace key combination (not available on all ports.) If everything worked correctly you are left in the X environment with the default window manager (twm): although it is a simple window manager many users feel that it is enough for their needs. If you want a highly configurable window manager with many bells and whistles, you have many choices in the package collection.
To start customizing X, try giving the following command in an xterm to change the background color:
# xsetroot -solid DarkSeaGreen
16.8 Customizing X
The look of the X environment can be customized in several ways. The easiest method is to copy the default .xinitrc file in your home directory and modify it. For example:
# cp /usr/X11R6/lib/X11/xinit/xinitrc ~/.xinitrc
# vi .xinitrc
The following example shows how to start the window manager (twm), open an instance of the xclock program in the lower right part of the screen and two xterm windows. The "Bisque4" color is used for the background.
the first part of the file is the same
...
# start some nice programs
twm &
xclock -geometry 50x50-1-1 &
xterm -geometry 80x34-1+1 -bg OldLace &
xsetroot -solid Bisque4 &
exec xterm -geometry 80x44+0+0 -bg AntiqueWhite -name login
With this type of setup, to exit X you must close the last xterm (the one with the "login" title.)
Even with this simple configuration X has a considerably nicer look. To give an even better look to the environment you can install some utility program from the package collection. For example:
- xcolorsel
-
displays all the colors defined in rgb.txt. Use it to choose background colors for the root window or for xterms.
- xpmroot
-
lets you use a pixmap for the background.
- xscreensaver
-
X screen saver.
- xdaemon
-
no desktop can be complete without this package, which displays a moveable bitmap of the BSD daemon in two selectable sizes.
16.9 Other window managers
If you don't like twm, which is a very simple window manager lacking many features and not very configurable, you can choose another window manager from the package collection. Some of the most popular are: fvwm2, olwm/olvwm (Open Look Window Manager), WindowMaker, Enlightenment, AfterStep.
In the rest of this section the installation of WindowMaker is described as an example. WindowMaker is a very nice looking and highly configurable window manager. To add the program the windowmaker-0.60.tgz precompiled package will be used, which depends on some other packages which must be installed. As usual, both pkg_add and make install will fetch the needed packages automatically, so there is no need to go through the dependencies manually.
# cd /usr/pkgsrc/x11/windowmaker
# make depends-list
xpm-3.4k
jpeg-6b
pkglibtool-1.2p2
giflib-3.0
libproplist-0.9.1
tiff-3.5.2
Note: you can also see the dependencies with the following command:
# pkg_info -f windowmaker-0.61.0.tgz | grep depends
After adding the required packages, WindowMaker and some preconfigured themes can be added:
# pkg_add windowmaker-0.61.0.tgz wmthemes-0.6x.tgz
WindowMaker is now installed; to start it you must modify your .xinitrc and/or .xsession: substitute the line which calls twm with a line which calls wmaker. For example:
# start some nice programs
# start WindowMaker
wmaker &
xclock -geometry 50x50-1-1 &
xdaemon2 -geometry +0-70 &
...
In this example the xdaemon program is also started automatically.
Before starting WindowMaker the configuration program must be run:
$ wmaker.inst
$ startx
16.10 Graphical login with xdm
If you always use X for your work and the first thing you do after you log in is run startx, you can set up a graphical login for your workstation which does this automatically. It is very easy:
-
Create the .xsession file in your home directory. This file is similar to ~/.xinitrc and can, in fact, be a link to the latter.
-
Modify /etc/rc.conf:
xdm=YES xdm_flags="" # x11 display manager
If you prefer (why?) you can add the following line at the end of /etc/rc.local instead of modifying rc.conf:
/usr/X11R6/bin/xdm
This method can be used to start, for example, kdm or gdm instead of xdm.
The configuration files for xdm are in the /usr/X11R6/lib/X11/xdm directory. In the Xservers file X is started by default on the vt05 virtual terminal; if you want to use another terminal instead, this is the right place to modify the setting. In order to avoid keyboard contention between getty and xdm it is advisable to start xdm on a virtual terminal where getty is disabled. For example if in Xservers you have:
:0 local /usr/X11R6/bin/X :0 vt04
in /etc/ttys you should have
ttyE3 "/usr/libexec/getty Pc" vt220 off secure
(please note that vt04 corresponds to ttyE3 because vt start at 1 and ttyE start at 0.)
If you want a nice look for your xdm login screen, you can modify the xdm configuration file. For example, to change the background color you can add the following line the the Xsetup_0 file:
xsetroot -solid SeaGreen
Instead of setting a color, you can put an image on the background using the xpmroot program: For example:
xpmroot /path_to_xpm/netbsd.xpm
If you experiment a little with the configuration file you can achieve many nice looking effects and build a pleasing login screen.
Chapter 17 Linux emulation
The NetBSD port for i386 can execute a great number of native Linux programs, using the Linux emulation layer. Generally, when you think about emulation you imagine something slow and inefficient because, often, emulations must reproduce hardware instructions and even architectures (usually from old machines) in software. In the case of the Linux emulation this is radically different: it is only a thin software layer, mostly for system calls which are already very similar between the two systems. The application code itself is processed at the full speed of your CPU, so you don't get a degraded performance with the Linux emulation and the feeling is exactly the same as for native NetBSD applications.
This chapter explains how to configure the Linux emulation with an example: the installation of the well known Acrobat Reader version 4 program.
17.1 Emulation setup
The installation of the Linux emulation is described in the compat_linux(8) man page; using the package system only two steps are needed.
-
Configuring the kernel.
-
Installing the Linux libraries.
17.1.1 Configuring the kernel
If you use a GENERIC kernel you don't need to do anything because Linux compatibility is already enabled.
If you use a customized kernel, check that the following options are enabled:
option COMPAT_LINUX
option EXEC_ELF32
when you have compiled a kernel with the previous options you can start installing the necessary software.
17.1.2 Installing the Linux libraries
You can get the linux libraries from any Linux distribution, provided it's not too old, but the suggested method is to use the package system and install the libraries automatically (the Suse libraries are used.) When you install the libraries, the following happens:
-
A secondary root directory is created which will be used for Linux programs. This directory is /emul/linux/. The Linux programs in emulation mode will use this directory as their root directory.
-
The shared libraries for Linux are installed. Most applications are linked dynamically and expect to find the necessary libraries on the system. For example, for Acrobat Reader, if you go to the /usr/pkgsrc/print/acroread and give the make depends command, you get the following message:
===> acroread-4.0 requires Linux glibc2 libraries - see compat_linux(8).
Both operations will be handled automatically by the package system, without the need of manual intervention from the user (I suppose that, by now, you have already begun to love the package system...). Note that this section describes manual installation of the Linux libraries.
To install the libraries, a program must be installed that handles the RPM format: it is rpm, which will be used to extract the Suse libraries. Execute make and make install in the /usr/pkgsrc/misc/rpm/ directory to build and install rpm.
Next the suse_base package must be installed. The Suse RPM files can be downloaded by the package system or, if you have a Suse CD, you can copy them in the /usr/pkgsrc/distfiles/suse directory and then run make and make install after going to the /usr/pkgsrc/emulators/suse_base directory.
With the same method install suse_compat, suse_libc5 and suse_x11. The final configuration is:
# pkg_info -a | grep suse
suse_base-6.1p1     Linux compatibility package
suse_x11-6.1p1      Linux compatibility package for X11 binaries
suse_compat-6.1p1   Linux compatibility package with old shared libraries
suse_libc5-6.1p1    Linux compatibility package for libc5 binaries
17.1.3 Installing Acrobat Reader
Now everything is ready for the installation of the Acrobat Reader program (or other Linux programs.) Change to /usr/pkgsrc/print/acroread and give the usual commands.
# make
# make install
Note: to download and install Acrobat Reader you need to add the line "ACCEPTABLE_LICENSES+=adobe-acrobat-license" to /etc/mk.conf to accept the Acrobat Reader license.
17.2 Directory structure
If we examine the outcome of the installation of the Linux libraries and programs we find that /emul/linux is a symbolic link pointing to /usr/pkg/emul/linux, where the following directories have been created:
bin/
boot/
cdrom/
dev/
etc/
floppy/
home/
lib/
mnt/
opt/
proc/
root/
sbin/
usr/
Note: please alwayr refer to /emul/linux and not to /usr/pkg/emul/linux. The latter is an implementation detail and may change in the future.
How much space is required for the Linux emulation software? On my system I get the following figure:
# cd /usr/pkg/emul
# du -k linux
...
60525   linux/
Acrobat Reader, the program, has been installed in the usual directory for package binaries: /usr/pkg/bin/.
Chapter 18 Audio
This chapter is a short introduction to the usage of audio devices on NetBSD (who wants a dumb computer, anyway?)
18.1 Basic hardware elements
In order to make audio work on your system you must know what audio card is installed. Sadly it often not enough to know the brand and model of the card, because many cards use chipsets manufactured from third parties. Therefore knowing the chipset installed on the audio card can sometimes be useful. The NetBSD kernel can recognize many chipsets and a quick look at dmesg is enough most of the times.
Therefore, write the following command:
# dmesg | more
and look for the audio card and chipset. If you're lucky you don't need to do anything because NetBSD automatically detects and configures many audio cards.
Sometimes audio doesn't work because the card is not supported or because you need to do some work in order for the card to be detected by NetBSD. Many audio cards are nowadays very cheap, and it is worth considering buying a different card, but before doing this you can try some simple steps to make the card work with NetBSD.
18.2 BIOS settings
This section is useful only to the owners of i386 PCs; on other architectures (eg. Amiga) there are no such features. The most important thing to determine in order to use the audio card with NetBSD is the type of bus supported by the card.
The most common interfaces are ISA and PCI.
ISA Plug and Play cards are usually more tricky to configure mostly because of the interaction with the BIOS of the computer.
On the newer machines (those produced after 1997) there is a BIOS option which causes many headaches for the configuration of ISA Plug and Play audio cards (but not only audio cards): this option is usually named "PNP OS Installed" and is commonly found in the "PNP/PCI Configuration" (the names can be different in your BIOS.) As a general rule it is usually better to disable (i.e. set it to "NO") this option for NetBSD.
Note: on many systems everything works fine even if this option is enabled. This is highly system dependent.
18.3 Configuring the audio device
During the installation of NetBSD the devices are created in the dev directory. We are primarily interested in:
/dev/audio
/dev/sound
/dev/mixer
If they are not present they can be created like this:
# cd /dev
# ./MAKEDEV all
This command creates all the devices, including the audio devices.
The audio card is now probably ready to be used without further work.
You can make a quick test and send an audio file to the device (audio files usually have the .au extension), but if you don't have an audio file you can just send a text or binary file (of course you won't hear anything useful...). Use /dev/audio or /dev/sound:
# cat filename > /dev/audio
or
# cat filename > /dev/sound
If you hear something it means that the card is supported by NetBSD and was recognized and configured by the kernel at boot, otherwise you must configure the kernel settings for the audio device installed on the system (assuming the card/chipset is supported.)
18.4 Configuring the kernel audio devices
NetBSD supports a wide range of audio cards and the GENERIC kernel already enables and configures most of them. Sometimes it is necessary to setup manually the IRQ and DMA for non-PnP ISA cards.
Note: when you create a custom kernel it is better to work on a copy of the GENERIC file, as described in Chapter 9.
If you still have problems you can try enabling all the devices, because some audio cards can be made to work only by emulating another card.
Many chipset make use of the SoundBlaster and OPL compatibility, but a great number of them work with the WSS emulation.
OPL is a MIDI synthetizer produced by Yamaha; there are many OPL variants (eg. OPL2, OPL3SA, OPL3SA2, etc.). Many audio cards rely on this component or on a compatible one. For example, the chips produced by Crystal (and amongst them the very common CS423x) all have this chipset, and that's why they work with NetBSD.
WSS is not a microchip; it is the acronym of Windows Sound System. Wss is the name of the NetBSD kernel driver which supports the audio system of Microsoft Windows. Many audio cards work with Windows because they adhere to this standard (WSS) and the same holds for NetBSD.
Of the many audio cards that I tested with NetBSD, a good number works only if opl* and wss* are enabled in the kernel.
You should have no problem to get the Creative SoundBlaster cards to work with NetBSD: almost all of them are supported, including the Sound Blaster Live 1024!
When everything works you can disable in the kernel configuration file the devices that you don't need.
18.5 Advanced commands
NetBSD comes with a number of commands that deal with audio devices. They are:
-
audioctl
-
mixerctl
-
audioplay
-
audiorecord
18.5.1 audioctl
Audioctl made its appearance in NetBSD 1.3 and is used to manually set some variables regarding audio I/O, like the frequencies for playing and recording. The available parameters can be displayed with the following command:
# audioctl -a | more
For example, to listen to CD quality music you can use the following command.
# audioctl -w play=44100,2,16,slinear_le
This command sets the frequence to 44100Hz, 2 audio channels, 16 bit, slinear_le encoding.
You can see the supported encodings with:
# audioctl encodings
This command displays the list of all the encodings supported by the audio card on your system.
18.5.2 mixerctl
This command is used to configure the audio mixing and has an interface similar to that of audioctl.
18.5.3 audioplay
With this command you can play audio files. For more sophisticated needs you might want to install one of the many programs available in the package system which let you play audio files in different formats (eg. MP3, etc.)
Chapter 19 Obtaining sources by CVS
CVS (Concurrent Versions System) can be used to fetch the NetBSD source tree or to keep the NetBSD source tree up to date with respect to changes made to the NetBSD sources. There are three trees maintained for which you can use CVS to obtain them or keep them up to date: the current source tree, in which the bleeding edge of developement can be followed or tested, the release source tree in which patches for errata are applied to fix issued and to close security holes found (for example the fragmentation issue in ipf was fixed) and in which some things are added, or replaced by a newer version, which have been found stable and safe to use. For example its now possible to remove the complete arp table with the arp command, this is added functionality and not a fix.
19.1 Fetching system and userland source
To install CVS (if you dont already have it), just do:
% pkg_add ftp://ftp.netbsd.org/pub/NetBSD/packages/OS Ver/arch/All/cvs-1.11nb2.tgz
Where OS Ver, and arch can be obtained by running
% sysctl kern.osrelease hw.machine_arch
To get the sources from scratch without having anything in /usr/src
% setenv CVSROOT :pserver:anoncvs@anoncvs.NetBSD.org:/cvsroot
% cd /usr
% cvs login
password: anoncvs
% cvs checkout -rnetbsd-<BRANCH> -PA src
Where <BRANCH> is the release branch to be checked out, for example, 1.6 would be 1-6, 2.2 would be 2-2. If 2.0 were the branch then it would look like:
% cvs checkout -rnetbsd-2-0 -PA src
Where <BRANCH> is the release branch to be checked out, for example, 1.6 would be 1-6, 2.2 would be 2-2. Note that the branch name does not include the patch level, thus for 1.6.2 it would still be 1-6. If 2.0 were the branch then it would look like:
% cvs checkout -rnetbsd-2-0 -PA src
Or do it by ssh, so that the data is encrypted:
% setenv CVS_RSH ssh
% setenv CVSROOT anoncvs@anoncvs.NetBSD.org:/cvsroot
% cd /usr
% cvs checkout -rnetbsd-<BRANCH> -PA src
To obtain the current source just omit "-rnetbsd-BRANCH" in the last line.
To just update the release source tree if you already got one:
% setenv CVSROOT :pserver:anoncvs@anoncvs.NetBSD.org:/cvsroot
% cd /usr
% cvs login
password: anoncvs
% cvs -d $CVSROOT update -rnetbsd-BRANCH -PAd src
Or by ssh:
% setenv CVS_RSH ssh
% setenv CVSROOT anoncvs@anoncvs.NetBSD.org:/cvsroot
% cd /usr
% cvs -d $CVSROOT update -rnetbsd-BRANCH -PAd src
To update the current source tree, omit the BRANCH.
When you wish to do an update from an unclean tree, i.e. when you rebuild some part of the source or even the whole source tree or the kernel source, and didn't do a make cleandir you have to make object files in the source tree.
The object directories are necessary to do a "cvs update" on an unclean tree. An unclean tree is a source tree in which you have built parts of the tree, i.e. compiled parts or the whole source tree, without having done a "make clean" in those parts or a "make" cleandir on the whole source tree. Otherwise, cvs will want to create directories that have the same name as some of the binairies, and will fail. (Where you used to have a directory called "groff", you now build the binary "groff", but "cvs" must create all the empty directories before pruning them.)
So in /usr/src:
% makedir /usr/obj
% make obj
% makedir /usr/obj
% make obj
Now you're ready to do the cvs update. Or do a make cleandir in /usr/src before using cvs. It's easier and less work instead of making the objectdirs when updating from an unclean tree. CVS is going a lot faster then sup. I don't know exactly how long it's going to take to fetch all the sources. I have only experience with T1 and higher speed lines in which case it just takes an hour or a little more to fetch the complete source, depending of course how well the connection is at the moment. I have no experience how long it takes with a modem. However, in a case you are using a modem, you will wish to compress ond decompress data once it is transferred. In that case do
% cvs -z5 checkout .........
or
% cvs -z5 -d $CVSROOT update ......
The 5 is the level of compression, you can use any number between 1 and 9 where 1 is the fastest compression method and 9 the best but slowest compression method. Keep in mind that this will put extra load on the cvs server.
Note: you must go to: /usr/src/sys/arch/$arch/compile/$kernel_conf_name and do make clean in there and remove that dir before you wish to do a cvs update, for else that one can be unclean as well. That takes care of the kernel source part to go well during cvs update.
19.2 Fetching pkgsrc
Pkgsrc (package source), is a set of software utilities and libraries which have been ported to NetBSD. Its very easy this way to install and deinstall software on your NetBSD system: it fetches the sources files needed, patches the source if needed, configures it and builds the binairies and installs the binaries and man pages. It keeps a database of all packages installed and exactly which files belongs to a package and where the are stored.
To fetch all the pkgsrc from scratch:
% setenv CVSROOT :pserver:anoncvs@anoncvs.NetBSD.org:/cvsroot
% cd /usr
% cvs login
(the password is: "anoncvs")
% cvs checkout -PA pkgsrc
Or by ssh:
% setenv CVS_RSH ssh
% setenv CVSROOT anoncvs@anoncvs.NetBSD.org:/cvsroot
% cd /usr
% cvs checkout -PA pkgsrc
This will create the directory pkgsrc in your /usr and all the package source will be stored under /usr/pkgsrc
To update the pkgsrc just do:
% setenv CVSROOT :pserver:anoncvs@anoncvs.NetBSD.org:/cvsroot
% cd /usr
% cvs login
(the password is: "anoncvs")
% cvs -d $CVSROOT update -PAd pkgsrc
Or by ssh:
% setenv CVS_RSH ssh
% setenv CVSROOT anoncvs@anoncvs.NetBSD.org:/cvsroot
% cd /usr
% cvs -d $CVSROOT update -PAd pkgsrc
However, make sure the pkgsrc dir is clean when you start udating. So do a make clean in /usr/pkgsrc if you aint sure.
Chapter 20 CCD Configuration
The CCD driver allows the user to "concatenate" several physical disks into one pseudo volume. CCD also lets you overcome a feature limitation in CMU RAIDFrame that does not allow you to RAID0 (file system spanning across disks) across disks of different geometry. CCD also allows for an "interleave" to improve disk performance with a gained space loss. This example will not cover that feature.
The steps required to setup a CCD are as follows:
-
Install physical media
-
Configure kernel support
-
Disklabel each volume member of the CCD
-
Configure the CCD conf file
-
Initialize the CCD device
-
Create a 4.4BSD/UFS filesystem on the new CCD device
-
Mount the CDD filesystem
This example features a CCD setup on NetBSD/sparc 1.5. The CCD will reside on 4 SCSI disks in a generic external Sun disk pack chassis connected to the external 50 pin SCSI port.
20.1 Install physical media
This step is at your own discretion, depending on your platform and the hardware at your disposal.
From my DMESG:
Disk #1:
  probe(esp0:0:0): max sync rate 10.00MB/s
  sd0 at scsibus0 target 0 lun 0: <SEAGATE, ST32430N SUN2.1G, 0444> SCSI2 0/direct fixed
  sd0: 2049 MB, 3992 cyl, 9 head, 116 sec, 512 bytes/sect x 4197405 sectors
Disk #2
  probe(esp0:1:0): max sync rate 10.00MB/s
  sd1 at scsibus0 target 1 lun 0: <SEAGATE, ST32430N SUN2.1G, 0444> SCSI2 0/direct fixed
  sd1: 2049 MB, 3992 cyl, 9 head, 116 sec, 512 bytes/sect x 4197405 sectors
Disk #3
  probe(esp0:2:0): max sync rate 10.00MB/s
  sd2 at scsibus0 target 2 lun 0: <SEAGATE, ST11200N SUN1.05, 9500> SCSI2 0/direct fixed
  sd2: 1005 MB, 1872 cyl, 15 head, 73 sec, 512 bytes/sect x 2059140 sectors
Disk #4
  probe(esp0:3:0): max sync rate 10.00MB/s
  sd3 at scsibus0 target 3 lun 0: <SEAGATE, ST11200N SUN1.05, 8808 > SCSI2 0
  sd3: 1005 MB, 1872 cyl, 15 head, 73 sec, 512 bytes/sect x 2059140 sectors
20.2 Configure Kernel Support
The following kernel configuration directive is needed to provide CCD device support. It is enabled in the GENERIC kernel:
pseudo-device ccd 4 # concatenated disk devices
In my kernel config, I also hard code SCSI ID associations to /dev device entries to prevent bad things from happening:
sd0     at scsibus0 target 0 lun ?
# SCSI disk drives
sd1     at scsibus0 target 1 lun ?
# SCSI disk drives
sd2     at scsibus0 target 2 lun ?
# SCSI disk drives
sd3     at scsibus0 target 3 lun ?
# SCSI disk drives
sd4     at scsibus0 target 4 lun ?
# SCSI disk drives
sd5     at scsibus0 target 5 lun ?
# SCSI disk drives
sd6     at scsibus0 target 6 lun ?
# SCSI disk drives
20.3 Disklabel each volume member of the CCD
Each member disk of the CCD will need a special file system established. In this example, I will need to disklabel:
/dev/rsd0c
/dev/rsd1c
/dev/rsd2c
/dev/rsd3c
Note: always remember to disklabel the character device, not the block device, in /dev/r{s,w}d*
Note: on all platforms, the cslice is symbolic of the entire NetBSD partition and is reserved.
You will probably want to remove any pre-existing disklabels on the disks in the CCD. This can be accomplished one of two ways the dd command:
# dd if=/dev/zero of=/dev/rsd0c bs=8k count=1
# dd if=/dev/zero of=/dev/rsd1c bs=8k count=1
# dd if=/dev/zero of=/dev/rsd2c bs=8k count=1
# dd if=/dev/zero of=/dev/rsd3c bs=8k count=1
If your port uses a MBR (Master Boot Record) to partition the disks so that the NetBSD partitions are only part of the overall disk, and other OSs like Windows or Linux use other parts, you can void the MBR and all partitions on disk by using the command:
# dd if=/dev/zero of=/dev/rsd0d count=1
This will make all data on the entire disk unaccessible.
The default disklabel for the disk will look similar to this:
# disklabel -r /dev/rsd0c
[...snip...]
bytes/sector: 512
sectors/track: 116
tracks/cylinder: 9
sectors/cylinder: 1044
cylinders: 3992
total sectors: 4197405
[..snip...]
3 partitions:
#        size   offset    fstype   [fsize bsize   cpg]
  c:  4197405       0     unused     1024  8192        # (Cyl.    0 - 4020*)
You will need to create one "slice" on the NetBSD partition of the disk that consumes the entire partition. The slice must begin at least one cylinder offset from the beginning of the disk/partition to provide space for the special CCD disklabel. The offset should be 1x sectors/cylinder (see following note). Therefore, the "size" value should be "total sectors" minus 1x "sectors/cylinder".
Note: the offset of a slice of type "ccd" must be a multiple of the "sectors/cylinder" value.
Edit your disklabels accordingly. Be sure to specify the path to the character device, not the block device.
Note: be sure to export EDITOR=[path to your favorite editor] before editing the disklabels.
# disklabel -e /dev/rsd0c
Note: the slice must be fstype ccd.
Because there will only be one slice on this partition, you can recycle the c slice (normally reserved for symbolic uses). Change your disklabel to the following:
3 partitions:
#        size   offset    fstype   [fsize bsize   cpg]
  c:  4196361     1044       ccd                       # (Cyl. 1 - 4020*)
Optionally you can setup a slice other than c to use, simply adjust accordingly below:
3 partitions:
#        size   offset    fstype   [fsize bsize   cpg]
  a:  4196361     1044       ccd                       # (Cyl. 1 - 4020*)
  c:  4197405       0     unused     1024  8192        # (Cyl. 0 - 4020*)
Be sure to write the label when you have completed. Disklabel will object to your disklabel and prompt you to re-edit if it does not pass it's sanity checks.
20.4 Configure the CCD
Once all disk are properly labeled, you will need to generate a configuration file. The configuration file resides in /etc by default. You may need to create a new one. Format:
#ccd ileave flags component devices
Note: for the "ileave", if a value of zero is used then the disks are concatenated, but if you use a value equal to the "sectors/track" number the disks are interleaved.
Example in this case:
# more /etc/ccd.conf
ccd0  0  none /dev/sd0c /dev/sd1c /dev/sd2c /dev/sd3c
Note: the CCD configuration file references the device file for the newly created CCD filesystems. Be sure not to reference the block device at this point, instead use the character device.
20.5 Initialize the CCD device
Once you are confident that your CCD configuration is sane, you can initialize the device using the ccdconfig command: Configure:
# ccdconfig -c -f /etc/ccd.conf
Unconfigure:
# ccdconfig -u -f /etc/ccd.conf
Initializing the CCD device will activate /dev entries: /dev/{,r}ccd#:
# ls -la  /dev/{,r}ccd0*
brw-r-----  1 root  operator   9, 0 Apr 28 21:35 /dev/ccd0a
brw-r-----  1 root  operator   9, 1 Apr 28 21:35 /dev/ccd0b
brw-r-----  1 root  operator   9, 2 May 12 00:10 /dev/ccd0c
brw-r-----  1 root  operator   9, 3 Apr 28 21:35 /dev/ccd0d
brw-r-----  1 root  operator   9, 4 Apr 28 21:35 /dev/ccd0e
brw-r-----  1 root  operator   9, 5 Apr 28 21:35 /dev/ccd0f
brw-r-----  1 root  operator   9, 6 Apr 28 21:35 /dev/ccd0g
brw-r-----  1 root  operator   9, 7 Apr 28 21:35 /dev/ccd0h
crw-r-----  1 root  operator  23, 0 Jun 12 20:40 /dev/rccd0a
crw-r-----  1 root  operator  23, 1 Apr 28 21:35 /dev/rccd0b
crw-r-----  1 root  operator  23, 2 Jun 12 20:58 /dev/rccd0c
crw-r-----  1 root  operator  23, 3 Apr 28 21:35 /dev/rccd0d
crw-r-----  1 root  operator  23, 4 Apr 28 21:35 /dev/rccd0e
crw-r-----  1 root  operator  23, 5 Apr 28 21:35 /dev/rccd0f
crw-r-----  1 root  operator  23, 6 Apr 28 21:35 /dev/rccd0g
crw-r-----  1 root  operator  23, 7 Apr 28 21:35 /dev/rccd0h
20.6 Create a 4.4BSD/UFS filesystem on the new CCD device
You may now disklabel the new virtual disk device associated with your CCD. Be sure to use the character device:
# disklabel -e /dev/rccd0c
Once again, there will be only one slice, so you may either recycle the c slice or create a separate slice for use.
# disklabel -r /dev/rccd0c
# /dev/rccd0c:
type: ccd
disk: ccd
label: default label
flags:
bytes/sector: 512
sectors/track: 2048
tracks/cylinder: 1
sectors/cylinder: 2048
cylinders: 6107
total sectors: 12508812
rpm: 3600
interleave: 1
trackskew: 0
cylinderskew: 0
headswitch: 0           # microseconds
track-to-track seek: 0  # microseconds
drivedata: 0
#        size   offset    fstype   [fsize bsize   cpg]
  c: 12508812        0    4.2BSD     1024  8192    16  # (Cyl. 0 - 6107*)
The filesystem will then need formatted:
# newfs /dev/rccd0c
Warning: 372 sector(s) in last cylinder unallocated
/dev/rccd0c:    12508812 sectors in 6108 cylinders of 1 tracks, 2048 sectors
        6107.8MB in 382 cyl groups (16 c/g, 16.00MB/g, 3968 i/g)
super-block backups (for fsck -b #) at:
[...]
20.7 Mount the filesystem
Once you have a created a file system on the CCD device, you can can mount the file system against an mount point on your system. Be sure to mount the slice labeled type ffs or 4.4BSD:
# mount /dev/ccd0c /mnt
Then:
# export BLOCKSIZE=1024; df
Filesystem  1K-blocks     Used   Avail Capacity  Mounted on
/dev/sd6a      376155   320290   37057    89%    /
/dev/ccd0c    6058800       1  5755859     0%    /mnt
Congratulations, you now have a working CCD. Please consult the rest of the manual for instructions on how to initialize the device at boot-time via RC. For more detail on any of the commands here, please see their respective man pages.
Chapter 21 The cryptographic device driver
The cgd driver provides functionality which allows you to use disks or partitions for encrypted storage. After authentication the encrypted partition is accesible using cgd pseudo-devices. The cgd driver provides the following encryption algorithms:
-
aes-cbc: AES (Rijndael). AES uses a 128 bit blocksize and accepts 128, 192 or 256 bit keys.
-
blowfish-cbc: Blowfish uses a 64 bits blocksize and accepts 128 bit keys
-
3des-cbc: Triple DES uses a 64 bit blocksize and accepts 192 bit keys (only 168 bits are actually used for encryption)
All three ciphers are used in CBC mode. This means each block is XORed with the previous encrypted block before encryption. This reduces the risk that a pattern can be found, which can be used to break the encryption.
Another aspect of cgd that needs some attention are the verification methods cgdconfig provides. These verification methods are used to verify the passphrase is correct. The following verification methods are available:
-
none: no verification is performed. This can be dangerous, because the key is not verified at all. When a wrong key is entered cgdconfig configures the cgd device as normal, but data which was available on the volume will be destroyed (decrypting blocks with a wrong key will result in random data, which will result in a regeneration of the disklabel with the current key).
-
disklabel: cgdconfig scans for a valid disklabel. If a valid disklabel is found with the key that is provided authentication will succeed.
-
ffs: cgdconfig scans for a valid FFS file system. If a valid FFS file system is found with the key that is provided authentication will succeed.
21.1 Configuring kernel support
To use cgd you need a kernel with support for the cgd pseudo device. Make sure the following line is in the kernel configuration:
pseudo-device cgd 4 # cryptographic disk driver
The number specifies how many cgd devices may be configured at the same time. After configuring the cgd pseudo-device you can recompile the kernel and boot it to enable cgd support.
21.2 Setting up a cgd device
The best way to learn something is by practice. In this section we will look at an example of setting up cgd. In this example we have reserved the "h" partition of the wd0 disk for encryption purposes, and we want want to create an encrypted FFS filesystem. The first thing that needs to be done is to create a configuration file for the wd0h parition. This file is named /etc/cgd/wd0h. This file can be created using the cgdconfig. Suppose we want to use the Blowfish cipher and want to check for an FFS filesystem for verification, this command would create that configuration:
# cgdconfig -g -o /etc/cgd/wd0h -V ffs blowfish-cbc
The "-g" parameter forces cgdconfig to create a configuration file, the filename is specified by the "-o" parameter. The "-V" parameter specifies which verification method should be used, valid choices are none, disklabel, and ffs (which are explained above). The resulting configuration file looks like this:
algorithm blowfish-cbc;
iv-method encblkno;
keylength 128;
verify_method ffs;
keygen pkcs5_pbkdf2 {
        iterations 71564;
        salt AAAAgOGFALVANSHf61jf4XYlnUI=;
};
At this moment we have created a configuration file and we can start to use this configuration. The next thing that has to be done is to configure an cgd pseudo device. This can be done with the following command:
# cgdconfig -V none cgd0 /dev/wd0h
This command configures the cgd0 device to use the wd0h parition to store encrypted data. At this point we will not use verification, because the cgd0 "disk" does not have a valid FFS filesystem. cgdconfig will ask for a passphrase, just enter the passphrase you would like to use for this encrypted partition. You can use the cgd0 device as an normal disk and disklabel it. Create a partition with the 4.2BSD type and make a FFS filesystem on this partition with newfs.
After the initial partitioning and formatting the cgd pseudo-device can be unconfigured with:
# cgdconfig -u cgd0
After these configuration steps the encrypted partition can be used with:
# cgdconfig cgd0 /dev/wd0h
Note that the "-V" parameter is omitted. The verification method configured in /etc/cgd/wd0h will be used.
21.3 Swap encryption
A question that pops up quite often on the mailinglists is how one can setup NetBSD to encrypt swap. While the instructions above should be sufficient to know how to set up swap, we will provide a short outline in this section. In this example we will use wd0b for storage of the encrypted swap partition. Swap will be encrypted with the Blowfish cipher. As normal, the first step is to create a cgd configuration file. This time we will use the "-k" parameter to generate a random key, and we will not use a verification method (because the parition will be reinitialized after each boot). Execute the following command to generate /etc/cgd/wd0b:
# cgdconfig -g -o /etc/cgd/wd0b -V none -k randomkey blowfish-cbc
With the configuration file set up we can configure the cgd0 pseudo-device:
# cgdconfig cgd0 /dev/wd0b
The next step is to configure the disklabel and to save it to /etc/cgd/wd0b.disklabel. Please refer to disklabel(8) for information about how to use disklabel to set up a swap partition.
Now we have to configure cgd to make sure cgd0 is configured during boot process of NetBSD. Add the following line to /etc/cgd/cgd.conf:
cgd0 /dev/wd0b
cgd0 is reinitialized with a blank disklabel after a reboot, because no verification is used and a random key is generated. So, the cgd0 device has to disklabelled with the disklabel we just saved during each boot. This can be done by creating the /etc/rc.conf.d/cgd and add this function (thanks to Lubomir Sedlacik):
swap_device="cgd0"
swap_disklabel="/etc/cgd/wd0b.disklabel"
start_postcmd="cgd_swap"
cgd_swap()
{
        if [ -f $swap_disklabel ]; then
                disklabel -R -r $swap_device $swap_disklabel
        fi
}
Finally add the cgd0 partition you configured to /etc/fstab.
Chapter 22 rc.d System
As of NetBSD version 1.5 the startup of the system changed slightly to using rc scripts for controlling services. This chapter is an overview of the rc configuration on NetBSD 1.5 and later.
22.1 The rc.d Configuration
The rc files for the system reside under /etc, they are:
-
/etc/rc
-
/etc/rc.conf
-
/etc/rc.d/*
-
/etc/rc.lkm
-
/etc/rc.local
-
/etc/rc.shutdown
-
/etc/rc.subr
-
/etc/defaults/*
-
/etc/rc.conf.d/*
First, a look at controlling and supporting scripts:
-
/etc/rc runs the scripts in /etc/rc.d
-
/etc/rc.subr contains common functions used by rc scripts.
-
/etc/shutdown calls the scripts in /etc/rc.d in reverse order.
Additional scripts outside of the rc.d directory:
-
/etc/rc.lkm loads or unloads Loadable Kernel Modules.
-
/etc/rc.local almost the last script called at boot up, local daemons may be added here.
Following is the example from the system for an apache web server added to /etc/rc.local:
if [ -f /usr/pkg/etc/rc.d/apache ]; then
        /usr/pkg/etc/rc.d/apache start
fi
The /etc/defaults directory contains the default settings for NetBSD and the contents should not be changed. Within the rc context the only file of interest is rc.conf, this is the default rc configuration that ships with NetBSD. In order to alter a default setting, an override may be installed in /etc/rc.conf. For example, if you wanted to enable the Secure Shell Daemon:
# cd /etc; grep ssh defaults/rc.conf
sshd=NO                 sshd_flags=""
# echo "sshd=YES" >> rc.conf
Or just edit the file with your favorite editor. The same can be done with any default that needs to be changed.
Another way to make rc.conf easy to edit is to do the following:
# cd /etc/defaults
# cat rc.conf >> ../rc.conf
Then modify anything you need to.
Last and not least, the /etc/rc.conf.d/ directory can be used for scripts that are third party.
22.2 The rc.d Scripts
The actual scripts that control services are in /etc/rc.d. Once a service has been activated or told not to activate in /etc/rc.conf it can be also be modified by calling the rc script from the command line, for example if an administrator needed to start secure shell:
# /etc/rc.d/sshd start
Starting sshd.
The rc scripts must receive one of the following arguments:
-
start
-
stop
-
restart
-
kill
An example might be when a new record has been added to the named database on a named server:
# /etc/rc.d/named restart
Stopping named.
Starting named.
A slightly more complex example is when a series of settings have been changed, for instance a firewall's ipfilter rules, ipnat configuration, and the secure shell server has switched encryption type:
# cd /etc/rc.d
# ./ipfilter restart; ./ipnat restart; ./sshd restart
22.3 The Role of rcorder and rc Scripts
As per the System Manager's Manual, rcorder is designed to print out a dependancy ordering of a set of interdependent files. It basically determines the order of execution one way or another. On some Unix systems this is done by numbering the files and/or putting them in separate run level directories. Which can be messy. On NetBSD this is done by the controlling scripts mentioned at the beginning of this document and by the contents of each rc script.
In the rc scripts there is a series of lines that have one of the following in them:
REQUIRE
PROVIDE
BEFORE
KEYWORD
These dicatate the dependencies of that particular rc script and hence rcorder can easily work either "up" or "down" as the situation requires. Following is an example of the nfsd rc script:
...
 PROVIDE: nfsd
 REQUIRE: mountd
. /etc/rc.subr
...
Here we can see that this script provides the nfsd service, however, it requires mountd to be running.
22.4 Additional Reading
There are other resources available pertaining to the rc.d system:
-
One of the principal designers of rc.d, Luke Mewburn, gave a presentation on the system at USENIX 2001. It is available in PDF format.
-
Will Andrews wrote a Daemonnews article called The NetBSD rc.d System.
Chapter 23 The Internet Super Server
Many systems administrators, users, engineers and the like are familar with the internet super server or inetd. Additionally, most are also quite familar with the relationship between several key files in the /etc directory and inetd. Suprisingly there is very little documentation on the internet that is easily obtainable which explains the basics of inetd and its relation to other files and the system as a whole.
23.1 Overview
In this document we will look at a simple definition of inetd, how several files that relate to inetd work (not that these files are not related to other software), how to add a service to inetd and some considerations both to use inetd for a particular service and times when a service might be better off running outside of inetd.
23.2 What is Inetd
The internet super server listens on its own sockets, when it receives a request it then determines which server to connect the request to and starts an instance of the server program.
Following is a very simple diagram to illustrate inetd:
 pop3  ------  |
               |
 ftpd -------  | INETD | ---- Internet / DMZ / Switch / Whatever . . .
               |
 cvspserver -  |
In the above diagram you can see the general idea. The inetd server receives a request and then starts the appropiate server process. What inetd is doing is software multiplexing. An important note here, on many other UNIX-like systems, inetd has a package called tcpwrappers as a security enhancment, on NetBSD the secure behavoir of tcpwrappers was built in using libwrap.
23.3 Protocols
The first file is the protocols name data base which is /etc/protocols. This file has the information pertaining to DARPA Internet protocols. The format of the protocols name data base is:
protocol_name number aliases
Lets look at the second entry in the /etc/protocols db as an example:
icmp 1 ICMP
Starting from the left, we see that the protocol name is icmp, the number is 1 and the only aliases listed is ICMP.
23.4 Services
The next file to consider is the service name data base that can be found in /etc/services. This db basically contains information about services and the mappings from protocol to port number. The format of the /etc/services file is:
service_name port_number protocol_name aliases
Lets take a look at the ssh entries as an example:
ssh             22/tcp
ssh             22/udp
As we can see, from the left, the service name is ssh, the port number is 22, the protocols are both tcp and udp. Notice that there is a separate entry for every protocol a service can use (even on the same port).
23.5 RPC
The rpc program number data base is kept in /etc/rpc and contains name mappings to rpc program numbers, the format of the file is:
server_name program_number aliases
For example, here is the nfs entry:
nfs 100003 nfsprog
23.6 Inetd
Last and definitely not least of the files we are concerned with is the internet super-server file, /etc/inetd.conf. The inetd.conf file basically provides enabling and mapping of services the systems administrator would like to have multiplexed through inetd.
The previous files were very much informational for the system and hence their layout was also relatively simple, the inetd.conf file, however, is a little more complex (but not too much) and deserves a little deeper explanation.
The basic field layout of the inetd.conf file is:
service_name socket_type protocol wait/nowait user:group server_program arguments
- service-name
-
The service name should match up with the /etc/services file for all standard services (it is at least highly recommended), however, non-standard services you may be running locally do not, it is important that you take care in selecting a non-standard service name so it does not clash with a standard one.
- socket-type
-
The communications socket type, the different types are stream dgram raw rdm and seqpacket. The most common socket types are stream and dgram.
- protocol
-
The protocol used, mostly tcp, tcp6, udp and udp6. It is worth noting that tcp and udp mean they are backwards compatible with all previous versions, however, tcp4 specifically means communication via ipv4 only. This can be taken a step forward by putting ipv46. In additon to those, rpc uses rpc and tcp or rpc/tcp.
- wait/nowait
-
This field tells inetd if it should wait for a server program to return or to keep processing a connection steadily. Many connections to their server processes require answers after data transfers are complete, where other types can keep transmitting on a connection continously, the latter is a nowait and the former wait. In most cases, this entry corresponds to the socket-type, for example a streaming connection would (most of the time) have a nowait value in this field.
- user[:group]
-
This field is pretty obvious, the user and optionally a group that runs the server process which inetd starts up.
- server-program
-
This field is path to the program that gets started.
- program-arguments
-
This field contains the program and additional arguments the systems administrator may need to specifiy for the server program that is started.
That is all a lot to digest and there are other things the systems administrator can do with some of the fields. Here is a sample line from an inetd.conf file:
ftp stream tcp nowait root /usr/libexec/ftpd ftpd -ll
From the left, the service-name is ftp, socket-type is stream, protocol is tcp, wait/nowait is set to nowait, the user is root, path is /usr/libexec/ftpd and program name and arguments is ftpd -ll. Notice in the last field, the program name is different from the service-name.
23.7 Adding a Service
Many times a systems administrator will find that they need to add a service to their system that is not already in inetd or they may wish to move a service to it because it does not get very much traffic. This is usually pretty simple, so as an example we will look at adding a version of pop3 on a NetBSD system.
In this case we have retrieved and installed the cucipop package. This server is pretty simple to use, the only oddities are different path locations. Since it is pop3 we know it is a stream oriented connection with nowait. Using root will be fine, the only item that is different is the location of the program and the name of the program itself.
So the first half of the new entry looks like this:
pop3 stream tcp nowait root
After installation, pkgsrc deposited cucipop in /usr/pkg/sbin/cucipop. So with the next field we have:
pop3 stream tcp nowait root /usr/pkg/sbin/cucipop
Last, we want to use the Berkeley mailbox format, so our server program must be called with the -Y option. This leaves the entire entry looking like so:
pop3 stream tcp nowait root /usr/pkg/sbin/cucipop cucipop -Y
Now, to have inetd use the new entry, we simply restart it using the rc script:
# /etc/rc.d/inetd restart
All done, in most cases, the software you are using has documentation that will specify the entry, in the off case it does not, sometimes it helps to try and find something similar to the server program you will be adding. A classic example of this is a MUD server which has built-in telnet. You can pretty much borrow the telnet entry and change parts where needed.
23.8 When to use or not to use inetd
The decision to add or move a service into or out of inetd is usually arrived at based on serverload. As an example, on most systems the telnet daemon does not require as many new connections as say a mail server. Most of the time the administrator has to feel out if a service should be moved.
A good example I have seen is mail services such as smtp and pop. I had setup a mail server in which pop3 was in inetd and exim was running in standalone, I mistakenly assumed it would run fine since there was a low amount of users, namely myself and a diagnostic account. The server was also setup to act as a backup MX and relay in case another heavily used one went down. When I ran some tests I discovered a huge time lag for pop connections remotely. This was because of my steady fetching of mail and the diagnostic user constanty mailing diagnostics back and forth. In the end I had to move the pop3 service out of inetd.
The reason for moving the service is actually quite interesting. When a particular service becomes heavily used, of course, it causes a load on the system. In the case of a service that runs within the inetd meta daemon the effects of a heavily loaded service can also harm other services that use inetd. If the multiplexor is getting too many requests for one particular service, it will begin to affect the performance of other services that use inetd. The fix, in a situation like that, is to make the offending service run outside of inetd so the response time of both the service and inetd will increase.
23.9 Other Resources
Following is some additional reading and information about topics covered in this document:
Chapter 24 Miscellaneous operations
This chapter collects various topics, in sparse order, which didn't find a place in the previous chapters.
24.1 Creating install boot floppies for i386
First of all, you need to be running a kernel with the vnd pseudo device enabled (this is the default for a GENERIC kernel.).
-
First, you must create a valid kernel to put on your floppies, let's call it FLOPPY. This kernel must be derived from some INSTALL model. Then, you have a valid /sys/arch/i386/compile/FLOPPY/netbsd file.
-
Go to /usr/src/distrib/i386/floppies/ramdisk and do
# make
This will create the ramdisk.fs file in the directory.
-
Go to /usr/src/distrib/i386/floppies/fdset and do
# make KERN=/sys/arch/i386/compile/FLOPPY/netbsd
This will create one or two (depending on the size of kernel) files named boot1.fs and boot2.fs
-
Transfer these files to the floppies with the commands
# dd if=boot1.fs of=/dev/fd0a bs=36b
# dd if=boot2.fs of=/dev/fd0a bs=36b
-
Put the first floppy in the drive and power on!
24.2 Creating a CD-ROM
To create a data CD-ROM the mkisofs and cdrecord programs can be used: both SCSI and IDE recorders are supported. IDE/ATAPI drives are supported by NetBSD without the need of an emulation layer, because the driver can receive ATAPI commands directly, which is a simple and elegant solution.
Two steps are required to create a CD: first the ISO image of the CD must be created on the hard drive with the mkisofs program. Next, the image must be written to the CD with cdrecord. In the following example an IDE/ATAPI CD-Writer supported by cdrecord is used. This is the dmesg output:
cd1 at atapibus1 drive 0: <HP CD-Writer Plus 8100> type 5 cdrom removable
Note: when burning a CD the execution speed is critical: the data flow to the CD-Writer must be constant and there can be no pauses; the data buffer of cdrecord must never be empty. This means that it is better to burn CD's when the system is idle or nearly idle (don't recompile the kernel or encode an MP3 while you are running cdrecord...)
24.2.1 Creating the ISO image
Since ISO images tend to be quite large, it is better to check that there is sufficient space on the hard disk for the data that you are writing (up to 700MB.) To create the image, if the data are in the mydata directory and its subdirectories, write the following command:
# mkisofs -flrTv -o cdimage mydata/
When the cdimage file has been created, it can be examined and browsed like a regular file system, to check that there are no errors before writing it to the CD. For example:
# ls -l cdimage
-rw-rw-r--  1 auser     user  284672 Dec  1 11:58 cdimage
# vnconfig -v vnd0 cdimage 512/556/1/1
# mount -r -t cd9660 /dev/vnd0c /mnt
  ... browsing su /mnt ...
# umount /mnt
# vnconfig -u vnd0
The value 556 is the result of the size of the cdimage file divided by 512.
Creating a hybrid CD: mkisofs can create CDs using the Joliet format; such CDs will be readable on Microsoft platforms. It is also possible to create hybrid CDs, with both RockRidge and Joliet extensions, which will be readable on Unix and Windows platforms. For example:
$ mkisofs -l -J -R -o cd.iso mydata/Check the mkisofs man page for the details of the available options.
24.2.2 Writing the image to the CD
In the second step the image is written to the CD with the following command:
# cdrecord -v speed=2 dev=/dev/rcd1d cdimage
Note: for ATAPI drives the rcd#d must be used because the a device does not accept ATAPI commands.
before writing the image it is possible to perform a test, disabling the laser: just add the -dummy and -nofix options to the command line. For example:
# cdrecord -v -dummy -nofix speed=2 dev=/dev/rcd1d cdimage
The two steps, creating and burning the image, can be combined in a single command, without the need to create a (big) temporary file on the hard disk. The command looks like this:
# (nice -18 mkisofs -flrT mydata/) | cdrecord -v fs=16m speed=2 dev=/dev/rcd1d -
The option fs=16m is used to allocate a bigger fifo, avoiding cdrecord buffer underflow errors (this means that cdrecord has no data to write.)
24.2.3 Copying a CD
To copy directly a CD the -isosize option of cdrecord can be used. For example:
# cdrecord -v fs=16m -isosize speed=2 dev=/dev/rcd1d /dev/rcd0d
Note: if you are using two IDE/ATAPI CD(-RW) it is better if they are connected to two different IDE controllers (one to the primary and one to the secondary) because the data flow is better. This is an example configuration:
wd0: hard disk, IDE primary master
cd0: CD reader, IDE primary slave
cd1: CD writer, IDE secondary master
24.2.4 Creating a bootable CD
Creating a bootable CD is only a matter of having a boot binary file to put on the CD: this boot file emulates a floppy. Then the -b option of mkisofs can be used. For example:
# mkisofs -vr -b boot.fs -o cdimage mydata/
boot.fs is the boot binary for the CD. Note that the path of boot.fs must be relative to the mydata/ directory.
24.3 Synchronizing the system clock
It is not unusual to find that the system clock is wrong, often by several minutes: for some strange reason it seems that computer clocks are not very accurate. The problem gets worse if you administer many networked hosts: keeping the clocks in sync can easily become a nightmare. To solve this problem, the NTP protocol (version 3) comes to our aid: this protocol can be used to synchronize the clocks of a network of workstations using one or more NTP servers.
Thanks to the NTP protocol it is possible to adjust the clock of a single workstation but also to synchronize an entire network. The NTP protocol is quite complex, defining a hierarchical master-slave structure of servers divided in strata: the top of the hierarchy is occupied by stratum 1 servers, connected to an external clock (ex. a radio clock) to guarantee a high level of accuracy. Underneath, stratum 2 servers synchronize their clocks with stratum 1, and so on. The accuracy decreases as we proceed towards lower levels. This hierarchichal structure avoids the congestion which could be caused by having all hosts refer to the same (few) stratum 1 servers. If, for example, you want to synchronize a network, you don't connect all the hosts to the same public stratum 1 server. Instead, you create a local server which connects to the main server and the remaining hosts synchronize their clocks with the local server.
Fortunately, to use the NTP tools you don't need to understand the details of the protocol and of its implementation (if you are interested, refer to RFC 1305) and you only need to know how to configure and start some programs. The base system of NetBSD already contains the necessary tools to utilize this protocol (and other time related protocols, as we'll see), derived from the xntp implementation. This section describes a simple method to always have a correct system time.
First, it is necessary to find the address of the public NTP servers to use as a reference; a detailed listing can be found at http://www.eecis.udel.edu/~mills/ntp/servers.html. As an example, for Italy the two stratum 1 servers tempo.cstv.to.cnr.it and time.ien.it can be used.
Next, to adjust the system clock give the following command as root:
# ntpdate -b tempo.cstv.to.cnr.it time.ien.it
(substitute the names ot the servers in the example with the ones that you are actually using. Option -b tells ntpdate to set the system time with the settimeofday system call, instead of slewing it with adjtime (the default.) This option is suggested when the difference between the local time and the correct time can be considerable.
As you've seen, ntpdate is not difficult to use. The next step is to start it automatically, in order to always have the correct system time. If you have a permanent connection to the Internet, you can start the program at boot with the following line of /etc/rc.conf:
ntpdate=YES ntpdate_hosts="time.ien.it"
The name of the NTP server to use is specified in the ntpdate_hosts variable; if you leave this field empty, the boot script will try to extract the name from the /etc/ntp.conf file.
If you don't have a permanent Internet connection (ex. you have a dial-up modem connection through an ISP) you can start ntpdate from the ip-up script, as explained in Chapter 11. In this case add the following line to the ip-up script:
/usr/sbin/ntpdate -s -b time.ien.it
(the path is mandatory or the script will probably not find the executable.) Option -s diverts logging output from the standard output (this is the default) to the system syslog(3) facility, which means that the messages from ntpdate will usually end up in /var/log/messages.
Besides ntpdate there are other useful NTP commands. It is also possible to turn one of the local hosts into an NTP server for the remaining hosts of the network. The local server will synchronize its clock with a public server. For this type of configuration you must use the xntpd daemon and create the /etc/ntp.conf configuration file. For example:
server time.ien.it
server tempo.cstv.to.cnr.it
Xntpd can be started too from rc.conf, using the relevant option:
xntpd=YES
NTP is not your only option if you want to synchronize your network: you can also use the timed daemon, which was developed for 4.3BSD. Timed too uses a master-slave hierarchy: when started on an host, timed asks the network time to a master and ajusts the local clock accordingly. A mixed structure, using both timed and xntpd can be used. One of the local hosts gets the correct time from a public NTP server and is the timed master for the remaining hosts of network, which become its clients and synchronize their clocks using timed. This means that the local server must run both NTP and timed; care must be taken that they don't interfere with each other (timed must be started with the -F hostname option so that it doesn't try to adjust the local clock.)
24.4 Installing the boot manager
Sysinst, the NetBSD installation program, can install the NetBSD boot manager on the hard disk. The boot manager can also be installed or reconfigured at a later time, if needed, with the fdisk command. For example:
# fdisk -B wd0
If NetBSD doesn't boot from the hard disk, you can boot it from the installation floppy and start the kernel on the hard disk. Insert the installation disk and, at the boot prompt, give the following command:
> boot wd0a:netbsd
This boots the kernel on the hard disk (use the correct device, for example sd0a for a SCSI disk.)
Note: sometimes fdisk -B doesn't give the expected result (at least it happened to me), probably if you install/remove other operating systems like Windows 95. In this case, try a fdisk /mbr from DOS and then run again fdisk from NetBSD.
24.5 Deleting the disklabel
Though this is not an operation that you need to perform frequently, it can be useful to know how to do it in case of need. Please be sure to know exactly what you are doing before performing this kind of operation. For example:
# dd if=/dev/zero of=/dev/rwd0c bs=8k count=1
The previous command deletes the disklabel (not the MBR partition table.) To completely delete the disk, the wd0d device must be used. For example:
# dd if=/dev/zero of=/dev/rwd0d bs=8k
24.6 Speaker
I found this tip on a mailing list (I don't remember the author.) To output a sound from the speaker (for example at the end of a long script) the kernel spkr device can be used, which is mapped on /dev/speaker. For example:
echo 'BPBPBPBPBP' > /dev/speaker
Note: the spkr device is not enabled in the generic kernel; a customized kernel is needed.
24.7 Forgot root password?
If you forget root's password, not all is lost and you can still "recover" the system with the following steps: boot single user, mount / and change root's password. In detail:
-
Boot single user: when the boot prompt appears and the five seconds countdown starts, give the following command:
> boot -s
-
At the following prompt
Enter pathname of shell or RETURN for sh:
press Enter.
-
Write the following commands:
# fsck -y / # mount -u / # fsck -y /usr # mount /usr
-
Change root's password with passwd.
-
Use the exit command to go to multiuser mode.
24.8 Adding a new hard disk
This section describes how to add a new hard disk to an already working NetBSD system. In the following example a new SCSI controller and a new hard disk, connected to the controller, will be added. If you don't need to add a new controller, skip the relevant part and go to the hard disk configuration. The installation of an IDE hard disk is identical; only the device name will be different (wd# instead of sd#).
As always, before buying new hardware, consult the hardware compatibility list of NetBSD and make sure that the new device is supported by the system.
When the SCSI controller has been physically installed in the system and the new hard disk has been connected, it's time to restart the computer and check that the device is correctly detected, using the dmesg command. This is the sample output for an NCR-875 controller:
ncr0 at pci0 dev 15 function 0: ncr 53c875 fast20 wide scsi ncr0: interrupting at irq 10 ncr0: minsync=12, maxsync=137, maxoffs=16, 128 dwords burst, large dma fifo ncr0: single-ended, open drain IRQ driver, using on-chip SRAM ncr0: restart (scsi reset). scsibus0 at ncr0: 16 targets, 8 luns per target sd0(ncr0:2:0): 20.0 MB/s (50 ns, offset 15) sd0: 2063MB, 8188 cyl, 3 head, 172 sec, 512 bytes/sect x 4226725 sectors
If the device doesn't appear in the output, check that it is supported by the kernel that you are using; if necessary, compile a customized kernel (see Chapter 9.)
Now the partitions can be created using the fdisk command. First, check the current status of the disk:
# fdisk sd0
NetBSD disklabel disk geometry:
cylinders: 8188 heads: 3 sectors/track: 172 (516 sectors/cylinder)
BIOS disk geometry:
cylinders: 524 heads: 128 sectors/track: 63 (8064 sectors/cylinder)
Partition table:
0: sysid 6 (Primary 'big' DOS, 16-bit FAT (> 32MB))
start 63, size 4225473 (2063 MB), flag 0x0
beg: cylinder 0, head 1, sector 1
end: cylinder 523, head 127, sector 63
1: <UNUSED>
2: <UNUSED>
3: <UNUSED>
In this example the hard disk already contains a DOS partition, which will be deleted and replaced with a native NetBSD partition. The command fdisk -u sd0 allows to modify interactively the partitions. The modified data will be written on the disk only before exiting and fdisk will request a confirmation before writing, so you can work relaxedly.
To create the BIOS partitions the command fdisk -u must be used; the result is the following:
Partition table:
0: sysid 169 (NetBSD)
start 63, size 4225473 (2063 MB), flag 0x0
beg: cylinder 0, head 1, sector 1
end: cylinder 523, head 127, sector 63
1: <UNUSED>
2: <UNUSED>
3: <UNUSED>
Now it's time to create the disklabel fot the NetBSD partition. The correct steps to do this are:
# disklabel sd0 > tempfile # vi tempfile # disklabel -R -r sd0 tempfile
Now we create some disklabel partitions, editing the tempfile as already explained. The result is:
# size offset fstype [fsize bsize cpg] a: 2048004 63 4.2BSD 1024 8192 16 # (Cyl. 0*- 3969*) c: 4226662 63 unused 0 0 # (Cyl. 0*- 8191*) d: 4226725 0 unused 0 0 # (Cyl. 0 - 8191*) e: 2178658 2048067 4.2BSD 1024 8192 16 # (Cyl. 3969*- 8191*)
Note: when the disklabel has been created it is possible to optimize it studying the output of the command newfs -n /dev/sd0a, which warns about the existence of unallocated sectors at the end of a disklabel partition. The values reported by newfs can be used to adjust the sizes of the partitions with an iterative process.
The final operation is the creation of the file systems for the newly defined partitions (a and e.)
# newfs /dev/sd0a # newfs /dev/sd0e
The disk is now ready for usage, and the two partitions can be mounted. For example:
# mount /dev/sd0a /mnt
24.9 Password file is busy?
If you try to modify a password and you get the mysterious message "Password file is busy", it probably means that the file /etc/ptmp has not been deleted from the system. This file is a temporary copy of the /etc/master.passwd file: check that you are not loosing important information and then delete it (ptmp, not master.passwd.)
Note: if the file /etc/ptmp exists you can also receive a warning message at system startup. For example:
root: password file may be incorrect - /etc/ptmp exists
24.10 How to rebuild the devices in /dev
First shutdown to single user, partitions still mounted "rw" (read-write); You can do that by just typing shutdown now while you are in multi user mode, or reboot with the -s option and make / and /dev read-writable by doing.
# mount -u / # mount -u /dev
Then:
# mkdir /nudev # cd /nudev # cp /dev/MAKEDEV* . # sh ./MAKEDEV all # cd / # mv dev odev # mv nudev dev # rm -r odev
Or if you fetched all the sources in /usr/src:
# mkdir /nudev # cd /nudev # cp /usr/src/etc/MAKEDEV.local . # cp /usr/src/etc/etc.$arch/MAKEDEV . # sh ./MAKEDEV all # cd / # mv dev odev; mv nudev dev # rm -r odev
You can determine $arch by
# uname -m
or
# sysctl hw.machine_arch
Using the second way by copying the new MAKEDEV's from the source tree will add some additional devices in at least the i386 architecture. For example now it's possible to have 16 partitions instead of 8. If you use the "old" MAKEDEV's from /dev, the additional devices wont be made.
Appendix A. Information
A.1 Guide history
This guide was born as a collection of sparse notes that I wrote mostly for myself. When I realized that they could be useful to other NetBSD users I started collecting them and created the first version of the guide using the groff formatter. In order to "easily" get a wider variety of output formats (eg. HTML and PostScript/PDF), I made the "mistake" of moving to SGML/DocBook, which is the current format of the sources. The format was changed to XML/DocBook later due to better tools and slightly more knownow on customisations.
The following open source tools were used to write and format the guide:
-
the vi editor which ships with NetBSD (nvi.)
-
the libxslt parser from GNOME for transforming XML/DocBook into HTML.
-
the TeX system from the NetBSD packages collection. TeX is used as a backend to produce the PS and PDF formats.
-
the tgif program for drawing the figures.
-
the gimp and xv programs for converting between image formats and making small modifications to the figures.
Many thanks to all the people involved in the development of these great tools.
Appendix B. Contributing to the NetBSD guide
There is a interest for both introductory and advanced documentation on NetBSD: this is probably a sign of the increased popularity of this operating system and of a growing user base. It is therefore important to keep adding new material to this guide and improving the existing stuff.
Whatever your level of expertise with NetBSD, you can contribute to the development of this guide. This appendix explains how you can contribute to the NetBSD guide and what you should know before you start.
If you are a beginner and you found this guide helpful, please send your comments and suggestions to me. For example, if you tried something described here and it didn't work for you, or if you think that something is not clearly explained, or if you have an idea for a new chapter, etc: this type of feedback is very useful.
If you are an intermediate or advanced user, please consider contributing new material to the guide: you could write a new chapter or improve an existing one.
If you have some spare time, you could translate the guide into another language.
Whatever you choose to do, don't start working before having contacted me, in order to avoid duplicating efforts.
B.1 Translating the guide
If you want to translate the guide the first thing to do is, as already said, to contact me or to write to the <netbsd-docs@NetBSD.org> mailing list. There are several possible scenarios:
-
someone else is already working on a translation into your language; you could probably help him.
-
nobody is currently working on a translation into your language, but some chapters have already been translated and you can translate the remaining chapters.
-
you start a new translation. Of course you don't need to translate all the guide: this is a big effort, but if you start translating one or two chapters it'll be a good starting point for someone else.
Even if a translation is already available, it is always necessary to keep it up do date with respect to the master version when new material is added or corrections are made: you could become the mantainer of a translation.
B.1.1 What you need to start a translation
In order to translate the guide you must get the guide sources. Send an e-mail to me and I'll send you the latest sources, makefiles, etc.
In short, all you need is:
-
the guide sources
-
a text editor, such as vi or emacs.
Note: don't start working with HTML or other formats: it will be very difficult to convert you work to SGML/DocBook, the format used by the NetBSD guide.
B.1.2 Writing SGML/DocBook
In order to translate the guide you don't need to learn SGML/DocBook: get the SGML/DocBook sources and work directly on them, in order to reuse the existing format (i.e. tags) in your work. For example, to translate the previous note, you would do the following:
-
load the english source of the current chapter, ap-contrib.sgml, in your editor.
-
find the text of the previous note. You will see something like:
<note> <para> don't start working with HTML or other formats: it will be very difficult to convert you work to SGML/DocBook, the format used by the NetBSD guide. </para> </note> -
add your translation between the tags, after the english version. The text now looks like this:
<note> <para> don't start working with HTML or other formats: it will be very difficult to convert you work to SGML/DocBook, the format used by the NetBSD guide. your translation goes here your translation goes here your translation goes here </para> </note> -
delete the four lines of english text between the tags leaving your translation.
<note> <para> your translation goes here your translation goes here your translation goes here </para> </note>
When you write the translation please use the same indentation and formatting style of the original text. See Section B.3 for an example.
One problem that you will probably face when writing the DocBook text is that of national characters (eg. accented letters like "č"). You can use these characters in your source document but it's preferable to replace them with SGML entities. For example, "č" is written as "è". Of course this makes your source text difficult to write and to read; the first problem, writing, can be solved using a good editor with macro capabilities. Vi and emacs, which are very popular choices, both have this feature and you can map the accented keys of you keyboard to generate the required entities automatically. For example, for vi you can put a line like the following in your .exrc file:
map! č è
Appendix C explains how to install the software tools to generate HTML and other formats from the DocBook sources. This is useful if you want to check your work (i.e. make sure you didn't inadvertedly delete some tag) or to see what the output looks like, but it is not a requirement for a translation. If you don't want to install the software tools, send me the sources and I'll check them and create the various output formats.
B.2 Sending contributions
If you want to contribute some material to the guide you have several options, depending on the amount of text you want to write. If you just want to send a small fix, the easiest way to get it into the guide it to send it to me via e-mail. If you plan to write a substantial amount of text, such as a section or a chapter, you can choose among many formats:
-
SGML/DocBook; this is the preferred format. If you choose to use this format, please get the guide sources and use them as a template for the indentation and text layout, in order to keep the formatting consistent.
-
text; if the formatting is kept simple, it is not difficult to convert text to SGML format.
-
HTML; handwritten HTML (i.e. written with a text editor) is preferred over automatically generated HTML because it is easier to convert. There is no real advantage in using HTML except that it gives a better idea of you want your text to look like. Another small benefit is that the HTML text probably already contains the required entities for accented characters, etc.
-
other formats are also accepted if you really can't use any of the previous ones.
B.3 SGML/DocBook template
For the guide I use a formatting style similar to a program. The following is a template:
<chapter id="chap-xxxxx"> <title>This is the title of the chapter</title> <para> This is the text of a paragraph. This is the text of a paragraph. This is the text of a paragraph. This is the text of a paragraph. This is the text of a paragraph. </para> <!-- ============================================================= --> <sect1> <title>This is the title of a sect1</title> <para> This is the text of a paragraph. This is the text of a paragraph. This is the text of a paragraph. This is the text of a paragraph. This is the text of a paragraph. </para> <!-- ........................................................... --> <sect2> <title>This is the title of a sect2</title> <para> A sect2 is nested inside a sect1. </para> </sect2> </sect1> <!-- ============================================================= --> <sect1> <title>This is the title of another sect1</title> <para> An itemized list: <itemizedlist> <listitem> <para> text </para> </listitem> <listitem> <para> text </para> </listitem> </itemizedlist> </para> </sect1> </chapter>
The defaults are:
-
two spaces for each level of indentation
-
lines not longer than 72 characters.
-
use separator lines (comments) between sect1/sect2.
Appendix C. Getting started with XML/DocBook
HFHFHF - THIS WHOLE SECTION NEEDS REWRITING FOR THE NEW XML/DocBook based setup!!! Either ask Grant to do it or maybe even rip out the whole thing. - HFHFHF
This appendix describes the installation of the tools needed to produce a formatted version of the NetBSD guide. XML/DocBook and the XSLT are not described here, but at the end of this appendix there is a section containing links to useful documents which can get you started.
The XML/DocBook environment can be installed using the netbsd-docs meta-package; this is the easiest way and you are encouraged to use it. This appendix describes the installation of the components one by one and can be used for a more fine grained installation or as a reference for troubleshooting your installation.
Note: the netbsd-docs meta-package installs some packages which are not described in this document because they are not needed for the NetBSD guide. These are:
iso12083-1993
unproven-pthreads-0.17nb2
opensp-1.4
html-4.0b
This document describes the installation of the XML tools using precompiled packages. For details on packages see Chapter 10.
Note: the version numbers of the tools that we are going to install can change, as new versions are added to the package system.
C.1 What is XML/DocBook
XML (Standard Generalized Markup Language) is a language which is used to define other languages based on markups, i.e. with XML you can define the grammar (i.e. the valid constructs) of markup languages. HTML, for example, can be defined using XML. If you are a programmer, think of XML like the BNF (Backus-Naur Form): a tool used to define grammars.
DocBook is a markup template defined using XML; DocBook lists the valid tags that can be used in a DocBook document and how they can be combined together. If you are a programmer, think of DocBook as the grammar of a language specified with the BNF. For example, it says that the tags
<para> ... </para>
define a paragraph, and that a <para> can be inside a <sect1> but that a <sect1> cannot be inside a <para>.
Therefore, when you write a document, you write a document in DocBook and not in XML: in this respect DocBook is the counterpart of HTML (although the markup is richer and the concepts are different.)
The DocBook specification (i.e. the list of tags and rules) is called a DTD (Document Type Definition.)
In short, a DTD defines how your source documents look like but it gives no indication about the format of your final (compiled) documents. A further step is required: the DocBook sources must be converted to some other representation like, for example, HTML or PDF. This step is performed by a tool like Jade, which applies the DSSSL transforms to the source document. DSSSL (Document Style Semantics and Specification Language) is a format used to define the stylesheets necessary to perform the conversion from DocBook to other formats.
The life of a DocBook document is thus the following:
-
DocBook source document.
-
the DocBook DTD is used by nsgmls to "validate" the document.
-
Jade is used to apply the DSSSL stylesheets to the source document and generate a new document.
It is still not possible to print or view this document. The new document is just the original document where formatting directives have been added and DocBook tags removed; it could be HTML, RTF, TeX, etc.
-
a formatter (HTML viewer, Word or another RTF word processor, TeX, ...) is used to create the final version of the source document.
Therefore what you need to start working is
-
a DTD for DocBook.
-
the DSSSL stylesheets used by Jade, to generate HTML/RTF, etc.
-
the Jade program and the nsgmls parser.
C.2 Jade
Jade is an XML/XML parser which implements the DSSSL engine. The Jade package includes the validating parser, nsgmls.
Note: OpenJade is a more recent version of Jade. It currently doesn't compile on NetBSD. It is not needed for the NetBSD guide.
Install Jade using a precompiled package:
# pkg_add jade-1.2.1.tgz
You will find some documentation in /usr/pkg/share/doc/jade/index.htm, but the most important directory installed is /usr/pkg/share/sgml/jade/: this is where you can find Jade's catalog file.
C.3 DocBook
The next thing that you need to install is the DocBook DTD (i.e. the template used to write DocBook documents.)
This package requires the package with the character entity sets from ISO 8879:1986. Therefore let's add the entities:
# pkg_add iso8879-1986.tgz
The entities are installed in the directory /usr/pkg/share/sgml/iso8879/ and the catalog file is /usr/pkg/share/sgml/iso8879/catalog.
Now we can install the DocBook DTD.
# pkg_add docbook-4.1.tgz
Despite its name this package installs several versions of the DocBook DTD (i.e. 2.4.1, 3.0, 3.1, 4.0, 4.1). This lets you process documents which use different versions of the DTD.
Note: the current version of the NetBSD guide uses version 4.1 of the DocBook DTD. Therefore the other versions are not strictly necessary for the guide. Each version requires less than 250 KB so you might want to keep them in order to process other documents.
The root of the installation is /usr/pkg/share/sgml/docbook/4.1/. Each version of the DTD has a separate directory and each has its catalog file, eg. /usr/pkg/share/sgml/docbook/4.1/catalog.
C.4 The DSSSL stylesheets
Now it's time to install the DSSSL stylesheets:
# pkg_add dsssl-docbook-modular-1.57.tgz
The stylesheets install their catalog too, in /usr/pkg/share/sgml/docbook/dsssl/modular/catalog. You will find the documentation of the Modular DocBook stylesheets in /usr/pkg/share/sgml/docbook/dsssl/modular/doc/index.html.
C.5 Using the tools
Let's try to use the tools that we have installed and produce an HTML version of the english guide.
Cd to the base directory of the guide and then:
$ cd en $ make netbsd.html
You will get a long list of errors, because the XML parser, nsgmls, can't find the catalog files. Therefore, type the following commands (and add them to your ~/.profile):
SGML_ROOT=/usr/pkg/share/sgml
SGML_CATALOG_FILES=${SGML_ROOT}/jade/catalog
SGML_CATALOG_FILES=${SGML_ROOT}/iso8879/catalog:$SGML_CATALOG_FILES
SGML_CATALOG_FILES=${SGML_ROOT}/docbook/3.0/catalog:$SGML_CATALOG_FILES
SGML_CATALOG_FILES=${SGML_ROOT}/docbook/3.1/catalog:$SGML_CATALOG_FILES
SGML_CATALOG_FILES=${SGML_ROOT}/docbook/4.0/catalog:$SGML_CATALOG_FILES
SGML_CATALOG_FILES=${SGML_ROOT}/docbook/4.1/catalog:$SGML_CATALOG_FILES
SGML_CATALOG_FILES=${SGML_ROOT}/docbook/dsssl/modular/catalog:$SGML_CATALOG_FILES
export SGML_CATALOG_FILES
Note: modify the commands if you are using a csh style shell.
When the SGML_CATALOG_FILES environment variable is active, do another
$ make netbsd.html nsgmls -sv netbsd.sgml nsgmls:I: SP version "1.3.3" jade -d ../dsl/myhtml.dsl -t sgml -o netbsd.html netbsd.sgml
This time everything goes well and the HTML version of the guide is generated. The RTF version is created in the same way:
$ make netbsd.rtf nsgmls -sv netbsd.sgml nsgmls:I: SP version "1.3.3" jade -d ../dsl/myrtf.dsl -t rtf -o netbsd.rtf netbsd.sgml
With this setup you can create only the HTML and RTF versions; the generation of PS and PDF requires the installation and configuration of TeX and Jadetex.
C.6 An alternative approach to catalog files
In my installations I usually create a master catalog file which references all the other catalog files. If you like this approach, create the /usr/pkg/share/sgml/catalog file containing the following lines:
CATALOG "/usr/pkg/share/sgml/docbook/3.0/catalog" CATALOG "/usr/pkg/share/sgml/docbook/3.1/catalog" CATALOG "/usr/pkg/share/sgml/docbook/4.0/catalog" CATALOG "/usr/pkg/share/sgml/docbook/4.1/catalog" CATALOG "/usr/pkg/share/sgml/docbook/dsssl/modular/catalog" CATALOG "/usr/pkg/share/sgml/iso8879/catalog" CATALOG "/usr/pkg/share/sgml/jade/catalog"
When you have created this file you can simplify your ~/.profile like this:
SGML_CATALOG_FILES=/usr/pkg/share/sgml/catalog export SGML_CATALOG_FILES
C.7 Producing PostScript output
To create a printable version of the guide the following steps are needed:
-
installing TeX
-
enabling the hyphenation for the italian language
-
creating the hugelatex format required by jadetex
-
installing jadetex
The following sections describe each of the steps in detail.
C.7.1 Installing TeX
You don't need to do anything special to install TeX; it's a huge package, but thanks to the package system it is easy to install. To add the packages that you need (the version numbers could be different):
# pkg_add teTeX-share-1.0.2.tgz
# pkg_add teTeX-bin-1.0.7nb1.tgz
C.7.2 Enabling hyphenation for the italian language
The NetBSD guide is currently available in three languages: english, french and italian. Of these, only english and french are automatically hyphenated by TeX. To turn on hyphenation for the italian language, some simple steps are required:
Edit /usr/pkg/share/texmf/tex/generic/config/language.dat and remove the comment (%) from the line of the italian hyphenation. I.e.
%italian ithyph.tex
becomes
italian ithyph.tex
Note: as more translations of the guide become available, you will probably need to enable other hyphenation patterns as well.
Now the latex and pdflatex formats must be recreated:
# cd /usr/pkg/share/texmf/web2c
# fmtutil --byfmt latex
# fmtutil --byfmt pdflatex
If you check, for example, latex.log you will find something like
Babel <v3.6Z> and hyphenation patterns for american, french, german,
ngerman, italian, nohyphenation, loaded.
Note: there are many ways to perform these operations, depending on your level of expertise with the TeX system (mine is very low.) For example, you could use the texconfig interactive program, or you could recreate the formats by hand using the tex program.
If you know a better way of doing the operations described in this appendix, please let me know.
C.7.3 Creating the hugelatex format
Jadetex requires the hugelatex format, which is not included in the default installation of teTeX. Make a backup copy of /usr/pkg/share/texmf/web2c/texmf.cnf and add the following lines at the end the file (we will need the jadetex and pdfjadetex settings when we install Jadetex later):
% hugelatex settings
main_memory.hugelatex = 1100000
param_size.hugelatex = 1500
stack_size.hugelatex = 1500
hash_extra.hugelatex = 15000
string_vacancies.hugelatex = 45000
pool_free.hugelatex = 47500
nest_size.hugelatex = 500
save_size.hugelatex 5000
pool_size.hugelatex = 500000
max_strings.hugelatex 55000
font_mem_size.hugelatex = 400000
% jadetex & pdfjadetex
main_memory.jadetex = 1500000
param_size.jadetex = 1500
stack_size.jadetex = 1500
hash_extra.jadetex = 15000
string_vacancies.jadetex = 45000
pool_free.jadetex = 47500
nest_size.jadetex = 500
save_size.jadetex 5000
pool_size.jadetex = 500000
max_strings.jadetex 55000
main_memory.pdfjadetex = 2500000
param_size.pdfjadetex = 1500
stack_size.pdfjadetex = 1500
hash_extra.pdfjadetex = 50000
string_vacancies.pdfjadetex = 45000
pool_free.pdfjadetex = 47500
nest_size.pdfjadetex = 500
save_size.pdfjadetex 5000
pool_size.pdfjadetex = 500000
max_strings.pdfjadetex 55000
This is how the hugelatex format can be created according to the Jadetex installation guide:
# cp -R /usr/pkg/share/texmf/tex/latex/config /tmp
# cd /tmp/config
# tex -ini -progname=hugelatex latex.ini
# mv latex.fmt hugelatex.fmt
# mv hugelatex.fmt /usr/pkg/share/texmf/web2c
# ln -s /usr/pkg/bin/tex /usr/pkg/bin/hugelatex
Note: as before, there is more than one way to create the hugelatex format. The one outlined above is more thoroughly described in the Jadetex install guide.
Another possibility is to add the following lines describing the hugelatex format to the fmtutil.cnf file (in the /usr/pkg/share/texmf/web2c directory)
# hugelatex format created for jadetex hugelatex tex language.dat latex.inisave the file and run the command
fmtutil --byfmt hugelatex.
C.7.4 Installing Jadetex
Note: you can get jadetex from http://www.tug.org/applications/jadetex/
Fetch the most recent distribution of Jadetex (currently jadetex-3.6.zip), unzip it, then:
# cd jadetex
# make install
# mktexlsr
When you install the jadetex and pdfjadetex format files are copied to the tex tree along with other utility files.
The jadetex distribution contains two manual pages that are not installed automatically. You can just copy them manually; for example:
# cp jadetex.1 pdfjadetex.1 /usr/local/man/man1
Now you are ready to create the Postscript version of the NetBSD guide (and of any document you like, of course.)
C.8 Links
You can find a simple and well written introduction to SGML/DocBook and a description of the tools in SGML comme format de fichier universel.
The official DocBook home page is where you can find the definitive documentation on DocBook. You can also read online or download a copy of the book DocBook: The Definitive Guide by Norman Walsh and Leonard Muellner.
For DSSSL start looking at http://nwalsh.com.
Jade/OpenJade sources and info can be found on the OpenJade Home Page.
If you want to produce Postscript and PDF documents from your DocBook source, look at the home page of JadeTex.
The home page of Markus Hoenicka explains everything you need to know if you want to work with SGML/DocBook on the Windows NT platform.
Appendix D. Acknowledgements
For the development of this guide I received help from some persons which I would like to thank and give credit to. They have supplied material for the guide or sent suggestions. They have reviewed the guide or helped in the setup of programs necessary for the production of the guide.
In particular I want to thank:
-
Paulo Aukar
-
Grant Beattie, converted to XML DocBook.
-
Manolo De Santis, Audio Chapter
-
Eric Delcamp, Boot Floppies
-
Hubert Feyrer, who contributed the Introduction to TCP/IP Networking in Section 11.1 including Next generation Internet protocol - IPv6 and the section on getting IPv6 Connectivity & Transition via 6to4 in Section 11.3.4. Helped the SGML to XML transition.
-
Jason R. Fink
-
Daniel de Kok, audio and linux chapters fixes.
-
Reinoud Koornstra, CVS chapter and rebuilding /dev in th Misc chapter.
-
Brian A. Seklecki <lavalamp@burghcom.com> who contributed the CCD Chapter.
-
David Magda
-
Brian A. Seklecki <lavalamp@burghcom.com> who contributed the CCD Chapter.
-
Guillain Seuillot
If I forgot to mention your name in the previous list, please let me know.